Mexican Ham and Bean Soup

Mexican Ham and Bean Soup

Mexican Ham and Bean Soup

With a cold rain falling outside and the wind whipping the remaining leaves around, it is just the kind of day when I like to make soup.  A big pot of warming soup and some biscuits to go with it.  Oh, I can’t wait for dinner!  So I had better get started.

When made with dried beans as this soup is, it shortens the cooking time if you precook the beans and let them soak in the hot liquid for about an hour before actually making the soup.  Once you get the beans, broth, and seasonings going you can go on to other things and let the wonderful aroma fill your kitchen until it’s time to add the tomatoes and chili.

A one-pot meal will be waiting for you whenever you want it.  This is a good meal for when family members are coming and going, eating at different times.  Keep it warm on the back burner and let everyone ladle out their serving as needed.IMG_5743

Since the recipe for this soup makes a large quantity, I made only half the recipe and at step #3 where tomatoes are added, I also added the leftover sauce from my Omelette with Bacon Ham and Beans.  It was a good way to use up the extra sauce, and it rounded out the soup with some extra vegetables.  I made the recipe as it is given here on many occasions and we always love it.  Men in particular will find this to be very spicy, hearty and filling.  Someone in my family once said it was the best soup he ever had.  I’m looking at you, Steve.

MEXICAN HAM AND BEAN SOUP

Yield:   8 servingsIMG_5733

Ingredients:

  • 1 pound dried pinto beans ( or navy beans)
  • 8 cups fat-free less-sodium chicken broth
  • 2 cups chopped onion
  • 2 cups water
  • 1  1/2 cups cubed smoked ham steak (about 8 ounces)
  • 1 Tbsp. chili powder
  • 2 tsp. ground cumin
  • 2 tsp. dried oreganoIMG_5735
  • 2 packets Sazon Goya (optional), but good
  • 3 bay leaves
  • 3 garlic cloves, crushed
  • 1 (14.5-ounce) can diced tomatoes, undrained
  • 1 chipotle chile ( or dried ancho or pasilla chile)
  • 1/2 cup shredded Manchego cheese or Monterey Jack cheese
  • 1/2 cup minced fresh cilantro

Directions:

1.  Sort and wash beans; place in a large Dutch oven or soup kettle.  Cover with water to 2 inches above beans, bring to a boil. Cook 2 minutes, remove from heat.  Cover and let stand 1 hour.  Drain.

2.  In the same pan, combine beans, broth, and next 8 ingredients (broth through garlic); bring to a boil.  Partially cover; reduce heat to medium-low.  Simmer 1  1/2 hours or until beans are tender.

3.  Stir in tomatoes and chile, simmer 30 minutes.  Discard bay leaves and chile.  Ladle soup into bowl.  Top with cheese, sprinkle with cilantro.

IMG_5745

If there is any left over, it seems to taste even better the second time around when flavors have had even more time to meld.

SOURCE:  an old recipe from my recipe box

A Day for Giving Thanks

To all my readers:   I’m busy cooking for my family today, and later we will sit down to our Thanksgiving feast remembering all we have to be thankful for.  I wish you all a wonderful day today however you may be celebrating it.  Just be sure it includes family, friends, and, of course, good food.      Carolyn

IMG_5749

Cheese Garlic Biscuits

Cheese Garlic Bisquits

Cheese Garlic Bisquits

Dinner rolls and biscuits often times join each other on the dinner table.  Some folks prefer rolls while others like biscuits.  I’m a biscuit person when given a choice, although I never turn down a good dinner roll either.  These biscuits are so good that I just had to share them with you just in case your family is like mine and likes a variety of “breads” on the table.

I suppose it doesn’t make much sense to rave about a recipe that starts with a baking mix and includes just a couple of other ingredients.  And it probably doesn’t count that I literally had these mixed up in seconds yet I can’t praise them enough. They are light, fluffy, and reach- for- seconds delicious.  They feel like they are going to float right out of your mouth!

Tender, and fluffy inside.

Tender, and fluffy inside.

These biscuits are also great with a bowl of soup or a salad.

CHEESE GARLIC BISCUITS

Yield:  10 servingsIMG_5736

Ingredients:

  • 2 cups buttermilk baking mix, like Bisquick
  • 2/3 cup milk
  • 2/3 cup shredded cheddar cheese
  • 1/2 tsp. garlic powder
  • 1/4 cup butter, melted
  • 1/2 tsp. chopped parsley

Directions:

1.  Preheat oven to 450*F    Have ready a cookie sheet lined with parchment paper.

2.  Combine baking mix, garlic powder, milk and cheddar cheese in a mixing bowl.  Beat with wooden spoon until soft dough forms.

3.  Drop dough by spoonfuls onto cookie sheet.

I brushed them with butter before baking.

I brushed them with butter before baking.

Bake 8 – 10 minutes until golden brown.

after baking, golden and lightly browned with little crisp edges.

After baking, golden and lightly browned with little crisp edges.

4.  Melt butter and add chopped parsley.**  Brush over warm biscuits before removing from cookie sheet.  Serve warm.

IMG_5741

**I like to brush the butter mixture on before and after baking.  It makes them so much better.

SOURCE:  Allrecipes.com

Gluten Free Pumpkin Cheesecake

Gluten-free Pumpkin Cheese Cake.

Gluten-free Pumpkin Cheese Cake.

Not too long ago a member of my family was diagnosed with a gluten sensitivity.  So for Thanksgiving, I wanted to make a dessert that she particularly likes and could eat.  Pumpkin pie has always been a favorite, so I knew that anything with pumpkin would work out well.  I also needed it to be something that didn’t have a crust.

Remembering a cheesecake recipe that I have made in the past that was crustless,  I devised this recipe for a cheesecake that is crustless, but gives all the flavor of a pumpkin pie.  We all loved it.  So for anyone who needs a gluten-free dessert, this one is very good.  You can also reduce the fat content by using low-fat cream cheese and low-fat sour cream.  It mixes up easily and can be all made in a little over an hour.  Chill until ready to serve.

Oh, soooo good.

Oh, soooo good.

GLUTEN-FREE PUMPKIN CHEESECAKE

Yield:  serves 8

Ingredients:

Looks like someone's making a pumpkin cheesecake!

Looks like someone’s making a pumpkin cheesecake!

  • 2  (8-oz.) packages cream cheese
  • 1 cup sugar
  • 1 cup pumpkin puree
  • 1 tsp. vanilla
  • 1 Tbsp. pumpkin pie spice
  • 4 eggs

Topping:

  • 1 cup sour cream
  • 3 Tbsp. sugar
  • 1/2 tsp. vanilla

Directions:

1.  Preheat oven to 350*F.  Spray or grease a 9-inch deep pie pan, or 10-inch regular pie pan.

2.  In the large bowl of an electric mixer,  put in cream cheese and sugar.  Beat until smooth and thick. Add eggs one at a time beating smooth.  Add vanilla, pumpkin and pumpkin pie spice.  Blend in well.  Pour into prepared pie pan.  I had enough filling for a 9-inch deep dish pie plate plus 3 custard cups.

This makes a lot of filling.  Use a 10" pan or several extra custard cups.

This makes a lot of filling. Use a 10″ pan or several extra custard cups.

3.  Bake at 350*F for 40- 45 minutes.   Test center for doneness.  The cheesecake may develop cracks in the top, but this will be covered by the sour cream topping.

It will puff up as it bakes and may crack like this one did.

It will puff up as it bakes and may crack like this one did.

4.  Remove from oven and allow to cool for about 20 minutes.  While cooling the center will become slightly depressed.

A depression forms in the center as it cools a bit.

A depression forms in the center as it cools a bit.

Meanwhile mix up the topping mixture using a bowl and whisk.  Pour over cheesecake, and bake an additional 10 – 15 minutes.  The topping should fill the depression in the cheesecake, creating a white center with raised edges that are light pumpkin color.  A pretty effect!

Before baking--fill center with sour cream topping.

Before baking–fill center with sour cream topping.

After baking.

After baking.

5.  Cool on a wire rack and then refrigerate until ready to serve.

A light and fluffy texture.

A light and fluffy texture.

Oh, soooo good.

Oh, soooo good.

SOURCE:   a  Carolyn’s Original

Pumpkin Apple Muffins

Pumpkin Apple Mufins

Pumpkin Apple Muffins

The cold fall and winter months are not my favorite. But cold weather weekends…..I don’t mind them too much, because I spend a lot of time in my kitchen.  There’s something to be said about cooking and baking at this time of year, filling the house with incredible smells and warmth.IMG_5730

This recipe,  oh, dear readers, this recipe!   Apples, pumpkin, spices, cream cheese filling, streusel topping AND a drizzle of frosting—what more do you need to know?   Though I love every recipe I share with you, I don’t usually gush except for the very best.  I’m definitely gushing over these muffins.  Every bite elicits an “mmmmm…”,  ‘Wow…”,  “So good….”, etc.  Mr. D. on tasting them said…”I would walk over hot coals for these”, to which I replied,  “Oh My Goodness, that good?”

IMG_5725

Here’s the deal with these muffins….they should really be named Pumpkin Apple Cream Cheese Streusel Muffins, which is a mouthful, so I just shortened it.  What you need to know about these muffins is –if you don’t like them with, say cream cheese , no problem, skip that part.  If you don’t like streusel, no worries, omit it, and move on!  Don’t have any apple?,  Ok, leave it out.  Streusel, yes; cream cheese, no?  Totally do-able.  Like your muffins naked?  Knock yourself out.

Do you get the picture here?  This is basically a “choose your own muffin adventure”.  So let’s get on with it…..

IMG_5732

PUMPKIN APPLE MUFFINS

Yield:   Makes 18 muffins

Ingredients:

Muffins:

  • 2  1/2 cups flourIMG_5681
  • 2 cups granulated sugar
  • 1 Tbsp. pumpkin pie spice
  • 1 tsp. baking soda
  • 1 tsp. salt
  • 2 eggs
  • 1 cup pumpkin puree
  • 1/2 cup vegetable oil
  • 2 cups chopped apples, peeled

Cream Cheese layer:

  • 6 oz cream cheese, room temperature
  • 1/4 cup sugar
  • 2 Tbsp. milkIMG_5689
  • 2 tsp. vanilla

Streusel:

  • 1/2 cup flour
  • 1/2 cup sugar
  • 1 tsp. cinnamon
  • 5 Tbsp. cold butter, cut into small pieces
  • Glaze (optional)
  • 1 cup powdered sugar
  • 2 Tbsp. milk

Directions:

1.  Preheat oven to 350*F.   Line muffin pans with paper liners, or spray with cooking spray.

2.  Prepare dry ingredients by whisking together flour, granulated sugar, pumpkin pie spice, baking soda and salt.

3.  In another bowl mix together the eggs, pumpkin and oil.

IMG_5682

Mix these wet ingredients in with the dry ingredients until incorporated.

4.  Stir in chopped apples.

IMG_5683

5.  Fill muffin cups about 2/3 full.

IMG_5684

6.  Make the cream cheese mixture–  In a mixing bowl of your electric beater, beat cream cheese, sugar, milk and vanilla together until smooth.  Place a heaping teaspoon on top of muffin batter in cups.

7.  Make streusel–Combine all the dry ingredients, then using a fork or pastry cutter, cut in butter until coarse crumbs form. Sprinkle evenly over all the muffins.

IMG_5686

8.  Bake for 20 – 25 minutes until a toothpick comes out clean.  Cool on a cooling rack.

IMG_5687

9.  Mix up glaze, if using, and drizzle over tops of muffins.

Note:   When I made this recipe, I cut all quantities in half, and I still got 11 muffins.  My muffin cups were filled to the tops.  The only part I omitted was the glaze.  These are quite sweet,  you could have one as dessert.  Awesome!

IMG_5729

IMG_5722

SOURCE:   Cookies and Cups

Thanksgiving Menu

With this being the start of Thanksgiving week, you may be looking for some recipes to try out.  Well, you’re in the right place.  By clicking on any of the categories listed to the right, you will get to that section of the recipe index for a selection of holiday appropriate recipes.      Happy Hunting,   and Happy  Thanksgiving!

Omelette with Bacon, Ham and Beans

Omelette with Bacon, Ham and Beans

Omelette with Bacon, Ham and Beans

Today was one of those days when I didn’t have a minute to myself—ever have days like that?   I didn’t think I would have time to make dinner, before I needed to turn around and go back out again.  Whew!  Somehow I managed to cook up something that turned out quite good, so I thought I would tell you about it, so when you have “one of those days”, you can do what I did, and still feel that you’ve put something healthy and hearty on the table for dinner.

This is an adaptation of a recipe from Food Network Magazine that was called Grits with Bacon and Beans.  Instead of making grits which can take some time, I made an omelette, thereby saving on time, reducing the carbohydrates and increasing the proteins. To work this into my time crunch, after lunch when I had about an hour, I made the mixture of bacon and beans adding in some diced ham, again to increase the protein content.  With this mixture made in advance, I only needed to reheat it while I made an omelette.  Then I made some rye bread toast to go with it.  Mr. D. raved about this meal.

This was really good!!

This was really good!!

Besides being a quick meal for dinner this could be served for a brunch.  I think eggs cooked just about any way would be good with this mixture of vegetables and ham.  I love a recipe like this that can be adapted several different ways.  Try it!  Next time I make this, I’ll make cheese grits to spoon the ham-bean mixture over.  I’m looking forward to that meal 😀

OMELETTE, WITH BACON, HAM AND BEANS

Yield;  Serves 4

Ingredients:

  • 3 slices bacon, cut into small pieces
  • 1 Tbsp. vegetable oil
  • 1 green bell pepper chopped
  • 1 small onion, chopped
  • 1 pkg. frozen chopped collard greens, kale, or spinach, thawed and drained

    Beans, tomatoes, and frozen "greens".

    Beans, tomatoes, and frozen “greens”.

  • 1 tsp. cayenne pepper (optional)
  • 1/4 tsp. salt
  • 1  (14.5 oz.) can diced tomatoes
  • 1  (15 oz.) can black-eyed peas (do not drain)
  • 1 cup diced ham
  • 4 eggs
  • salt and pepper to taste
  • small amount of milk
  • 1 Tbsp. butter
  • 1/4 cup shredded cheddar cheese

Directions:

1.  Cook the bacon in a large skillet or shallow sauce pan over medium heat until almost crisp, about 8 minutes.  Add the vegetable oil and increase the heat to medium high;  add the peppers, onion, collard greens, cayenne and 1/2 tsp. salt and cook, stirring occasionally, until the vegetables are slightly soft, about 8 minutes.

Cooking up the vegetables.

Cooking up the vegetables.

2.  Add the tomatoes, black-eyed peas (with their liquid) and ham and bring to a simmer, cook 15 minutes.

Dice up some ham to add in.

Dice up some ham to add in.

Season with salt if needed.    Note:  all of this mixture can be made in advance and reheated when needed.

3.  Meanwhile, in a small bowl, whisk together the eggs, about 2-3 Tablespoons milk, and salt and pepper.  Melt butter in an omelette pan or skillet.  When hot, but not browned, add the egg mixture and cook over medium heat, lifting the edges as they become set, and let uncooked egg run underneath.  When all the egg mixture has been cooked, except for the “wet” top, sprinkle with half the shredded cheddar,  fold the omelette in half, and sprinkle the top with remaining cheese.  Cover and turn off the heat.  Allow cheese to melt.

Cheese omelette, ready to serve with the vegetable-ham mixture.

Cheese omelette, ready to serve with the vegetable-ham mixture.

4.  Serve omelette with the ham and bean mixture on the side.

Cook eggs in your favorite style and serve with this vegetable mixture.

Cook eggs in your favorite style and serve with this vegetable mixture.

SOURCE:   adapted from Food Network Magazine

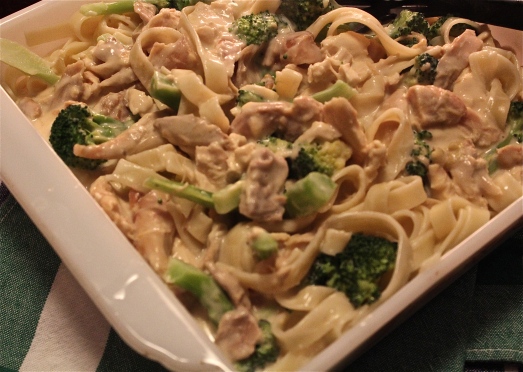
Chicken and Broccoli Alfredo

Chicken Broccoli Alfredo

Chicken and Broccoli Alfredo

A one-dish meal that is easy and quick to prepare using a short cut:  Rotisserie Chicken.  I see absolutely nothing wrong with making my life a little easier at times by picking up a rotisserie chicken at the super market and building a meal around it.  After the first meal, I usually use what’s left for chicken salad sandwiches.

What brought me to making this dish was Mr. D’s request for Chicken Fettuccine Alfredo.   What better time than now when I had a bunch of broccoli on hand and the remains of the rotisserie chicken.  I just combined all that and what resulted was  this dish that was very close to what he asked for.  This is how it went together…..

CHICKEN AND BROCCOLI ALFREDO

Yield:   serves 4

  • Fettuccine or other favorite pasta, cooked according to package directions
  • 1 to 2 cups fresh broccoli florets, add to last 3 minutes of pasta cooking time
  • 1/4 cup (1/2 stick) butter
  • 1 clove garlic, minced
  • 2 cups whole milk or half and half
  • 1/8 tsp. black pepper
  • 1/4 cup freshly grated Parmesan cheese
  • 2 cups cooked chicken, cut up

Directions:

1.  Cook fettuccine according to package directions adding broccoli during last 3 minutes of cooking time.  Drain.  Set aside.

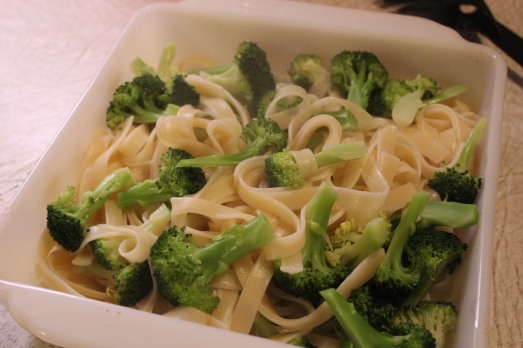
Place cooked fettuccine and  broccoli in a serving dish.

Place cooked fettuccine and broccoli in a serving dish.

2.  Meanwhile, melt butter in medium saucepan over medium heat.  Add minced garlic and sauté briefly.  Add milk or half and half, and pepper.

3.  Simmer, uncovered, for 10 – 12 mintes or until thick, stirring frequently.  When sauce has reached desired consistency, stir in Parmesan cheese.

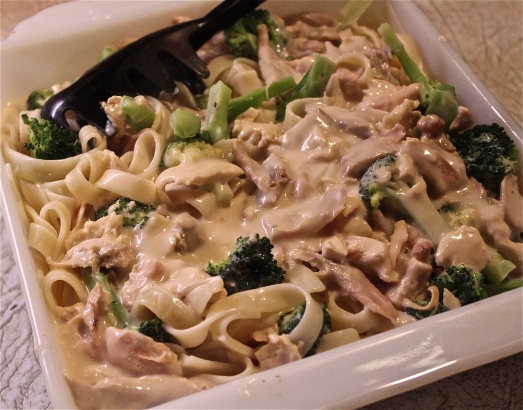
4.  Add cooked chicken to Alfredo sauce and heat through.  Pour over noodles and broccoli……

Pour on Alfredo sauce and chicken.  Mix together.

Pour on Alfredo sauce and chicken. Mix together.

Transfer to serving dish and serve with additional Parmesan to grate on at the table.

Chicken Broccoli Alfredo

Chicken Broccoli Alfredo

After having made this recipe I would make these changes next time around:  add 2 Tablespoons flour to the melted butter before adding the milk to help the sauce thicken up more;  add some shredded Asiago to the Parmesan for a stronger cheese flavor. You could also use heavy cream in place of milk for a much richer sauce. This is definitely a fantastic meal, one that reheats well in the microwave the next day.

SOURCE:   The Girl Who Ate Everything

Cranberry-Pear Crisp

Cranberry and pear crisp.

Cranberry and pear crisp.

If I were to ask you to name the “fruits of fall”,  surely apples would likely be the first you would mention, and then maybe pears would be a close second.  Where would cranberries fall on that list of fall fruits?  Fresh cranberries are in season now, bagged and sold by the pound.  I usually get several bags of them and put them into the freezer for use later on when they’re no longer available at the supermarket.  They are so useful in both sweet and savory dishes.

We think of cranberries when we’re planning the Thanksgiving menu, because cranberry sauce, whether canned or home made is a natural with turkey.  But cranberries seem to get neglected when it comes to baking or making a dessert for the holiday table.  So today I have a recipe that attempts to change that.

This tart-sweet dessert combines fresh cranberries  with dried cranberries and fresh diced pears, plus lovely spices.  It gets topped with a crumble that is made from flour, sugar, oats, chopped nuts and melted butter.  Served warm with a scoop of vanilla ice cream or whipped cream, it could be the grand finale to your holiday dinner, if not this month, maybe next.  The colors are so festive, they remind me of Christmas jewels and ornaments.

Love the color, and it tastes great, too.

Love the color, and it tastes great, too.

CRANBERRY-PEAR CRISP

Yield:   Serves 6 – 8

Ingredients:

  • 1 pound cranberries, thawed if frozen

    The colors of these two fruits are so pretty together!

    The colors of these two fruits are so pretty together!

  • 1 cup dried cranberries
  • 1 1/2 cups sugar
  • 2 tsp. vanilla extract
  • 3 firm pears (such as Bosc), peeled and cut into 1/2 inch pieces
  • 1/2 tsp. ground cinnamon
  • pinch of ground allspice
  • 1 cup plus 2 Tbsp. flour
  • 1 cup chopped pecans or other nuts of choice
  • 1/4 cup old fashioned rolled oats
  • 1/4 tsp. salt
  • 1 stick unsalted butter, melted

Directions:

1.  Preheat oven to 375*F.  Lightly grease or spray a 3-quart baking dish.

2.  Combine the fresh and dried cranberries in a large bowl.  Add 1 cup sugar,  3 Tbsp. water and the vanilla and toss to coat.  Lightly mash with a potato masher or fork to burst some of the cranberries.

Mix cranberries with sugar and vanilla.

Mix cranberries with sugar and vanilla.

Add the pears, cinnamon, allspice and 2 Tbsp. flour and toss to coat.

Add chopped pears and spices.

Add chopped pears and spices.

Transfer to the prepared baking dish.

Arrange mixed fruits in a baking dish.

Arrange mixed fruits in a baking dish.

3.   Make the topping:  Mix the remaining 1 cup flour, the nuts, oats, the remaining 1/2 cup sugar and the salt in a medium bowl,  then stir in the melted butter.

Add melted butter to dry ingredients for crumble topping.

Add melted butter to dry ingredients for crumble topping.

Use your fingers to pinch the topping into small clumps and sprinkle it over the fruit.

Sprinkle on crumble topping.

Sprinkle on crumble topping.

4.  Bake until the fruit is bubbling and the topping is golden brown, about 40 minutes.  Serve warm or at room temperature.

Golden and bubbly after it has baked.

Golden and bubbly after it has baked.

A little sweet, a little tart, a lot of delicious!

A little sweet, a little tart, a lotta delicious!

SOURCE:  Food Network Magazine

Pumpkin Pie Cupcakes

Pumpkin Pie Cupcakes

Pumpkin Pie Cupcakes

Here we are well into the month of November with Thanksgiving looming just ahead.  If you’re anything like me, you’re probably thinking of your menu for the big day, and maybe trying out a new recipe or two.  That’s what I do.  We seem to want the traditional foods, but I try to give a new twist to one or two of those dishes.

In this case it’s a somewhat different way of enjoying pumpkin pie.  These are individual little “cupcakes” that taste just like pumpkin pie, but without the bother of a crust.  These are pretty easy to make.  They go together in only two steps and are baked in muffin tins.  The only thing you need to be concerned about is to make sure you spray the muffin cups well with non-stick spray or line them with foil liners.  Paper liners make if difficult to remove the “cupcakes” from the muffin tins and are hard to peel away from the pumpkin filling.IMG_5636

I’ve also read a review of this recipe with suggestions for making it very low cal. so I am including those suggestions here for any of you who must maintain a low sugar/calorie intake.

PUMPKIN PIE CUPCAKES

Yield:   Makes 12

Ingredients:

All the  same ingredients as for pumpkin pie filling.

All the same ingredients as for pumpkin pie filling.

wet:

  • 1   15oz.can pumpkin puree
  • 1/2 cup sugar (or 1/2 cup all natural Stevia in the raw)
  • 1/4 cup brown sugar, packed
  • 2 eggs
  • 1 tsp. vanilla extract
  • 3/4 cup evaporated milk, fat free is Ok. (or use 3/4 cup 1% milk with 2 Tbsp. cornstarch whisked in.)

dry:

  • 2/3 cup flour
  • 2 tsp. pumpkin pie spice
  • 1/4 tsp. salt
  • 1/4 tsp. baking powder
  • 1/4 tsp. baking soda

Directions:

1.  Preheat the oven to 350*F.   Line a 12 cup muffin tin with foil liners, or spray well with non-stick cooking spray.

2. In a bowl with a pouring spout (batter bowl) whisk together all the wet ingredients.   In another bowl, whisk together the dry ingredients.

3.  Add the dry ingredients to the wet ingredients, and blend well.  Pour the batter into the muffin cups, filling them almost to the tops.  (mine hold 1/3 cup batter each, and this amount filled them to the top).

4.  Bake for 20 minutes.  They will puff up as they bake, but will fall slightly as they cool.  Cool for 20 minutes, them refrigerate to chill until ready to serve.

See how they puff up in the oven--they will fall a little when you take them out.

See how they puff up in the oven–they will fall a little when you take them out.

5.  Carefully run a knife around the edge of each cupcake to remove from the tin.  Top each serving with whipped cream or whipped topping and a sprinkle of more pie spice.   Delicious!!

Top with whipped cream and a sprinkle of pie spice.

Top with whipped cream and a sprinkle of pie spice.

One is not enough  :D

One is not enough 😀

SOURCE:   Allrecipes.com