Stuffed Chicken with Roast Peppers, Mozzarella and Basil

Chicken Breasts Stuffed with Roasted Peppers and Mozzarella

Chicken Breasts Stuffed with Roasted Peppers and Mozzarella

I’ve been away from my kitchen too long.   Recovery from knee replacement surgery is a slow process, one that must be taken seriously, if you expect to regain full use of the knee.  All that stretching, bending, walking, etc is hard work and very tiring.  I’m glad to report that I’m moving ahead at a steady pace, but in tiny steps.  During the past weeks, we’ve had some wonderful friends who stopped by with meals for us (they took pity on Mr. D.)  so we have enjoyed some great home cooking while I’m recuperating  but today I felt like getting my hands dirty in the kitchen.  So this is what I came up with.

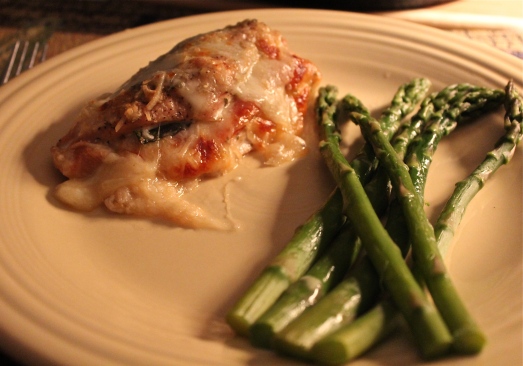
Exploring my freezer, I found a package of boneless chicken breasts, and in my cupboard, a jar of roasted peppers.  What naturally came to mind to accompany these ingredients were mozzarella cheese and basil.  This meal is quick and easy-to-prep, just right for when you want to get out of the kitchen fast, but also elegant enough for a special meal. Keep the side dishes simple with a vegetable and a salad.

IMG_9285

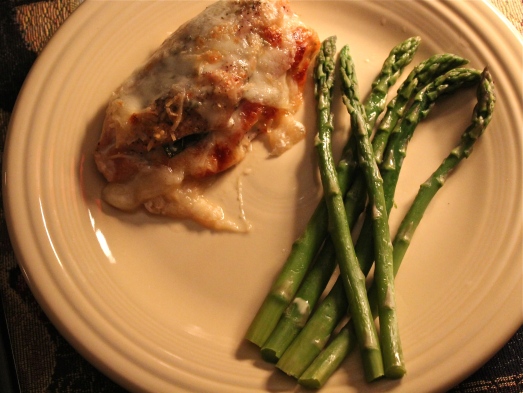
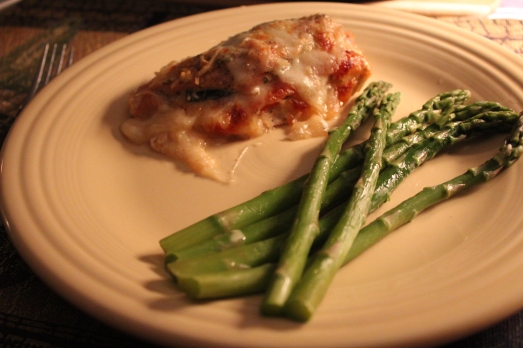
Mr. D. loved it, commenting that it looks like pizza.   It really does because of the colors of peppers and cheese, plus the Italian seasoning.  It smells wonderful as it’s cooking also.  He said it’s become his new favorite way to have chicken.

This is my basic recipe, but it can certainly be changed or added to with some sautéed spinach, sliced fresh tomatoes, artichokes, mushrooms, etc.

STUFFED CHICKEN WITH ROAST PEPPERS, MOZZARELLA AND BASIL

Yield:  Serves 4

Ingredients:IMG_9274

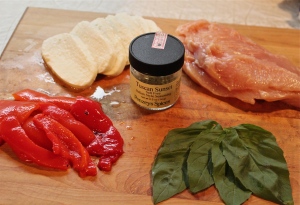
  • 4 boneless, skinless, chicken breasts
  • 8 oz. fresh mozzarella, sliced into 8 slices
  • 1 12 oz. jar roasted red peppers, sliced into 1-inch pieces
  • 1 bunch fresh basil, whole leaves
  • 1/4 cup grated parmesan
  • 1 Tbsp. Italian seasoning
  • salt and pepper for seasoning

Directions:

1.  Preheat the oven to 400*F.  Grease a broiler-proof baking dish.

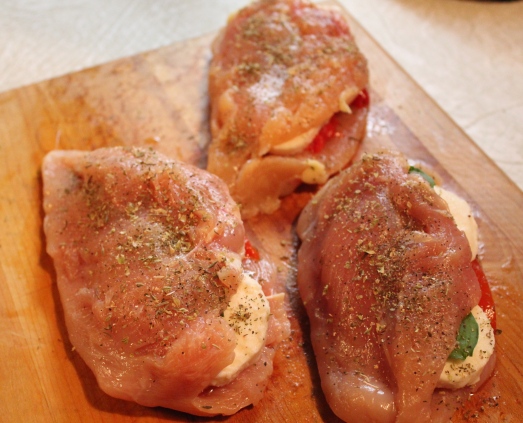
2.  Butterfly chicken breasts by cutting into the long side of the breast, stopping about 1/4-inch from the opposite side.  On your work surface, lay the chicken breasts opened up.  Sprinkle the exposed insides with 1/2 of the Italian seasoning, salt and pepper.

IMG_9275

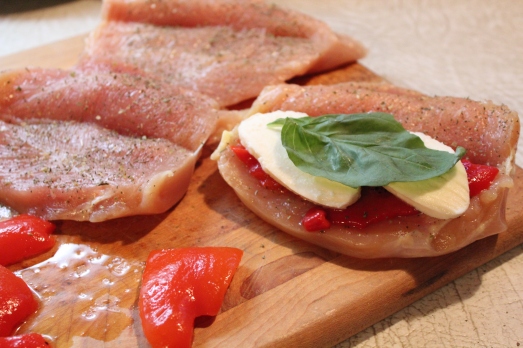
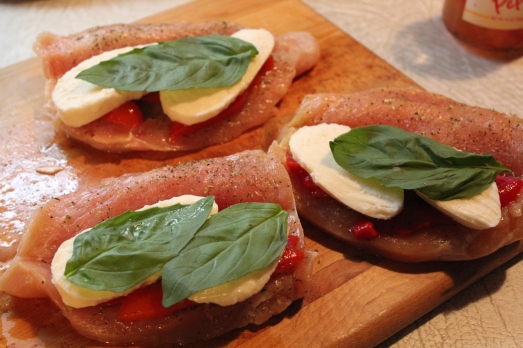
3.  Stack the pepper, 1 slice mozzarella and basil on the bottom side of the chicken.  Fold the top flap of the chicken over, tucking in the contents as necessary.  Sprinkle with the remaining Italian seasoning.

IMG_9276

IMG_9277

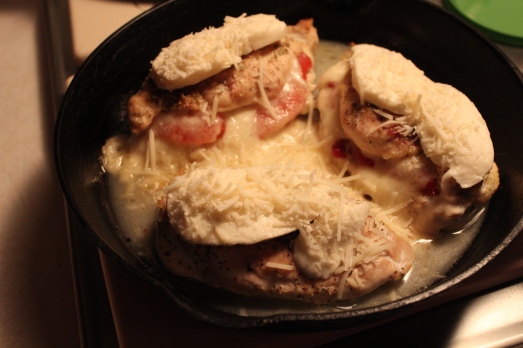
4.  Bake for 30 – 40 minutes (until chicken is no longer pink).  Take chicken out of the oven and turn on broiler.  Top each chicken piece with remaining slices mozzarella and sprinkle with Parmesan cheese.


IMG_9279

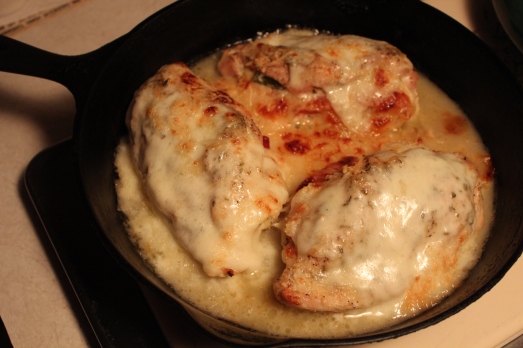
Broil until cheese is browned and bubbly, about 5 minutes.

IMG_9283

Serve with vegetable and a salad.

IMG_9286

SOURCE:  Food Network

Advertisement

Ravioli with Sautéed Asparagus

Ravioli with Sautéed Asparagus

Ravioli with Sautéed Asparagus

Sometimes you want an easy and quick pasta recipe that tastes incredible. Well, this recipe for ravioli with sautéed asparagus is all of that and more.  It can be whipped up quickly and the addition of  parmesan cheese at the end makes it a culinary masterpiece.  I kid you not!

Fresh store bought ravioli is cooked, then tossed with asparagus that has been sautéed in a simple butter and lemon sauce.  A little bit of grated parmesan, and minced parsley  are added at the end–just give it a toss and you’re done.

I love asparagus, an early sign of spring around here, and I can’t resist buying it when I see it.  With asparagus you want a simple sauce to enhance it’s flavor and this light lemony, buttery sauce is just right.  All it consists of is butter, lemon juice and a dash of black pepper.  Not at all heavy or greasy, it just coats the ravioli and asparagus.

IMG_9318

A couple of notes:  The asparagus should be slightly damp when you sauté it.  This helps with the sauce.  So rinse your asparagus right before you chop it and add to the pan.

Also, you can use whatever fresh ravioli you like for this dish–cheese, mushroom, spinach would all be good choices.  I used a three-cheese ravioli for mine.

This is a dish that goes together very quickly so be sure to have everything prepped and ready to go before you start cooking.  It takes no time to prepare the asparagus, chop the parsley and measure out the other ingredients, so this can be done while you’re waiting for the water to boil for the ravioli.

RAVIOLI WITH SAUTÉED ASPARAGUS 

Yield:  Serves 2

Ingredients:IMG_9309

  • 1 (8-ounce) package fresh ravioli, filling of choice
  • 1/2 pound asparagus, tough ends removed, chopped into thirds
  • 1/2 lemon
  • 2 Tbsp. butter
  • 2 Tbsp. parsley, chopped
  • few twists, fresh ground pepper
  • 2 Tbsp. grated parmesan cheese, plus more to serve at the table

Directions:

1.  Bring a large pot of water to a boil.

2.  Prepare asparagus by snapping off tough ends, then chopping into thirds, or smaller.  Mince parsley, squeeze lemon and measure out butter.

IMG_9313

3.  In a large saucepan, melt the butter over medium heat until frothy.  Add chopped asparagus to the pan, stir to coat asparagus with butter and cover with a lid.  (If asparagus is damp, steam created will hasten cooking.)  Cook for 4 – 5 minutes depending on thickness of asparagus.

IMG_9314

4.  Add ravioli to boiling water and cook as per package directions.  Drain when done and place in a bowl.  Keep warm.

IMG_9315

5.  When asparagus is done, add to bowl with ravioli with a slotted spoon.  Leave any browned butter in the pan.

6.  To the butter in the pan, add lemon juice, several twists fresh pepper, and bring to a boil.  Stir for 30 seconds.  Pour the butter-lemon sauce over the ravioli and asparagus.  This will just lightly coat them.

IMG_9317

7.  Add parsley and 2 Tbsp. Parmesan cheese.  Toss to coat and combine.  Serve with more cheese at the table.

This is so good, I can’t wait to make it again.


SOURCE:  Adapted from Green Valley Kitchen

Wiener- Kraut

Weiner-Kraut with Spatzele

Weiner-Kraut with Spatzele

I’m a little late getting this post up.   I made this dish several weeks ago with a nod to Octoberfest.  But what the heck, just call it Novemberfest.

What’s Oktoberfest if not an excuse to indulge–isn’t that why we co-oped the German holiday, after all?

This is an old Mennonite recipe, brought by those folks when they immigrated to this country.   I found it in a catalog from the Penzey’s Spice Company.  It’s relatively quick to prepare and perfect for a chilly fall day after working out in the yard.  It can be served over mashed potatoes, or egg noodles, but when I made it I used a package of Spaetzle and served it all with fresh green beans.  A cold glass of beer goes very well with this dish. Dirndles and lederhosen not required.

IMG_8474

WIENER-KRAUT

Yield:   Serves 6 – 8IMG_8467

Ingredients:

  • 1 Tbsp. butter or vegetable oil
  • 4  Polish or German-style sausages ( 1 1/2 – 2 pounds), sliced 1/4-inch thick.  (I used kielbasa.)
  • 1 onion, cut in half and sliced
  • 2 Tbsp. white vinegar, or apple cider vinegar
  • 2 apples, cored and sliced
  • 1 cup chopped red or green bell pepper, 1 medium
  • 4 cups sliced or shredded cabbage
  • 1 Tbsp. Krakow Nights, or Tsardust Seasoning (from Penzey’s)
  • 1/2 cup apple cider or apple juice ( in a pinch, use chicken broth)

Directions:

1.  In a large deep skillet, melt the butter  or vegetable oil over medium heat.  Add the sausage slices and brown, about 4 minutes per side.  Add the onion and cook until tender 3 – 5 minutes, stirring often.

Browning the sausage with onions.

Browning the sausage with onions.

2.  Add the vinegar to deglaze the pan, being sure to scrape up the browned bits on the bottom of the pan.  Add the apples, bell peppers, cabbage, seasonings and apple juice or cider.

IMG_8469

Reduce heat to medium-low and cook for about 10 minutes, until the cabbage is tender but not mushy.

IMG_8470


Serve with mashed potatoes, egg noodles, or spaetzle.

IMG_8472


SOURCE:  Penzey’s Catalog

Tomato, Tortellini and Spinach Soup

Tomato-Tortilini-Spinach Soup

Tomato-Tortellini-Spinach Soup

Soups are pretty mundane.  They don’t garner all the razzmatazz that entrees do in a fancy restaurant.  Soups sit quietly in the back row, never speaking unless spoken to.  I think of soups as kind of shy.  They mind their own business, but if you seek them out, well then….they love to be noticed, and they can charm you, but quietly.

I made this soup on a day when I needed soup….and on a day when I needed the soup to be easy, but captivating.  This is a soup that shines when you taste it, but not before.

IMG_8436

The savory onions and garlic go from sautéing, into a pot of hot broth, to which diced tomatoes are added and the seasonings.  Add some fresh cheese-filled tortilini,  cook a few minutes till done, add some spinach, and there it is.    The dried basil and oregano are essential.  They are what makes this soup have that wonderful Italian flavor.  The only thing that can make it better is a shaving of Parmesan cheese on top.   Oh, and a loaf of crusty, crunchy bread to soak up the broth.    Listen closely, and  you will hear Andrea Bocelli singing.

SPINACH-TOMATO-TORTELLINI SOUP

Yield:   Serves 4

Ingredients:IMG_8430

  • 1 Tbsp. olive oil
  • 1 small onion, chopped
  • 3 cloves garlic, minced
  • 1/2 tsp. dried basil
  • 1/2 tsp, dried oregano
  • 1 bay leaf
  • salt and pepper to taste
  • 1 (14.5-oz.) can diced tomatoes with their juice
  • 4 cups chicken broth (vegetarians, use vegetable broth)
  • 9 0z. pkg. refrigerated 3-cheese tortellini
  • 3 cups baby spinach, or 1 box frozen spinach, squeezed dry
  • grated Parmesan for serving

Directions:

1.  Heat the olive oil in a large soup kettle.  Add chopped onion and garlic and cook until the onion is translucent.

Sautéing the onions and garlic.

Sautéing the onions and garlic.

2.  Add the tomatoes with their liquid, the chicken broth plus 1 cup of water, all the seasonings, the tortellini and salt and pepper to taste.

There's all those lovely seasonings.

There’s all those lovely seasonings.

3.   Bring to a boil, reduce heat to simmer and cook until the tortellini is tender, about 5 – 6 minutes

4.  Stir in the spinach and cook for 2 – 3 more minutes to heat through.

IMG_8433

5.  Ladle into bowls and serve with  shaved Parmesan cheese as garnish.

Warming, captivating, delicious!!

Warming, captivating, delicious!!


SOURCE:   adapted from Cooking Classy


BLT Pizza

BLT Pizza with White Sauce

BLT Pizza with White Sauce

All the world seems to love bacon.  Although I am not really a bacon fanatic, I do love a good BLT sandwich, so the thought of enjoying all the flavors of the classic sandwich in the form of a pizza seemed fantastic.  I wish I had thought of it myself.   I knew that I had an open package of bacon from our favorite meat shop in the fridge, and some fresh ripe tomatoes from our local farm stand.  I also had a package of arugula and baby greens intended for a salad, so the moment I saw this pizza, I knew it was meant to be.

IMG_7855

This turned out to be so good I thought about it for days afterwards.   Mr. D. says it’s the best pizza I’ve ever made.  All the components of your favorite sandwich are here including the mayonnaise.  By adding some oil to the mayo it makes a creamy sauce that is used to fully cover the dough and gives a richer taste to the pizza.   We both enjoyed this pizza so much that I know that I’ll be making this one again and again.   It’s a keeper!

BLT PIZZA WITH WHITE SAUCE

Yield:   1 10-inch pizza

Ingredients:

  • 1 pound ripe tomatoes, seeded and cut into 1/4-inch-thick slices
  • 1 teaspoon dried oregano
  • 1/2 teaspoon black pepper
  • 1/4 cup mayonnaise
  • 1 tablespoon extra-virgin olive oil
  • 1 tablespoon minced fresh chives, or green onions (tops only)
  • 2 garlic cloves, grated, or finely minced
  • 4 center-cut slices lean bacon
  • 1 pound fresh pizza dough
  • 1 tablespoon cornmeal
  • 2 ounces part-skim mozzarella cheese, shredded
  • cooking spray
  • 1 cup baby arugula
Roast tomatoes, cook bacon, prepare sauce.

Roast tomatoes, cook bacon, prepare sauce.

Directions:

1.  Preheat oven to 400*F.  Place a pizza stone in the oven to preheat.  (If you don’t have a pizza stone, use a round or flat baking sheet)

2.  Arrange tomato slices on a piece of parchment paper;  sprinkle with oregano and pepper. Place on a baking sheet or pizza stone, and bake for 20 minutes or until tomatoes are no longer wet.  Remove tomatoes and and allow to cool slightly while you make the sauce and prepare the dough.

3.  Combine mayonnaise, oil, chives, and garlic in a small bow.

4.  Cook bacon in a skillet over medium heat until crisp;  drain on paper towels.  Break into pieces.

5.  Increase oven temperature to 450*F.  Using floured hands, pat dough into a 10-inch circle.  Place on the baking sheet or pizza stone that has been sprinkled with corn meal.  Pierce dough with a fork; transfer to preheated oven.  Bake at 450*F for 5 minutes.

6.  Carefully remove from the oven.  Brush mayonnaise mixture over crust, leaving a small border;   top with tomatoes.

Cover crust with mayo mixture then top with tomato slices.

Cover crust with mayo mixture then top with tomato slices.

Sprinkle with bacon and cheese; coat crust edges with cooking spray.

Add bacon and cheese next.

Add bacon and cheese next.

IMG_7853

7.  Bake 10 minutes or until cheese melts and crust browns.  Before serving top with arugula.  Cut into 8 wedges.

A BLT on a pizza--the best of both.

A BLT on a pizza–the best of both worlds.


SOURCE:   Cooking Light

Keeping it Simple

You’re going without makeup, walking around barefoot and even actually reading hardcover books.  Midsummer is here.   That means life is easy, and you’re  enjoying the simple things.    I hope that extends to your meal planning.

Here’s where a good pasta recipe comes in.  And those tomatoes that are really starting to ripen up?   Make them the star of the dish.  Roast or sauté 3 -4 of them along with some garlic and pour over thin spaghetti cooked al dente..  Then, before serving, top with chopped fresh basil and grate some cheese on top.   Oh my!  All that goodness in one place—-I think I might swoon!

Spaghetti with Fresh Tomato Sauce

Spaghetti with Fresh Tomato Sauce

The kind of tomatoes you use for this dish can be any kind you have available.  I’m partial to roma/plum tomatoes because they are so meaty without a ton of seeds,  Sometimes I mix different kinds for some variation.  In the version I made here, I added some small meatballs to the sauce and let them simmer just to cook through, making it a little more hearty–the way Mr. D. likes it.  Lots of fresh basil cut up on top is a must, and let everyone grate on some Parmesan cheese.

IMG_7843

SPAGHETTI WITH FRESH TOMATOES AND CHEESE

Yield:  Makes 4 main-dish servingsIMG_7846

Ingredients:

  • 1  (8-oz.) package spaghetti
  • 2 tbsp. olive oil, use a good quality with a nice fruity aroma
  • 2 small cloves garlic, minced
  • 3 – 4 medium tomatoes, diced
  • 2 tsp. fresh basil, torn
  • 1/2 tsp. salt
  • more bail for garnish
  • grated Parmesan cheese for serving (vegans, omit the cheese)

Directions:

1.  In a 6-quart saucepan, cook spaghetti as label directs.

2.  Meanwhile, in a medium saucepan or skillet, heat olive oil over medium heat.  Add mixed garlic and cook until tender, 1 – 2 minutes.  Stir in tomatoes, 2 tsp. torn basil and salt;   heat through.    If adding meatballs, cover, and simmer on low to heat through, stirring occasionally.

3.  Drain spaghetti, and save 1/4 cup cooking liquid.    Pour into serving bowl,  pour tomato sauce over, and stir to coat.  Add cooking liquid a little at a time, if needed, to further loosen the sauce.  Sprinkle more chopped basil over the top and serve.  Pass the grated cheese.

IMG_7845


This is my idea of great summer eating;  pick those tomatoes while they’re still warm with sunshine, cut them up, cook briefly, and eat ASAP.  Sigh!

SOURCE:  Carolyn’s Originals


Blue Cheese Burgers

Blue Cheese Burgers.

Blue Cheese Burgers.

We have a wonderful burger restaurant in our town that we go to on occasion.  They grind their own beef mixture from grass-fed cattle, and it’s juicy and so flavorful.  Using this great beef they come up with some very interesting burgers with unique toppings.  One of my favorites is their blue cheese burger.  This is not your standard burger with blue cheese on top.  Instead it’s crumbled and added to the meat mixture.  When the burger is cooked, the cheese melts, adds its flavor to the other seasonings and makes this burger so moist and juicy that it runs down your fingers and into your hands.

Can't wait for the first bite.

Can’t wait for the first bite.

Licking your fingers is allowed because you don’t want to waste one drop of that deliciousness.  Well, I have been wanting to replicate this burger at home for some time now, and last weekend I did just that.  It may not be an exact copy, but close enough that I was more than satisfied with the result.  We cooked them on the grill, but they would be just as good cooked in a hot skillet on the stove-top.  I would recommend serving them on the best buns you can find.  A good burger deserves a sturdy roll to capture all that goodness.  This burger will definitely be “in your face”. 🙂

Even if you don’t like blue cheese one little bit, you will most likely enjoy these burgers, because there is no strong flavor of blue cheese, but the overall flavor is just perfect.  If you would like a more pronounced flavor of blue cheese, increase the amount that you put into the meat mixture.

An added benefit to adding the cheese to the beef is that you can use a leaner cut of ground beef and still get a moist and very flavorful burger.  These burgers can be served with your favorite toppings.  I served them with sliced tomatoes and lettuce, and a little mayo on the bun that had been toasted.  These have zoomed to the top of my list of favorite burgers.  In fact I have already made another batch to freeze.  It’s so easy to pull out the number you need for a meal, and they’re pan ready.  Just defrost, cook, and eat!!  Exactly what summertime calls for!

IMG_7709

BLUE CHEESE BURGERS

Yield;    makes 12 burgers

Ingredients:

Mixing up the beef mixture.

Mixing up the beef mixture.

  • 3 pounds lean ground beef
  • 4 ounces blue cheese, crumbled, or more to taste
  • 1/2 cup minced fresh chives or green onions
  • 1/4 teaspoon hot sauce, or more to your taste
  • 1 teaspoon Worcestershire sauce
  • 1 teaspoon ground black pepper
  • 1 1/2 teaspoons salt
  • 1 teaspoon spicy mustard ( such as Gulden’s)
  • 12 French rolls or buns

Directions:

1.  In a large bowl, mix ground beef, blue cheese, chives, hot pepper sauce, Worcestershire sauce, pepper, salt, and mustard.  Cover and refrigerate for about 1 hour.

2.  Gently shape burger mixture into 12 ( 1/2-inch-thick) patties.

You will want to keep a few of these in your freezer.

You will want to keep a few of these in your freezer.

3.  Preheat an outdoor grill to high heat.  Oil the grill grate.  Grill patties 3 minutes/side for medium well; and 5 minutes/side for well done.  Serve on rolls, with toppings of choice.

Serve with fresh corn for a great summer meal.

Serve with fresh corn for a great summer meal.


SOURCE:    Carolyn’s Originals


Shrimp-Mango Stir-Fry

Shrimp-Mango Stir-Fry

Shrimp-Mango Stir-Fry

Every time I make an Asian-inspired meal from Cooking Light, I wonder if this will be the one that’s a bit off, the one that doesn’t quite come together.  And without fail we sit down to something fabulous, in a way I hadn’t ever considered before.   By now I should know better, the folks who design recipes at Cooking Light magazine seem to always get it right.

This one was no different.  It looks like a very simple shrimp stir-fry with noodles, and it is really, but mango?  with shrimp?  Yes, yes, and yes!  Add some sliced peppers and onion, plus ginger and I find it hard to describe the complexity and absolute deliciousness of this dish.  I swear it’s the ginger that brings it all together, so please don’t leave it out.

Shrimp-ly Delicious!

Shrimp-ly Delicious!

This recipe is meant to serve four, but two of us ate it all, with no regrets.  It’s that good!!

The other good thing about it is that it can be made quickly like most other stir-frys.  Slice, chop, measure and mix all the ingredients in advance and once you turn on the burner, cooking commences and it’s done in a flash.

SHRIMP-MANGO STIR-FRY

Yield:   serves 4

Ingredients:

  • 5 ounces uncooked rice noodles, or soba noodles

    A diverse mix of ingredients!

    A diverse mix of ingredients!

  • 3 tablespoons water
  • 4 teaspoons fresh lime juice
  • 2 teaspoons brown sugar
  • 2 teaspoons fish sauce
  • 1/2 teaspoon cornstarch
  • 1/4 teaspoon crushed red pepper
  • 1/4 teaspoon ground black pepper
  • 12 ounces large shrimp, peeled and deveined
  • 1 tablespoon canola oil, divided
  • 1 cup sliced yellow onion
  • 1 cup sliced red bell pepper
  • 1 tablespoon minced peeled fresh ginger
  • 1 cup cubed peeled ripe mango
  • 1/2 cup torn fresh basil leaves
Slice, chop, measure and mix before starting to cook.

Slice, chop, measure and mix before starting to cook.

Directions:

1.  Prepare noodles according to package directions.  Drain.

2.  Combine 3 tablespoons water and next 4 ingredients (through cornstarch) in a small bowl, stirring with a whisk.  Set aside.

3.  Combine red pepper, black pepper, and shrimp in a medium bowl; toss to coat.

4.  Heat a wok or a large skillet over high heat.  Add  1 1/2 teaspoons oil to pan; swirl to coat.  Add shrimp mixture; cook 3 minutes or until shrimp are almost done, turning once.  Remove shrimp mixture from pan.IMG_7695

5.  Add remaining 1 1/2 teaspoons oil to pan; swirl to coat.  Add onion, bell  pepper, and ginger; cook 2 minutes, stirring occasionally.  Return shrimp mixture and juice mixture to pan.

IMG_7697

Add mango; cook 1 minute or until liquid thickens slightly and shrimp are done.

Add mango last.

Add mango last.


Sprinkle with basil.  Serve over noodles.  (I mixed mine right in with the shrimp mixture.)

Sprinkle torn basil on top.

Sprinkle torn basil on top.


I can't believe we ate the whole thing!!

I can’t believe we ate the whole thing!!


SOURCE:  Cooking Light Magazine

Linguine, with Garlicky Kale and White Beans


Linguine with Kale and White Beans

Linguine with Kale and White Beans

This dish gets its flavor from lots of garlic.  Ya gotta love garlic!!  It makes the most bitter greens taste divine.  As it cooks and becomes sweeter, so do the greens lose their bitterness, and become silky and tender.  Pasta, greens and beans—typically an Italian-style meal.  All you need to think you’d “died and gone to heaven” is some Parmesan cheese dusted over the top, some crusty, toasted bread and a glass of white wine.  SIGH!

IMG_7343

Extremely easy to make with only five ingredients, and taking only about 30 minutes to prepare, this is a dish to put on the table when you’re in a hurry, but you want your family to be well fed on a healthy meal.  I used fresh leaf kale in my preparation, but you could speed up the process by using packaged prechopped kale, found in the produce department of most supermarkets.  Other than the kale, you probably have everything else to prepare this dish already in your cupboard.

I like the fact that only 1/2 pound of pasta makes 4 generous servings, because of the addition of the healthy kale and beans.  Calories are low/serving (381);  and the whole nutritional profile of this dish is impressive:  Fat, 11.8 g;  Protein, 13 g;  Carb, 58 g;  Fiber, 5 g; Cholesterol, O g; Iron, 4 mg;  Sodium, 34 mg.;  Calcium, 121 mg.

LINGUINE WITH GARLICKY KALE AND WHITE BEANS

Yield:   Makes 4 servings of about 1 3/4 cups  (calories:  381)IMG_7334

Ingredients:

  • 8 ounces uncooked linguine
  • 3 tablespoons extra virgin olive oil
  • 1/4 cup chopped fresh garlic
  • 1/2 cup water
  • 6 cups chopped kale (about 8 oz.)
  • 1 ( 15-ounce) can unsalted cannellini beans, rinsed and drained
  • 3/4 teaspoon black pepper, divided
  • 1/2 teaspoon salt
  • grated Parmesan cheese at the table (optional)

Directions:

1.  Cook pasta according to package directions, omitting salt and fat.  Drain in a colander over a bowl, reserving 1/2 cup cooking liquid.

2.  Heat oil and garlic in a large skillet over medium heat.  When garlic begins to sizzle, add 1/2 cup water and the kale;  cover and cook 5 minutes or until kale is tender, stirring occasionally.

Cook the kale with garlic and a little water.

Cook the kale with garlic and a little water.

3.  Add beans, 1/2 teaspoon pepper, and salt; cook 1 minute or until heated through, stirring occasionally.

Add beans and cook to warm through.

Add beans and cook to warm through.

Add drained pasta and 1/4 cup reserved cooking liquid to pan;  toss to coat.  Add the remaining cooking liquid if needed to liquify further.  Transfer to serving bowl and sprinkle remaining 1/4 teaspoon pepper over the pasta.  Serve immediately with grated Parmesan if desired.

IMG_7337


IMG_7344


SOURCE:   Cooking Light


Broccoli Mac and Cheese with Bacon

Broccoli Mac and Cheese with Bacon

Broccoli Mac and Cheese with Bacon

Comfort Foods!  Just those two words bring to mind certain foods that we grew up with, or crave at one time or another.  Maybe you’ve had a bad day, and just want a familiar meal that you know you love.  Perhaps it’s mid-winter, freezing cold, and you want something to eat that feels like being wrapped up in a warm quilt.  Or you just broke up with your boyfriend, best friend, or had to have a pet “put to sleep”.  You want food that will make you feel better, if that’s possible.  Food that gives you comfort is naturally called “comfort food”.

IMG_7499

Well, here’s a question that I’ve been pondering;  do you crave comfort foods in hot weather?  Aren’t comfort foods warm foods that give you a “warm fuzzy”?  I can’t think of any cold foods that do that, and in hot weather don’t we usually want cold foods to cool us off, so where do comfort foods fit in?

That is the dilemma I faced last week.  The weekend had served up warm, sunny days in the mid to high 80’s.  It was hot, we ate salads!   Come Monday, the temperature is in the 60’s, and its raining, cold and damp outside.  Then I go for my dance lesson, where every move I make gets corrected, and I can’t seem to do anything right.  (That’s an exaggeration, but it felt that way).  And to top it all off, I forgot to take something out of the freezer for dinner.  Does this day qualify for a comfort meal?  I thought it did.

This recipe for a variation on Mac and Cheese is my solution to wanting, no needing, something comforting to eat, but little time to prepare it, so let’s call this “Quick Comfort Broccoli Mac and Cheese with Bacon”.  Even though the calendar tells us it’s late spring or early summer, this dish was perfect for my needs.  And Mr. D.  loved it too, saying it was fabulous, and “hit the spot”.

IMG_7502

Note:  included here is a trick I learned at one time:  a little bit of turmeric enhances the color, making you perceive the sauce as cheesier than it actually is.  It adds no additional flavor of its own, it’s only there for color, so if it’s not in your cupboard, just omit it and use a yellow cheddar cheese.

BROCCOLI MAC AND CHEESE WITH BACON

Yield:  Serves 4IMG_7492

Ingredients:

  • 6 ounces uncooked large or regular elbow macaroni
  • 3 cups prechopped broccoli florets
  • 3 bacon slices, coarsely chopped
  • 1 tablespoon minced garlic
  • 1/8 teaspoon ground turmeric (optional)
  • 1 cup 1 % low-fat milk
  • 1 jar Alfredo Sauce with cheese
  • 1 1/4 cups sharp cheddar cheese, shredded

Directions:

1.  Cook pasta according to package directions, adding a little salt to the water.  Add broccoli to pan during last 2 minutes of cooking.  Drain.

Add broccoli to end of pasta cooking time.

Add broccoli to end of pasta cooking time.

2.  While pasta cooks, place bacon in a large ovenproof skillet over medium-high heat;  cook 4 minutes or until browned, stirring occasionally.  Remove bacon from pan with a slotted spoon.  Reserve 1 1/2 teaspoons drippings in the pan.  Add chopped garlic and the turmeric, if using.  Cook 1 minute, stirring throughout.

3.  Combine the milk with the Alfredo sauce, stirring with a whisk to blend well. Add to skillet with garlic, and mix together.  Bring to a simmer, and add 3/4 cup shredded cheese.  Stir to melt and blend in the cheese, stir in half the bacon.  Taste sauce and add salt and pepper if needed.

Making the cheese sauce with Alfredo sauce.

Making the cheese sauce with Alfredo sauce.

4.  Add the drained pasta and broccoli,  toss to coat.  Sprinkle remaining 1/2 cup cheese and remaining bacon over the top.

Add macaroni and broccoli to cheese.

Add macaroni and broccoli to cheese sauce.

Preheat the broiler to high.   Broil 2 minutes or until cheese melts and just begins to brown.  If time allows,  this dish could be baked for about 30 minutes, or until the cheese is melted and the top a little browned.

IMG_7498


Broccoli Mac and Cheese served with a salad.

Broccoli Mac and Cheese served with a salad.


SOURCE:   a Carolyn’s Originals