Pear Hazelnut Bread

Pear-Hazelnut Bread

Pear-Hazelnut Bread

Quick breads often meet my need for something sweet, without a guilt trip about how many calories I’m ingesting.  Of course not all of them meet that description, but this one is a nice compromise between a little sweetness and something you feel good about eating for breakfast.  It bakes up nice and hearty, with shredded pears and chopped hazelnuts folded into a cardamom-scented batter.

This bread would be a welcome addition to a holiday brunch or just nice to have with your morning’s coffee, on an average day.  Although, in my opinion, no day is average when it starts with a home-baked bread or muffin.

IMG_8549

Fresh, firm pears are needed for this recipe, so when they are grated you will not have a pile of mush.  I like Bosc pears but firm Bartletts work well also.  Wait to prepare them until you’re ready to put the bread together or the shredded fruit will turn brown.

While the original recipe for this bread called for 1  1/2 cups white all-purpose flour, I use a mixture of whole grains to make a total of  1 1/2 cups.  Examples are oats, spelt flour, whole wheat flour, and barley flakes.  The proportions should be about 3/4 cup all-purpose flour, 1/2 cup white whole wheat flour, and 1/4 cup something else like oats or barley flakes.  This will give you a bread that is tender with good texture.   Toasting the hazelnuts in the oven for about 5 minutes improves their nutty flavor, but watch them carefully so they don’t get too browned.

IMG_8552

PEAR-HAZELNUT BREAD

Yield:   1  9″x5″ loaf

Ingredients:

  • 1 cup shredded, peeled, ripe pears that are still firm (about 2 )
  • 1/2 cup vegetable oil, or coconut oil
  • 1/2 cup plain low-fat yogurt
  • 2 eggs
  • 1 tsp. vanilla extract
  • 1 1/2 cups flour (see recommended types above)
  • 3/4 cup sugar
  • 1 tsp. baking powder
  • 1/2 tsp. baking soda
  •  1/2 tsp. ground cardamom
  • 1/4 tsp. ground nutmeg
  • 1/4 tsp. ground cloves
  • 1 tsp. lemon zest
  • 1 cup chopped toasted hazelnuts

IMG_8535

Directions:

1.  Preheat the oven to 350*F.  and line a 9 x 5-inch loaf pan with parchment paper, leaving an overhang on two sides.  Coat well with cooking spray and set aside.

2.  Whisk together the vegetable oil, yogurt, eggs, and vanilla together well.  Stir in the shredded pears.

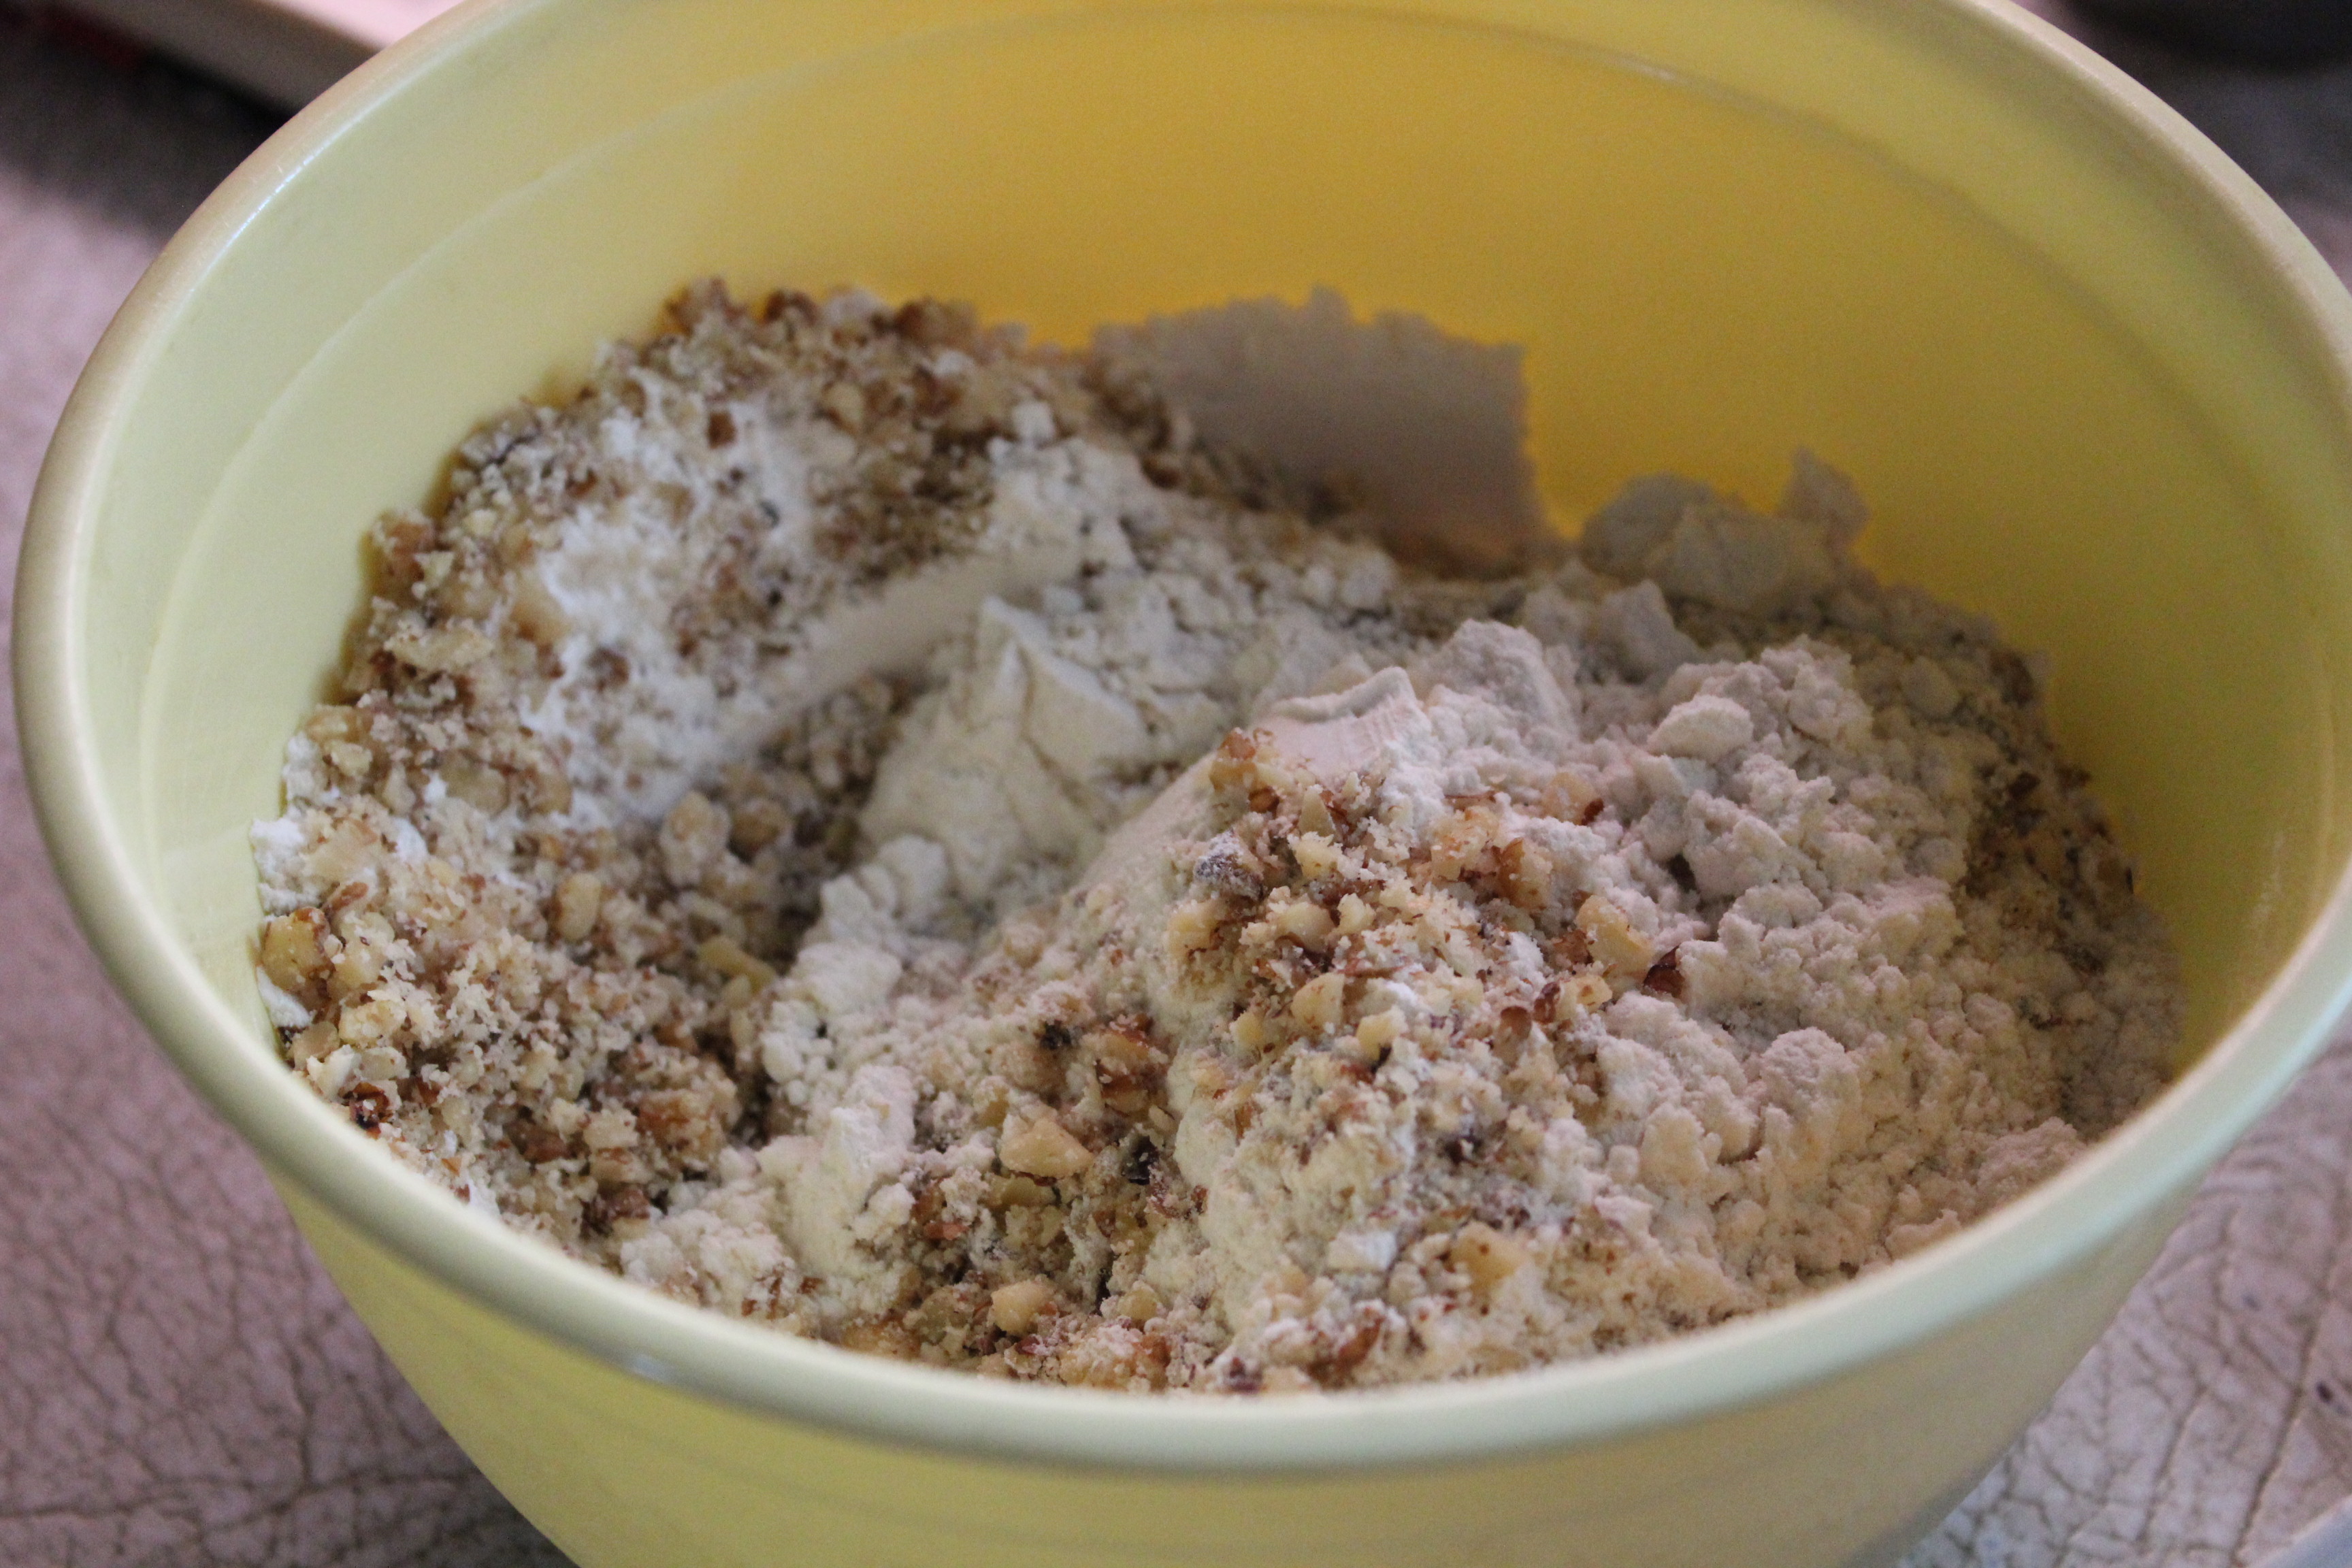
3.  Whisk together all the dry ingredients,  adding in the chopped nuts also.

Whisk together all the dry ingredients.

Whisk together all the dry ingredients.

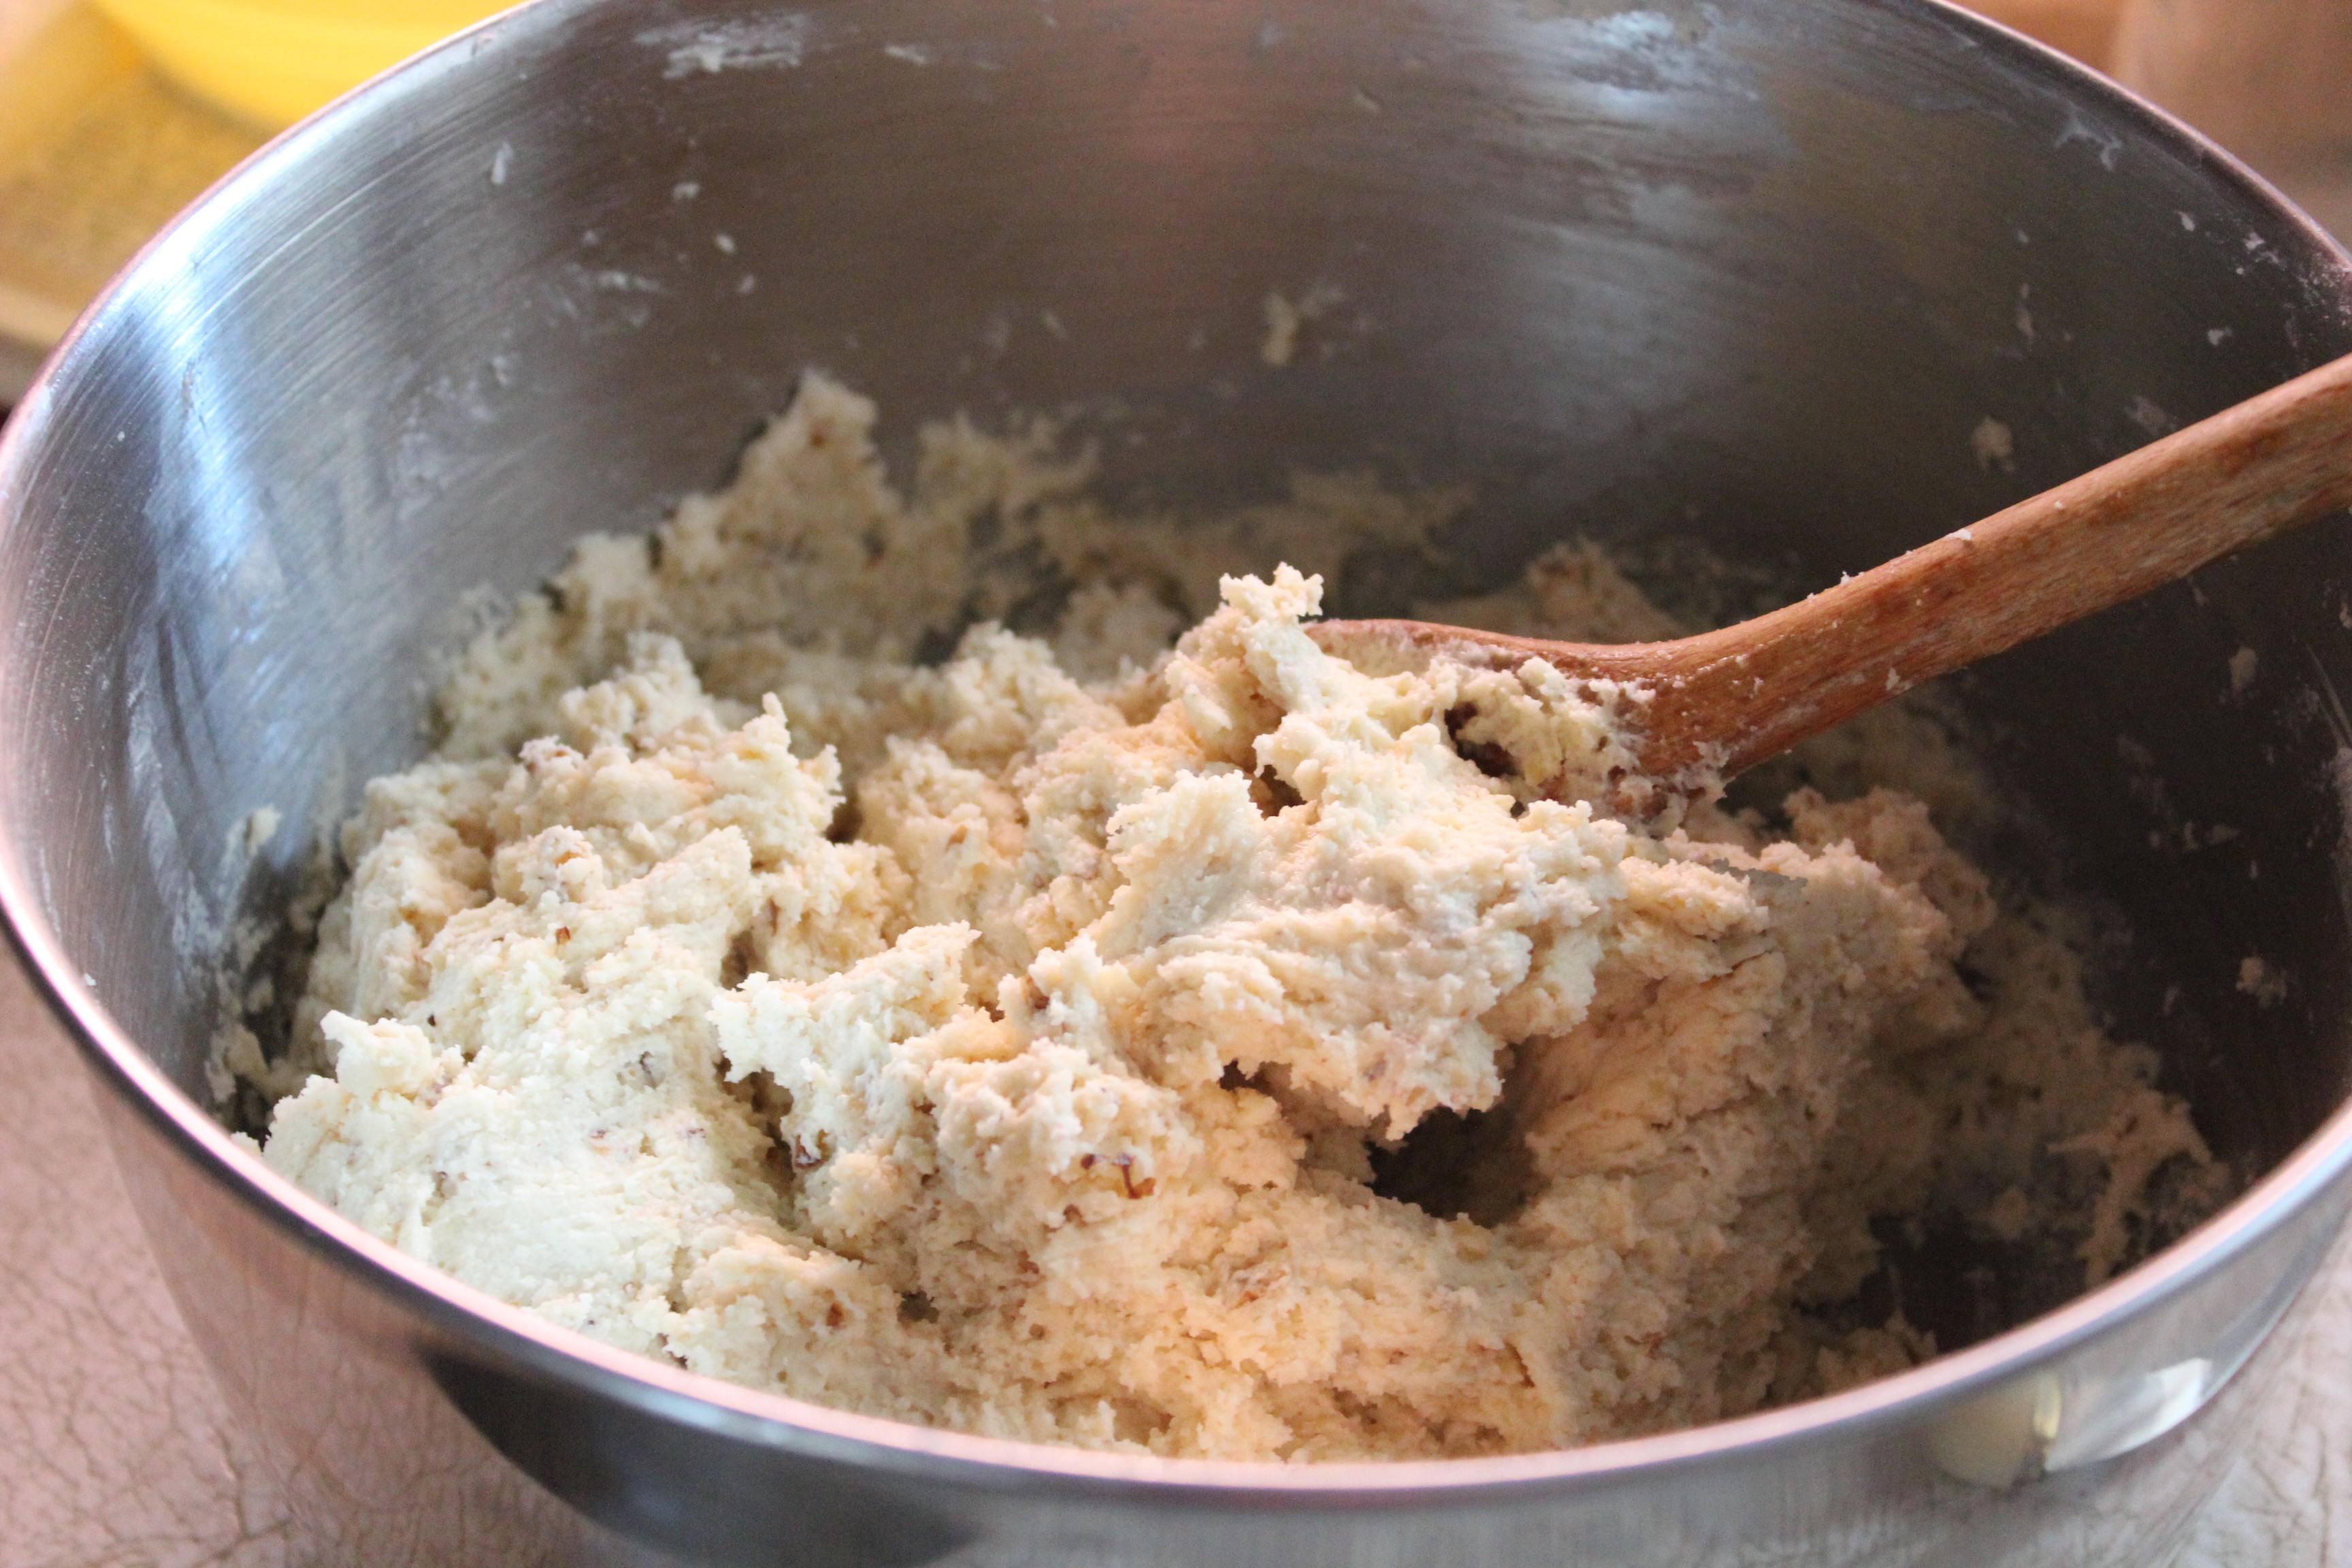
4.  Fold the wet ingredients into the dry ones, mixing just to moisten thoroughly.

Mixing wet ingredients into dry.

Mixing wet ingredients into dry.

Pour the batter into the prepared pan, and bake for 55 to 60 minutes or until a toothpick inserted into the center of the loaf comes out clean.  Test carefully as the top of this loaf may brown and look done while the center is still moist because of the pears.

5.  Let cool in the pan for about an hour, then remove from pan and transfer to a rack to cool completely.

IMG_8550


SOURCE:   Adapted from Whole Grain Mornings by Megan Gordon

Advertisement

Speculoos Buttons

Speculoos Buttons

Speculoos Buttons

Speculoos, or Speculatius, are lightly spiced little cookies that are often made with a special rolling pin, that imprints a design on the cookie.  In this version the dough is formed into a log, then sliced; thus making them small and round like a button.  To keep this idea going I put only a small round disc of frosting on the top of each one and sprinkled colored sugar or pearls on it.  These cookies are quite small and dainty, with their edges sparkling with sugar, and the dab of frosting on top, each one is just a quick little bite of deliciousness.

IMG_5977

I modified the original recipe to include a more elaborate mix of spices that make a nice blend with the light brown sugar and mild-flavored light molasses.  You might wish to make these little gems somewhat larger than I did, if you wish to decorate the top surface with piping or add more colored sugar.

IMG_5973

SPECULOOS BUTTONS

Yield:  About 8  dozen cookies

Ingredients:

A nice blend of spices give these cookies their yummy flavor.

A nice blend of spices give these cookies their yummy flavor.

  • 2 cups all-purpose flour
  • 1 tsp. ground cinnamon
  • 1/2 tsp. ground cardamom
  • 1/4 tsp. ground nutmeg
  • 1/8 tsp. ground cloves
  • 1/4 tsp. ground mace
  • 1/2 tsp. salt
  • 1/2 cup (1-stick) unsalted butter, softened
  • 1/2 cup packed light brown sugar
  • 1/4 cup granulated sugar
  • 2 Tbsp. mild-flavored (light) molasses
  • 1 large egg, room temperature
  • 1 tsp. vanilla extract
  • 1 egg white
  • sanding, or other decorative sugar

    Decorative sugars to roll the logs in.

    Decorative sugars to roll the logs in.

Glaze:

  • 1  1/2 cups powdered sugar
  • sprinkles, colored sanding sugar, or dragées

Directions:

1.  Whisk the dry ingredients (flour through salt) in a medium bowl; set aside.  Using an electric mixer at medium speed, beat butter in a medium bowl until smooth, about 2 minutes.  Add both sugars and molasses; continue to beat until mixture is smooth and creamy, about 3 minutes.  Beat in egg and vanilla, mix for 2 minutes.  Reduce speed to low;  add dry ingredients and mix to blend well.

2.  Scrape dough from bowl and divide into thirds.  Using your palms, roll each piece of dough into an 8″ log.  Wrap logs tightly in plastic or parchment paper and freeze for at least 3 hours.

Roll the dough into 3 logs, wrap in plastic wrap and freeze.

Roll the dough into 3 logs, wrap in plastic wrap and freeze.

I left mine overnight before baking.  For neater edges, remove logs from freezer after 1 hour and roll on counter.   Do Ahead:  These cookies can be made up to 2 months ahead. Keep frozen until ready to bake.

3.  Preheat oven to 375*F.  Line 3 baking sheets with parchment paper or silicone baking mats.

4.  Whisk egg white in a small bowl to loosen, lightly brush all over 1 log.  Sprinkle with (or roll in) sanding sugar.  Using a long slender knife, slice off a sliver of dough from each end of log to make ends flat. Cut log into 1/4″-thick rounds.  Transfer to baking sheet, spacing 1/2″ apart;  place in freezer while you cut the next log.  (The cookies hold their shape better if you bake when dough is cold.)  Repeat with remaining dough.

Slice the logs into "coins" before baking.

Slice the logs into “coins” before baking.

5.  Bake the cookies for 11 – 13 minutes, until tops are golden brown and centers are almost firm.  Transfer cookies to wire racks and let cool.  Repeat with all of the baking sheets.  Do Ahead:  Cookies may be baked up to 2 days before glazing.  Store airtight at room temperature.

6.  Glaze:  Mix powdered sugar and 1 – 2 teaspoons cold water in a medium mixing bowl.  Add more water a little at a time if needed.  Glaze should be quite thick.  You may spoon about 1/2 tsp. glaze onto each button, or fill a resealable plastic bag with glaze and cut a small hole in 1 corner, and pipe an even circle onto the cookies.  Decorate with sprinkles, colored sugar, or dragées, if desired.

Decorate each cookie with a little glaze and some colored sugar.

Decorate each cookie with a little glaze and some colored sugar.

Let stand on rack at room temperature for at least 30 minutes for glaze to set.  Cookies may be stored at room temperature in a tightly sealed container.

IMG_5972

SOURCE:   Slightly modified recipe from Dorie Greenspan, via Bon Appetit.com

Cocoa Thumbprints

Cocoa Thumbprints

Cocoa Thumbprints

Today, because I don’t already have enough browned, crisp, sugary, buttery thoughts swirling around in my head, I’m going to talk about chocolate, thumbprints, white sugar, sprinkles and all sorts of other decorative garnishes.  So just let me get suited up in my mask, and super-woman cape and gallop into my kitchen with a sense of urgency.  Not so fast, time, I’m coming, I’m coming. Wait for meeee…….

IMG_5971

Something would be noticeably absent if I didn’t include a chocolate cookie in my gifts and platter of Christmas cookies.  I have too many such recipes to count, but if you’ll remember I’m trying to keep my cookie choices to ones that are simple to make, yet have great texture and outstanding flavor.  So this great recipe got my vote this year.  At this point, I’ve made them and we’ve eaten a few, and I can say for certain they get a “standing ovation”.  You can mix them up by hand, no electric mixer to get out, butter is melted so you don’t have to take it out in advance to soften, and once they come out of the oven they are finished and ready to eat.  If you’re in a hurry, these are perfect!

Thumbprints are easy to make and traditionally filled with jam, but these are much more fun.  Even though the cookies are all the same, they look different due to the variety of garnishes I used in the centers.  Try chocolate kisses, crushed candy canes or a dollop of frosting.  Colored sprinkles, mini marshmallows,  M&M’s, or dried fruit would work out nicely as well.  Let your imagine go wild, use what ever you have on hand.  They will be delicious no matter how you decorate them.

COCOA THUMBPRINTS

Yield:    Makes about 3 dozen cookies

Ingredients:

Dutch process cocoas makes a nice dark cookie.

Dutch process cocoa makes a nice dark cookie.

  • 1  1/2 cups all-purpose flour
  • 3/4 cup granulated sugar, plus 1/2 cup for rolling
  • 1/2 cup unsweetened Dutch-process cocoa powder
  • 1 tsp. baking powder
  • 1/2 tsp. salt
  • 6 Tbsp. unsalted butter, melted
  • 2 large eggs, lightly beaten
  • 1/2 cup confectioners’ sugar
  • various decorative sprinkles, nuts, mini marshmallow, candies etc. for filling

Directions:

1.  Whisk the flour, 3/4 cup granulated sugar, the cocoa powder, baking powder and salt in a medium bowl.  Add the melted butter and eggs and stir until combined.  Cover and refrigerate the dough until firm, about 30 minutes to 1 hour.  If you’re really in a hurry I think you could shape these without chilling, but the cookies may spread more while baking.

2.  Preheat the oven to 325*F.  Line 2 baking sheets with parchment.  Place the confectioners’ sugar and the remaining granulated sugar into 2 separate small bowls.  Roll scant tablespoonfuls of dough into balls;  roll in the granulated sugar and then in the confectioners’ sugar.

Roll first in regular sugar, then in powdered sugar.

Roll first in regular sugar, then in powdered sugar.

Place 1 inch apart on the prepared baking sheets.  Lightly flatten each ball with your fingers and make a deep 1/2-inch wide indentation in the centers with your thumb.  (TIP:  use a cork to make perfect indentations, taking care not to press all the way to the bottom of the cookie.)

3.  Place your choice of filling in the indentations.

Red and green glacée cherries fill these cookies.

Red and green glacée cherries fill these cookies.

4.  Bake cookies until puffed and slightly cracked, about 10 minutes.  Let cool 3 minutes on the baking sheets, then transfer to racks to cool completely.

Cocoa Thumbprints with various fillings.

Cocoa Thumbprints with various fillings.

SOURCE:   Food Network Magazine, Dec. 2011

Oatmeal Ginger Cream Cookies

Oatmeal Ginger Cream Cookies

Oatmeal Ginger Cream Cookies

These large sandwich cookies made their way onto my cookies-to-give list.  The moist filling and the soft oatmeal cookie are both delicious separately, but when you put them together they become sublime.  I chose to include them in my cookie collection this year because they are BIG, not some little dainty cookie that’s gone in two bites.  (Although I love those, too!)  I think guys will really like them because they’re “manly”.

These are generously sized cookies, with a cream cheese filling that has bits of crystalized ginger in it.  (Did you notice what happened there?  I found another way to sneak in some ginger. :P)  The cookie part is a nice soft, oatmeal that’s got lots of spices in it.  The oats are toasted in the oven before incorporating them into the batter, making them crispier and toasting the oats also brings out their nutty flavor.  When two oatmeal cookies are sandwiched together with the ginger cream filling the flavors fuse and compliment each other so well.  Mr. D. described them as YUMMO!!IMG_5676

The recipe expects you to get 12 cookies, but I must have made mine a little smaller, because I got 15 sandwich cookies, and they were plenty big for my taste.  They are not low in calories, but I tried to reduce the fat and calories somewhat by using low-fat cream cheese.  These are definitely cookies that guys will like.

Without the filling these are still very good oatmeal cookies, and I think the addition of raisins in that case would really enhance them.

OATMEAL GINGER CREAM COOKIES

Yield:  Makes 12-15 sandwich cookies

Ingredients:

  • 1  1/2 cups rolled oats

    These cookies are nicely spiced.

    These cookies are nicely spiced.

  • 1 cup all-purpose flour
  • 3/4 tsp. baking powder
  • 1/2 tsp. baking soda
  • 1/2 tsp. cinnamon
  • 1/4 tsp. ground nutmeg
  • 1/4 tsp. ground ginger
  • 1/4 tsp. salt
  • 1 stick butter, at room temperature
  • 1/2 cup granulated sugar
  • 1/2 cup packed light brown sugar
  • 1 large egg
  • Ginger Cream  (recipe follows)

Directions:

1.  Preheat oven to 350*F.  Position racks in the top and bottom levels of the oven.  On a baking sheet, bake oats on the top rack, shaking the pan intermittently to prevent burning, until lightly browned, 10 minutes.  Transfer pan to a wire rack to cool, leaving oven on.

Begin by toasting the oats on a baking sheet.

Begin by toasting the oats on a baking sheet.

2.  Meanwhile, in a medium bowl, whisk together flour, baking powder, baking soda, cinnamon, nutmeg, ginger, and salt.  In a large bowl, using an electric mixer on medium speed, beat butter and sugars until light and fluffy….

Cream butter, sugars and egg.

Cream butter, sugars and egg.

Beat in the egg.  Add the flour mixture, beating until just combined.  Stir in the toasted oats.

This is a thick dough.

This is a thick dough.

3.  Line 2 baking sheets with parchment paper.  Roll dough ( about 2 tablespoons/cookie), into balls, or use a #30 (1-ounce) ice cream scoop.  For each baking sheet, drop 12 balls 2 inches apart.  With dampened hands, flatten each ball to 1/2-inch thickness.

Flatten dough balls prior to baking.

Flatten dough balls prior to baking.

Using the bottom and top racks, bake until cookies are lightly browned around the edges and set, 12 minutes, switching the baking sheets from top to bottom and rotating them from front to back halfway through baking.  Remove from the oven and let cool for 5 minutes on baking sheets, then transfer cookies to a wire rack to cool completely.

After baking, browned but not crispy.

After baking, browned but not crispy.

4.  Frost the bottoms of 12 cookies with Ginger Cream, then top with the remaining 12 cookies.

IMG_5674

For Ginger Cream:IMG_5670

  • 8 ounces cream cheese, at room temperature (low-fat cream cheese is OK)
  • 1/3 cup confectioners’ sugar
  • 1/4 cup finely chopped crystallized ginger

In a medium bowl, using an electric mixer on medium speed, beat the cream cheese and sugar until smooth.  Beat in the ginger.

IMG_5675

IMG_5678

SOURCE:  The Beekman Boys via Country Living Magazine

Ginger Snaps

Ginger Snaps

Ginger Snaps

Ginger is always a must in my Christmas baking.  Sometimes it appears in more than one item.  Since I’m keeping it simple this year I settled on ginger snaps for my ginger fix instead of anything more elaborate.

I can remember making these cookies with my mother when I was young and just wanting to help in the kitchen.  I always had the sense of excitement and anticipation when my mother was baking, so that is where I wanted to be also.  Often my job was “prepping”, i.e., chopping nuts, or fruits, or in this case cutting up the candied ginger.  I never minded this because, you know, I got to taste everything in advance.  That’s how I come by my love of candied ginger, and to this day I still have to eat a piece or two while I’m cutting it up.

IMG_5915

If store-bought ginger snaps are the only kind you have ever had then you will be very surprised by these.  They are not in the least bit dry, or crunchy.    You won’t need to dunk them into coffee or milk to soften them up.  They are kind of hard to describe;  a little crispy at the edges, but still soft and chewy inside.  Spicy and gingery, but not overly so–just a good blend of spices.  The outside is sugary, because  you form the dough into balls and roll in sugar.  Everything is better with a little sparkle, right?

These are great for gifting or make a fabulous go-along for your cup of coffee, tea, or hot cocoa.  I hope you love them as much as I do!

IMG_5923

GINGER SNAPS

Yield:   about 3 dozen

Ingredients:

  • 2 1/2 cups all-purpose flour
  • 1 tsp. baking soda
  • 1 1/2 tsp. ground ginger
  • 1/2 tsp. cinnamon
  • 1/4 tsp. ground cloves
  • 1/4 tsp. salt
  • 2/3 cup canola oil
  • 1 cup packed brown sugar
  • 1/3 cup molasses
  • 1/4 cup finely diced crystalized ginger (optional)
  • 1 large egg
  • 1/2 – 1 cup coarse/sparkling sugar

Directions:

1.  Preheat oven to 325*F.  Line baking sheets with parchment paper or silicone baking mats.  In a medium bowl, combine the flour, baking soda, ginger, cinnamon, cloves and salt.  Whisk to blend.  Stir in the ginger if using.

2.In the bowl of an electric mixer, combine the oil, sugar, molasses and the whole egg.  Mix on medium speed until well combines.  With the mixer on low speed, mix in the dry ingredients just until incorporated and a dough forms.

3.  Shape small portions (about 1 Tbsp) into 1 to 1 1/2-inch balls.   Place the sparkling sugar in a small dish, and roll each ball of dough in the sugar so that it is covered in an even layer.  Repeat with the remaining dough balls.

Roll dough balls in sugar.

Roll dough balls in sugar.

4.  Place the coated balls on the prepared baking sheets about 2 to 3 inches apart.  Bake,  just until the tops of the cookies are set and beginning to crack, about 15 – 17 minutes.  Let cool on the baking sheets a few minutes, then transfer to a wire rack to cool completely.  Store in an airtight container in a cool place.

Cooling after baking.

Cooling after baking.

IMG_5921

IMG_5922

Note:  The cookies will become more firm as they cool, but if you prefer a softer cookie for eating, warm in the microwave for 10 seconds.

SOURCE:  my mom’s recipe box

Limoncello Glazed Ricotta Drops

The baking marathon has begun!!. This week my oven is going into overdrive, and I’ll be all about holiday baking. These cookies are the first ones I’ve made, and the reason I chose them is because they make use of the limoncello I also just made.  What a coincidence that I should find this recipe, and I think it’s a super-good one.

Limoncello-Glazed Ricotta Drops

Limoncello-Glazed Ricotta Drops

The cookies are light and cake-like with a definite lemon flavor, and the glaze is made with limoncello so that carries the lemon flavor throughout the cookie.  I tasted one and found it hard to stop at just one.  The ricotta cheese is not detectable in the cookie, but contributes to the tender soft texture.  These would be delightful served at any time of year, but I like to add some yellow color to my plate of Christmas cookies, so these worked in very nicely, since I decorated them with yellow sugar and yellow sprinkles.

Yellow decoration suggests the lemon flavor.

Yellow decoration suggests the lemon flavor.

LIMONCELLO-GLAZED RICOTTA DROPS

YIELD:   Makes about 36 -40 cookies

Ingredients:

  • 2 cups flour

    My own Limoncello, lemon extract and lemon zest give the cookies a definite lemon flavor.

    My own Limoncello, lemon extract and lemon zest give the cookies a definite lemon flavor.

  • 2  1/2 tsp. baking powder
  • 1/2 tsp. baking soda
  • 1/2 tsp. salt
  • 1/2 cup butter ( 1 stick), softened
  • 1 cup sugar
  • 1 egg
  • 1 cup ricotta cheese
  • 1/2 tsp. vanilla extract
  • 1/2 tsp. lemon extract
  • 1 Tbsp. limoncello liqueur
  • 1 tsp. lemon zest

Glaze ingredients:

  • 3/4 cup confectioners’ sugar
  • 2 Tbsp. limoncello
  • grated lemon zest (optional for garnish)

Directions:

1.   In a medium bowl, whisk together the flour, baking powder, baking soda, and salt.

2.  In the bowl of an electric mixer, place butter and sugar.  Blend on medium speed to cream.  Add egg and continue beating.  Add vanilla, lemon extract, limoncello, and lemon zest.  Add ricotta cheese and blend well.

3.  Gradually add the dry ingredients and mix on low speed to incorporate.

4.  Spoon dough into a smaller bowl and refrigerate for 30 – 45 minutes for easier handling.

5.  Preheat oven to 350*F.  Line baking sheets with parchment paper or spray with non-stick spray.

6.  Drop dough by Tablespoons onto prepared baking sheets.  Bake for 12 – 13 minutes.  Edges should be light brown and bottoms evenly browned.  Cool on pans for about 5 minutes, then transfer to wire cooking racks to cool completely before glazing.

7.  Make glaze by mixing together the sugar and limoncello.  Stir till smooth, adding a drop or two of water to reach glazing consistency.  Spread lightly on cooled cookies and sprinkle with lemon zest to garnish, or sprinkle with decorative sugar.

 Glaze and decorate cookies.


Glaze and decorate cookies.

IMG_5931

Enjoy with coffee, tea or cocoa.

Enjoy with coffee, tea or cocoa.

SOURCE:   My Gourmet Connection

A Day for Giving Thanks

To all my readers:   I’m busy cooking for my family today, and later we will sit down to our Thanksgiving feast remembering all we have to be thankful for.  I wish you all a wonderful day today however you may be celebrating it.  Just be sure it includes family, friends, and, of course, good food.      Carolyn

IMG_5749

Anytime Frosted Sugar Cookies

Anytime frosted sugar cookies.

Anytime frosted sugar cookies.

Psssst—-Gather ’round everyone, I have a secret to tell you.   You know those soft, frosted sugar cookies that you see in those plastic containers at the grocery store?  The ones that have changing color schemes depending on the season and upcoming holiday?    Well, you can make them at home,  only BETTER!     I don’t buy them myself, but if someone offered me one, I guess I’d have a hard time saying,  ” no, thanks.”   They’re nicely decorated, make you feel festive, and it’s so easy to buy a package and put them out on a plate,  what’s the harm?    Artificial ingredients, that’s what.

I’ve found a recipe for a homemade version that blows the competition right out of the water.    These taste buttery and delicious because, well, they’re made with real butter, with real vanilla, and real eggs.  Real beats artificial every time.  These are easy to make and they can be customized to the season or holiday just by tinting either the cookie dough or the frosting with food coloring and sprinkling on some decorative sugars or jimmies.  The only problem once you make these is that they taste so much better than the store-bought, you won’t want to stop at having just one.  So having a batch of these around is kind of a problem, but at least it’s a good problem to have. 😀

ANYTIME FROSTED SUGAR COOKIES

Yield:  2 – 3 dozen large cookies

Change colors to suit the occasion or holiday.

Change colors to suit the occasion or holiday.

Ingredients:

  • 4  1/2 cups all-purpose flour
  • 4  1/2 tsp. baking powder
  • 3/4 tsp. salt
  • 1  1/2 cups ( 3 sticks) unsalted butter, at room temperature
  • 1 1/2 cups sugar
  • 3 large eggs
  • 5 tsp. vanilla extract

1.  Preheat oven to 350*F.  Line baking sheets with parchment paper or grease lightly.

2.  In a medium bowl combine the flour, baking powder and salt, and whisk together to blend.

3.  In the bowl of an electric mixer, combine the butter and sugar and beat together on medium-high speed until soft and fluffy, about 2 – 3 minutes.  Beat in the eggs one at a time, mixing well after each addition and scraping down the bowl as needed.  Blend in the vanilla.

4.  With the mixer on low speed, add the dry ingredients mixing just until incorporated and evenly mixed.  Cover and chill the dough for 1 hour.

5.  When you are ready to bake the cookies, scoop a scant quarter cup of cough and roll into a ball.  Flatten the ball slightly and place on the prepared baking sheet.  Repeat with the remaining dough, spacing the cookies at least 2 – 3 inches apart.  Bake about 10 – 12 minutes or just until set.  (Do not over bake.)  The edges should be only very lightly browned if at all.  Let cool on the baking sheet for several minutes.  Transfer to a wire rack to cool completely.

Frosting:IMG_5546

  • 4 – 5 cups confectioners’ sugar, sifted
  • 1/3 cup  ( 5  1/3 Tbsp.) unsalted butter, melted
  • 1 Tbsp. vanilla extract
  • 7 – 8 Tbsp. milk, plus more as needed
  • food coloring, optional
  • sprinkles and colored sugars, optional

To frost the cookies:

1.  Place the confectioners’ sugar in a medium bowl.  Add the melted butter, vanilla, and milk to the bowl and whisk until smooth.  Whisk in additional milk as necessary, 1 teaspoon at a time, until you reach your desired consistency.  Tint with food coloring if desired.  Use an offset spatula or knife to frost the cooled cookies.  Top with sprinkles as desired.   Store in an air-tight container.

Let frosting dry before storing in air tight container.

Let frosting dry before storing in air tight container.

SOURCE:    Martha Stewart

Pistachio Cupcakes

Pistachio Cupcakes

Pistachio Cupcakes

This is a very good recipe for cupcakes that just happen to be green.  If you’re looking for something to bake for that St Patrick’s Day event, or just for your family, these might be what you’re looking for.

The inclusion of Pistachio pudding mix into the cupcake batter is what gives them the green color, plus a mild flavor of pistachio.  I wanted a stronger flavor in mine so I added a tiny bit of almond flavoring, and that, for me, was just enough.  The frosting is a white butter cream that I tinted green and then sprinkled the tops with green decorating sugar.  The cupcake itself is very moist because of the addition of sour cream or yogurt.

IMG_3362

I plan to keep this recipe handy because I think I will try substituting other flavors of pudding mix for the pistachio, and varying the frosting to match the cupcake.  It has the potential for being a basic cupcake recipe that lends itself to many variations.

PISTACHIO CUPCAKES

SERVINGS:     Makes  12

INGREDIENTS  and  DIRECTIONS:

You will need to have ready 3  mixing bowls;   a large mixer bowl,  and 2 other smaller bowls.  A muffin pan with paper liners, or well sprayed.  Preheat oven to 350*F.

1.  In your large mixer bowl, beat together all the following till thoroughly combined.

  • 3/4 cup sugar
  • 1/2 cup vegetable oilIMG_3359
  • 2 eggs
  • 3/4 teaspoon salt
  • 2 teaspoons baking powder
  • 1/2 teaspoon baking soda
  • 1/4 teaspoon almond or pistachio flavoring, optional

2.  In a medium bowl, whisk together—

  • 1  ( 3  1/8 oz. ) package pistachio instant pudding mix.  Sugar free is OK.
  • 1  2/3 cup flour

3.  In a small bowl, whisk together

  • 1/2 cup plain or vanilla yogurt,  or sour cream
  • 1/2 cup milk

4.  3/4 cup chopped pistachio nuts,  optional

5.  Starting and ending with flour, alternately beat in flour and yogurt/milk mixtures, scraping down the bowl several times.

6.  Stir in chopped nuts, if using.

7.  Spoon into paper-lined muffin pans, and bake at 350*F for 18 – 22 minutes, until a toothpick inserted into the center of one comes out clean.

8.  Remove from oven and allow to cool 10 minutes in pan, then remove to a wire rack for complete cooling before frosting.

Butter cream frosting tinted green.

Butter cream frosting tinted green.

BUTTER CREAM FROSTING

  • 1/2 cup  ( 1 stick) unsalted butter, softened
  • 1/2 teaspoon flavoring;  vanilla, almond, or pistachio
  • 2  1/4 cups confectioners’ sugar
  • 1 – 2 Tablespoons milk
  • 2-3 drops green food coloring

1.  With an electric mixer, beat the butter till very soft and pale.  Beat in flavoring.

2.  Gradually sift in the confectioners’ sugar, beating well after each addition.  The more you beat at this stage, the lighter and fluffier the frosting will be.  Add milk a little at a time to achieve desired consistency for spreading or piping.

3.  To color, add drops of food coloring, and beat in to achieve desired level of color.

4.  Cover frosting with plastic wrap and put in refrigerator for at least an hour to firm up.  It will keep up to a week stored in the refrigerator.  Bring to room temperature before using.

IMG_3371

Decorating Tips:  Green decorating sugar is a nice touch for green/ St Patrick’s Day cupcakes; or, if using pistachio nuts in the cupcake batter, a few chopped pistachio nuts sprinkled on top would also be nice.

IMG_3364

SOURCE:   The Cupcake,  by Angela Drake,   for Paragon Books

Pecan Sour Cream Sandies

Pecan Sour Cream Sandies for Valentines Day

Pecan Sour Cream Sandies for Valentines Day

When I was young my favorite cookies were Keebler’s Pecan Sandies.  What I loved about them was the thickness of the cookie, and how rich and crunchy they were.  That was my after school snack with a glass of milk.  I don’t know if they even exist anymore.   I no longer look for them because I don’t buy packaged cookies at the grocery store  when I bake so frequently at home.

This recipe came to my attention one year around the holidays  when I was lining up the cookies I planned to bake for Christmas.  It has since become a favorite, and if I don’t make it for the holidays, I usually make it at some other time during the year.  The dough is easy to make and although initially a little sticky, after chilling a while it firms up and becomes a very forgiving and manageable dough for cut-out cookies.  Since there are all sorts of cookie cutters available for just about any occasion, this dough is a good one to have in your recipe box as a dependable go-to when you want to make a cookie that will always come out good.  If you bake for someone who is nut-sensitive, just leave out the nuts, they will still be a delicious butter cookie.

On a side note:  I used to wonder what it was about pecans that makes them so expensive, when they are widely grown in the South, and used lavishly in southern cuisine.  During my vacation in North Carolina last fall, I think I learned the answer.  The folks we visited have a large pecan tree on their property–see photo below–and it was laden with pecans that hung in clusters.  I thought the tree was beautifully shaped and so I took a picture of it.   I did not realize that a pecan tree can grow to such a large size.

A pecan tree.

A pecan tree.

Not quite ripe pecans in their pods.

Not quite ripe pecans in their pods.

When the nuts are ripe the pods which hold them crack open and the pecan in its shell falls to the ground where they are picked up.  The quantity of nuts a tree will produce in any one year varies,  some years are “good’ and other years “not so good”. Weather and rainfall play a big part.  The pecan is one really protected little nut.  It resides inside the tan-brown shell that we recognize, but that shell is covered by another outer green shell or pod.  If you have ever shelled pecans you know how difficult that can be especially if you want perfect halves.  I don’t know how they are harvested commercially, but for folks who have a pecan tree, harvesting and cracking pecans is a lot of work.  Knowing this helps me to understand and appreciate their price.

Here is the recipe for the pecan sandies.  I made these as part of my cookie packages for Valentines Day this year.  I like to give gifts of home-baked treats to close friends and family for V-Day, a day for love, hearts and all things frilly!

PECAN AND SOUR CREAM SANDIES

Decorated treats!

Decorated treats!

YIELD:   Makes about 5 dozen cookies, depending on size of cutter used.

INGREDIENTS:

  • 1/2 cup pecans
  • 2 1/4 cup all-purpose flour
  • 1 1/2 teaspoons baking powder
  • 1/2 cup butter
  • 3/4 cup sugar
  • 1 egg
  • 1/3 cup sour cream
  • 1 teaspoon vanilla
  • 1 recipe Royal Icing (recipe below)

1.  Grind the 1/2 cup pecans in a nut grinder or food processor.  Stir together the nuts, flour and baking powder in a bowl.

Mix finely chopped nuts with flour.

Mix finely chopped nuts with flour.

2.  In large mixer bowl beat butter about 30 seconds.  Add sugar;  beat till fluffy.  Add egg, sour cream, and vanilla; beat well.

Creaming butter, sugar, egg, sour cream and vanilla.

Creaming butter, sugar, egg, sour cream and vanilla.

3.  Add dry ingredients, beating till well combined.  Divide dough in half, cover and chill at least 3 hours, or overnight.

An easy to work with dough.

An easy to work with dough.

4.  Working with half the dough at a time, on a lightly floured surface, roll to 1/8 inch thickness.  Cut with desired cookie cutters.  (Or dough may be shaped into 1-inch balls).  Place on silpat or parchment-lined baking sheets.  Chill each pan of cookies while you cut the next batch.  Bake cutout cookies in 375*F oven for 7 – 8 minutes,  shaped cookies for about 10 minutes.  Remove to a wire rack to cool.

Cookies cooling before frosting.

Cookies cooling before frosting.

5.  Spread with Royal Icing, sprinkle with nuts, decorative sugars, or other kinds of trims.

Royal Icing, tinted pink

Royal Icing, tinted pink

IMG_3054Royal Icing is a smooth fluid icing that holds its shape well and sets hard.  Once it is set you can carefully write on it with gel-food pens.

ROYAL ICING

In a mixer bowl, beat 1 egg white till frothy.  Add 1 1/2 cups sifted powdered sugar, 1 Tablespoon lemon juice, and a dash of salt.  Beat well.  Add a drop or two of food coloring (optional) to all or part of the glaze.  Decorate as desired.

Various sizes of square cookies.

Various sizes of square cookies.

I cut my cookies with several sizes of square cutters, divided the icing and tinted half of it pink, then stacked some of them, sprinkled some of them, and wrote on others with food-gel pens.  Simply done, but pretty.  Oh, the large cookie with the heart on it (a one of a kind) I will put into Mr. D’s lunch as a surprise!

IMG_3064

SOURCE:  Better Homes and Gardens Special Edition, Baking for the Holidays