Crockpot Pot Roast

Fabulous Crockpot Pot Roast

Fabulous Crockpot Pot Roast

Super easy, super flavorful they said.  It was all over Pinterest, and everyone was raving about it.  I just couldn’t let something that sounded so good go by without giving it a try.

So I made it…..as a test.   Think of me as a scientific investigator.   I do all the work of testing out a recipe by making it, eating it, then telling all of you how wonderful it was (or not).   See, I do that, just for YOU.

Today,  I’m here to tell you it was Fabulous!!!!  But there is reason to be cautious.  This recipe uses only four ingredients, plus 1/2 cup water.  Three of those ingredients are pre-packaged mixes for Brown Gravy, Ranch Dressing, and Italian Salad Dressing.   I’m sure you know as well as I, that these mixes can contain a whole lot of Sodium, and sometimes, MSG. (Mine were labeled as having no MSG.)   There may be some slight variation among the many brands available, but here’s what mine contained:   Ranch Dressing mix==110mg,  Brown Gravy mix==240mg, and the biggest culprit of all, Italian Salad Dressing mix==320mg.

There’s no way I would ever put that much salt on a piece of meat I am cooking, so let’s get real, and try to fix the problem.  Reasoning that flavorful gravy is what we’re after, not salad dressing, I used the whole package of Brown Gravy mix, but I used only half of each of the dressing mixes.   The resulting gravy was full of flavor, and about right in terms of saltiness.  I think it is the best gravy I ever made.

IMG_9234

I served egg noodles with the pot roast and we spooned the gravy over the noodles.  Therefore I used only a tad of salt in the cooking water for the noodles.  Likewise, if served over mashed potatoes, use very minimal salt in the water to cook the potatoes.

IMG_9235

It is great to find a recipe this easy to make.  All it requires is a 2-3 pound pot roast that can be with or without the bone, like a chuck, or round roast;  the three packages of mixes and water.  I simply mixed the three mixes together in a small bowl, seared the roast in a large skillet to brown it on both sides, then put it in the crockpot.  Next I sprinkled the seasoning mixture over the beef, then poured on the 1/2 cup water.  Set it and forget it, as the saying goes. It couldn’t be easier.  You really don’t need a recipe to make this, but in case you need to see it written as a step-by-step procedure, here it is….

CROCKPOT  POT ROAST

Three packaged mixes plus the beef roast.

Three packaged mixes plus the beef roast.

Yield:   depends on size of roast,  probably 6 to 8 servings

Ingredients:

  • beef pot roast, such as chuck, top or bottom round ( 2.5 – 3 pounds)
  • 1 packet  Brown Gravy Mix
  • 1 packet Ranch Dressing Mix
  • 1 packet Italian Salad Dressing Mix
  • 1/2 cup warm water

Directions:

1`.  In a hot skillet, place the beef and sear well on both sides.  Transfer to crock pot.

Sear well on both sides.

Sear well on both sides.

2.  In a small bowl, combine the three mixes, using only half the Ranch and Italian mixes.  (save them for next time, and you’ll only need to buy the gravy mix.)

3.  Sprinkle over the pot roast in the crock pot.   Pour the water over all.

Sprinkle on seasonings, pour water over all.

Sprinkle on seasonings, pour water over all.

4.  Set on LOW, and cook for 8-9 hours.

You can thicken the gravy, if you prefer it that way.

Serve the beef with gravy and mashed potatoes or noodles for a real treat.

IMG_9236

SOURCE:   Pinterest


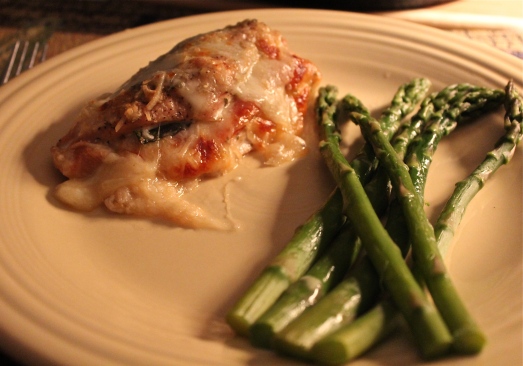
Stuffed Chicken with Roast Peppers, Mozzarella and Basil

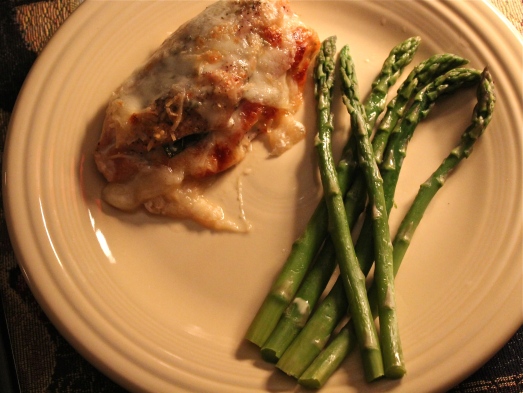
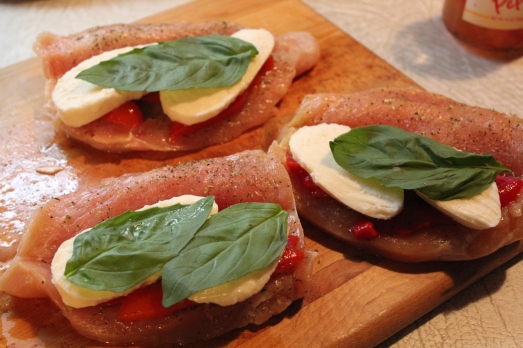
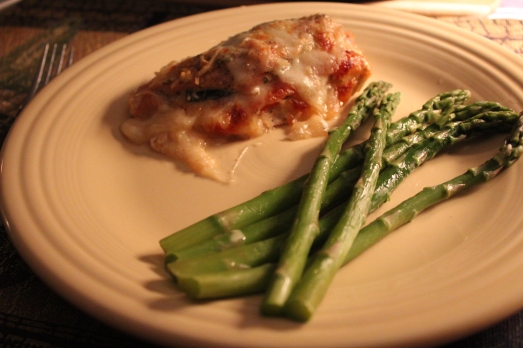
Chicken Breasts Stuffed with Roasted Peppers and Mozzarella

Chicken Breasts Stuffed with Roasted Peppers and Mozzarella

I’ve been away from my kitchen too long.   Recovery from knee replacement surgery is a slow process, one that must be taken seriously, if you expect to regain full use of the knee.  All that stretching, bending, walking, etc is hard work and very tiring.  I’m glad to report that I’m moving ahead at a steady pace, but in tiny steps.  During the past weeks, we’ve had some wonderful friends who stopped by with meals for us (they took pity on Mr. D.)  so we have enjoyed some great home cooking while I’m recuperating  but today I felt like getting my hands dirty in the kitchen.  So this is what I came up with.

Exploring my freezer, I found a package of boneless chicken breasts, and in my cupboard, a jar of roasted peppers.  What naturally came to mind to accompany these ingredients were mozzarella cheese and basil.  This meal is quick and easy-to-prep, just right for when you want to get out of the kitchen fast, but also elegant enough for a special meal. Keep the side dishes simple with a vegetable and a salad.

IMG_9285

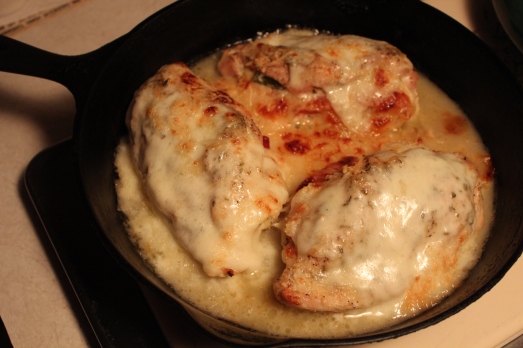
Mr. D. loved it, commenting that it looks like pizza.   It really does because of the colors of peppers and cheese, plus the Italian seasoning.  It smells wonderful as it’s cooking also.  He said it’s become his new favorite way to have chicken.

This is my basic recipe, but it can certainly be changed or added to with some sautéed spinach, sliced fresh tomatoes, artichokes, mushrooms, etc.

STUFFED CHICKEN WITH ROAST PEPPERS, MOZZARELLA AND BASIL

Yield:  Serves 4

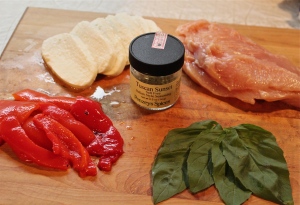
Ingredients:IMG_9274

  • 4 boneless, skinless, chicken breasts
  • 8 oz. fresh mozzarella, sliced into 8 slices
  • 1 12 oz. jar roasted red peppers, sliced into 1-inch pieces
  • 1 bunch fresh basil, whole leaves
  • 1/4 cup grated parmesan
  • 1 Tbsp. Italian seasoning
  • salt and pepper for seasoning

Directions:

1.  Preheat the oven to 400*F.  Grease a broiler-proof baking dish.

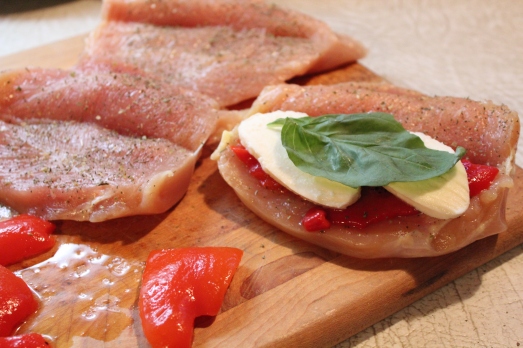
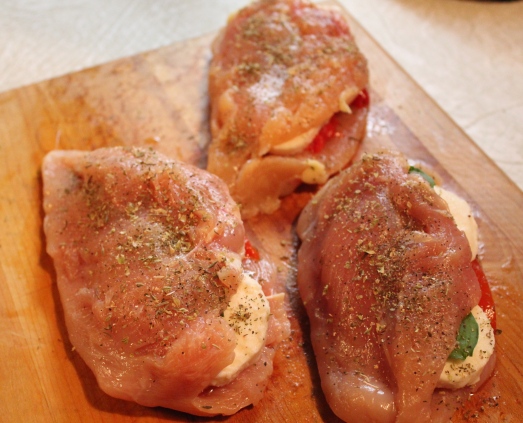
2.  Butterfly chicken breasts by cutting into the long side of the breast, stopping about 1/4-inch from the opposite side.  On your work surface, lay the chicken breasts opened up.  Sprinkle the exposed insides with 1/2 of the Italian seasoning, salt and pepper.

IMG_9275

3.  Stack the pepper, 1 slice mozzarella and basil on the bottom side of the chicken.  Fold the top flap of the chicken over, tucking in the contents as necessary.  Sprinkle with the remaining Italian seasoning.

IMG_9276

IMG_9277

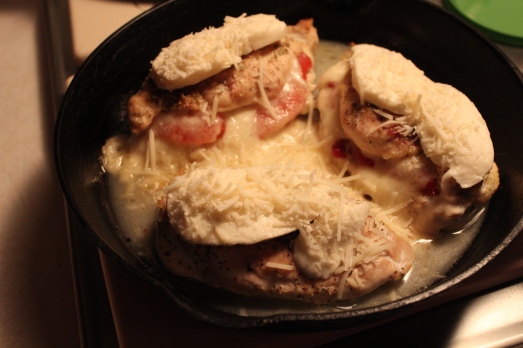
4.  Bake for 30 – 40 minutes (until chicken is no longer pink).  Take chicken out of the oven and turn on broiler.  Top each chicken piece with remaining slices mozzarella and sprinkle with Parmesan cheese.


IMG_9279

Broil until cheese is browned and bubbly, about 5 minutes.

IMG_9283

Serve with vegetable and a salad.

IMG_9286

SOURCE:  Food Network

Bacon and Leek Quiche

Bacon and Leek Quiche

Bacon and Leek Quiche

What food comes to mind most often when planning a menu for brunch?  Is it quiche?  I’m not surprised.  Quiche may well be the most versatile brunch dish.  A rich eggy custard encased in a flaky crust, it can be made with an almost endless variety of herbs, meats, cheeses and vegetables.  It can also be served hot or at room temperature, making it an ideal choice it you have other dishes on the menu.

We know that bacon can never go wrong, it seems, in any dish; so that’s beyond question in this quiche.  But leeks?  Probably not high on the list of favored ingredients.   If you are not familiar with leeks, they are a member of the onion family and have a mild oniony taste.  In most dishes where they are used they sort of blend in and their flavor is hard to identify, but not in this dish.  Their mild distinct flavor is noticeable and goes especially well with Gruyère cheese.

IMG_9513

My best description for the filling in this quiche is that it is “silky”.  The leeks are sautéed in a little butter until tender before adding to the crust with the bacon.  Once the egg, milk, cheese mixture is added everything melds together and bakes into a fabulous, silky, smooth custard, with bits of salty bacon throughout.

I made this dish one evening for our dinner and served it with a large mixed vegetable salad.  It seemed like the perfect meal.  The portion that was left over I rewarmed for lunch, and once again we enjoyed it immensely.

If you are someone who really like leeks, bacon and Gruyère cheese, (or even if you don’t) I encourage you to try this quiche.  I think you will be really glad you did.

BACON AND LEEK QUICHE

Yield:   makes 6 servings

Ingredients:

  • single-crust flaky pastry doughIMG_9505
  • Smoked bacon, 4 slices, coarsely chopped
  • unsalted butter, 1 Tbsp.
  • leeks, 2 small, white and pale green parts, chopped
  • half and half, 1 cup
  • large eggs, 2
  • kosher salt, 1/2 tsp.
  • ground black pepper, 1/4 tsp.
  • freshly grated nutmeg, 1/8 tsp.
  • Gruyère cheese, 1 cup shredded

Directions:

1.  Use your favorite recipe for pie dough, or use refrigerated store-bought pie dough.  Roll the dough out into a round about 12 inches in diameter.  Transfer to a 9-inch pie dish or tart pan.  Trim the dough, leaving a 1/2-inch overhang.  Fold the overhanging dough over and into the pan, pressing it firmly against the dough on the sides of the pan; the dough should be doubly thick at the sides and rise about 1/8 inch above the pan rim.  Line the dough with a piece of parchment paper, and chill for 30 minutes.

Make the pie shell and chill for 30 minutes.

Make the pie shell and chill for 30 minutes.

2.  Meanwhile, position a rack in the lower third of the oven and preheat to 375*F.  Place the dough-lined pan on a baking sheet and fill the parchment paper with pie weights or dried beans.  Bake until the dough is set and beginning to brown, about 20 minutes.

Fill pie shell with pie weights and bake till set.

Fill pie shell with pie weights and bake till set, about 20 minutes.

3.  While the crust is baking, make the filling.  In a fry pan, fry the bacon over medium heat, stirring until crisp and golden, about 6 minutes.  Use a slotted spoon to transfer the bacon to paper towels to drain.

Fry bacon till crisp, remove and drain on toweling.

Fry bacon till crisp, remove and drain on toweling.

Pour out the fat, wipe out the pan with clean paper towels, and add the butter.  Melt over low heat.  Add the leeks and cook, stirring occasionally, until tender, about 10 minutes.

Saute leeks in butter till tender.

Saute leeks in butter till tender.

Transfer to a plate and let cool slightly.

4.  Remove the baking sheet with the tart pan from the oven.  Remove the parchment and the weights/beans.  In a bowl, whisk together the half-and-half, eggs, salt, pepper, and nutmeg until combined.

Whisk together eggs, half-and-half and seasonings.

Whisk together eggs, half-and-half and seasonings.

Scatter the bacon, leeks, and cheese evenly in the pastry shell.

Layer in bacon.

Layer in bacon.

Cover bacon with leeks, then cheese.

Cover bacon with leeks, then cheese.

Carefully pour the egg mixture into the shell.

Pour in egg mixture.

Pour in egg mixture.

Return to the oven and bake until the filling is puffed and golden brown, about 30 minutes.  Let cool slightly, then serve.

IMG_9513

IMG_9516


SOURCE:  Comfort Food, warm and homey, rich and hearty,  by Rick Rodgers

Church Supper Chicken Casserole

Church Supper Chicken Casserole

Church Supper Chicken Casserole

Happy Spring, friends.  I do believe that Spring is finally starting to show signs of it’s arrival, and for me that means getting organized.  So this week has been a closet organizing, cob-web dusting, house cleaning kind of week.  This time of year always has me rearranging things for a fresh perspective, but this year I have an additional reason for doing so.

In just a few days I will be having surgery to replace the worn-out joint in my right knee.  Since I don’t know exactly what I’ll be capable of doing while healing and therapy take place, I’m doing some extra cooking (freezing meals),  clothes preparation (getting out the warm weather clothes), and trying to plan ahead for any events that may arise.    It will  be some time before I get back to my cooking adventures and writing to tell you about them.  In the mean time I have some posts ready to self-publish in my absence, but they will not be as frequent as you have been accustomed to.

The recipe that I’m sharing with you today is one that goes back quite a few years and was introduced to members of our church by our pastor, the first woman to be ordained in our church.  She always made this chicken and broccoli dish for our church suppers, and it became known as “Rosemary’s Chicken Casserole”.   Over the years I’ve taken a few liberties with the recipe and adapted it to use leftovers whenever I have some cooked chicken or rotisserie chicken on hand.

Chicken and Broccoli casserole with mashed sweet potatoes and salad.

Chicken and Broccoli casserole with mashed sweet potatoes and salad.

I include here the original recipe if you would like to make it the way it was intended, plus some notes on how I modify it to use leftovers.

Rosemary’s Church Supper Chicken Casserole

Yield:   Makes 8 servings

Ingredients:

  • 2 large chicken breasts ( or 3-4 cups cooked chicken or rotisserie chicken)IMG_9482
  • 2 packages frozen broccoli (or 1 large head fresh broccoli)
  • 1 can cream of mushroom soup
  • 1 can cream of chicken soup
  • 1 cup milk
  • 1/2 – 3/4 cup mayonnaise
  • 2 cups shredded cheddar cheese
  • 1 cup stuffing mix ( Pepperidge Farm or other)

Note:  the recipe can be easily halved for a smaller quantity.  If you do this, use only one can of soup, (Here, I’ve used cream of celery).   1/2 cup milk, and 1/4 cup mayonnaise.

Directions:

1.  Simmer chicken breasts in a small amount of water until cooked.  Cool and debone.

2.  Cook frozen broccoli, or fresh broccoli, if using.

IMG_9483

Place broccoli in a large casserole that has been prepared with cooking spray.  For half the recipe use an 8″ or 9″ square baking dish.  Cover with pieces of cooked chicken.

Cover broccoli with pieces of cooked chicken.

Cover broccoli with pieces of cooked chicken.

Preheat oven to 350*F.

3.  Make the sauce by whisking together the soups, milk and mayonnaise.

IMG_9485

Pour over the chicken and broccoli.

IMG_9488

IMG_9489

4.  Sprinkle the cheese over the sauce,

Add grated cheese over sauce.

Add grated cheese over sauce.

then place the stuffing mix on top.

Top with stuffing mix.

Top with stuffing mix.

5.  Bake at 350*F. for 25 – 30 minutes until top is browned and bubbly.

Hot and bubbly.  Yum, so good!

Hot and bubbly. Yum, so good!

IMG_9497


SOURCE:  Recipes From the Heart

Ravioli with Sautéed Asparagus

Ravioli with Sautéed Asparagus

Ravioli with Sautéed Asparagus

Sometimes you want an easy and quick pasta recipe that tastes incredible. Well, this recipe for ravioli with sautéed asparagus is all of that and more.  It can be whipped up quickly and the addition of  parmesan cheese at the end makes it a culinary masterpiece.  I kid you not!

Fresh store bought ravioli is cooked, then tossed with asparagus that has been sautéed in a simple butter and lemon sauce.  A little bit of grated parmesan, and minced parsley  are added at the end–just give it a toss and you’re done.

I love asparagus, an early sign of spring around here, and I can’t resist buying it when I see it.  With asparagus you want a simple sauce to enhance it’s flavor and this light lemony, buttery sauce is just right.  All it consists of is butter, lemon juice and a dash of black pepper.  Not at all heavy or greasy, it just coats the ravioli and asparagus.

IMG_9318

A couple of notes:  The asparagus should be slightly damp when you sauté it.  This helps with the sauce.  So rinse your asparagus right before you chop it and add to the pan.

Also, you can use whatever fresh ravioli you like for this dish–cheese, mushroom, spinach would all be good choices.  I used a three-cheese ravioli for mine.

This is a dish that goes together very quickly so be sure to have everything prepped and ready to go before you start cooking.  It takes no time to prepare the asparagus, chop the parsley and measure out the other ingredients, so this can be done while you’re waiting for the water to boil for the ravioli.

RAVIOLI WITH SAUTÉED ASPARAGUS 

Yield:  Serves 2

Ingredients:IMG_9309

  • 1 (8-ounce) package fresh ravioli, filling of choice
  • 1/2 pound asparagus, tough ends removed, chopped into thirds
  • 1/2 lemon
  • 2 Tbsp. butter
  • 2 Tbsp. parsley, chopped
  • few twists, fresh ground pepper
  • 2 Tbsp. grated parmesan cheese, plus more to serve at the table

Directions:

1.  Bring a large pot of water to a boil.

2.  Prepare asparagus by snapping off tough ends, then chopping into thirds, or smaller.  Mince parsley, squeeze lemon and measure out butter.

IMG_9313

3.  In a large saucepan, melt the butter over medium heat until frothy.  Add chopped asparagus to the pan, stir to coat asparagus with butter and cover with a lid.  (If asparagus is damp, steam created will hasten cooking.)  Cook for 4 – 5 minutes depending on thickness of asparagus.

IMG_9314

4.  Add ravioli to boiling water and cook as per package directions.  Drain when done and place in a bowl.  Keep warm.

IMG_9315

5.  When asparagus is done, add to bowl with ravioli with a slotted spoon.  Leave any browned butter in the pan.

6.  To the butter in the pan, add lemon juice, several twists fresh pepper, and bring to a boil.  Stir for 30 seconds.  Pour the butter-lemon sauce over the ravioli and asparagus.  This will just lightly coat them.

IMG_9317

7.  Add parsley and 2 Tbsp. Parmesan cheese.  Toss to coat and combine.  Serve with more cheese at the table.

This is so good, I can’t wait to make it again.


SOURCE:  Adapted from Green Valley Kitchen

Italian Style Chicken Sausage with Roast Vegetables

Italian Style Chicken  Sausage with Roast Vegetables and Rigatoni

Italian Style Chicken Sausage with Roast Vegetables and Rigatoni

I wish you could taste how good this dish is!  But since you can’t, you’re going to have to take my word for it.

This baked dinner came about as a result of having roast vegetables left over from when I made the Roast Vegetable Subs.  It’s everything I love in a meal and it’s all ready in about an hour.

IMG_9399

I used spicy chicken sausage to give it a little kick, but if you want it to be milder, simply swap it for sweet Italian sausage. The pasta I used is a large size rigatoni and I chose it so it would be compatible with the chunks of roasted vegetables.  For sauce I used a small jar of prepared pizza sauce mixed with a can of diced tomatoes with garlic and oregano.  Grated Italian blend cheese sprinkled on at the end of baking time gave it a nice melty topping.  We added more grated cheese at the table.  There wasn’t much conversation going on at this meal;  all we kept saying was  “MmmmmMm, Wow, this is So good”!!

If you’d like to Wow your family, here’s the recipe……

ITALIAN STYLE CHICKEN SAUSAGE WITH ROAST VEGETABLES (and Rigatoni)

Yield:   Serves  6

Ingredients:

  • 2-3 cups roast mixed vegetables (refer to Roast Vegetable Subs for directions)IMG_9390
  • 1 Tbsp. olive oil
  • 12 ounces uncooked rigatoni
  • 1 jar (15-oz.) pizza sauce
  • 1 can (14.5-oz) diced tomatoes with basil, garlic and oregano
  • 1 package (12-oz) Italian style Chicken Sausage, sliced 1/4-inch thick
  • 1/2 cup shredded Italian blend cheese, plus more for the table

Directions:

1.   Bring a large pot of salted water to a boil, and cook pasta according to package directions.  Drain and keep warm in the  pot.

2.  Meanwhile, in a large skillet, heat olive oil and sauté the chicken sausage just to brown a little;  add the roast vegetables and stir to combine.

Saute sausage with roast vegetables.

Saute sausage with roast vegetables.

Add the pizza sauce and tomatoes with their juice.  Heat the mixture thoroughly.

Add pizza sauce and tomatoes.

Add pizza sauce and tomatoes.

3.  Preheat oven to 350*F.   Spray a large baking dish with non-stick cooking spray.

4.  Pour the sausage mixture over the cooked pasta and stir well to combine.  Transfer to the prepared baking dish and cover with foil.

Transfer to baking dish and cover with foil.

Transfer to baking dish and cover with foil.

Bake for 30 minutes or until bubbly.

5.  Uncover and sprinkle with the cheese.

Sprinkle with grated cheese.

Sprinkle with grated cheese.

Bake uncovered, an additional 5 minutes until cheese is melted.

IMG_9397

IMG_9399

Comfort food….Yes!

Comfort food….Yes!

Garlic Roasted Vegetable Subs

Garlic Roasted Vegetable Sub

Garlic Roasted Vegetable Sub

Oven-roasting is an easy way to prepare vegetables and bring out the best of their natural flavor.  Any combination of vegetables will work in this hearty vegetarian sub sandwich.  I particularly like the combination I put together to create an Italian vibe.  I filled them with a medley of garlic-roasted eggplant, bell peppers, onion, mushrooms and tomatoes, then topped them with cheese and placed them in the oven for a light toasting.  This is an easy and delicious meal.

IMG_9348

The quantity of vegetables given in this recipe was more than I needed for just two of us, so I plan to use the extra ready-roasted  vegetables in another meal with pasta, sausage, and tomato sauce.  They would also be good on a pizza, I’m thinking!

Once roasted, they can be used in several ways.

Once roasted, they can be used in several ways.

GARLIC ROASTED VEGETABLE SUBS

Yield:  enough for 4 sandwiches

Ingredients:

  • 1 medium eggplant, peeled and cut into 1-inch cubesIMG_9336
  • 3 Tablespoons olive oil, divided
  • 1 medium red bell pepper, seeded and cut into 1-inch pieces
  • 1 medium green or yellow bell pepper, seeded and cut into 1-inch pieces
  • 4 Roma tomatoes, cut into 3 or 4 thick slices
  • 2 thick slices sweet onion, separated into rings
  • 8 ounces white button mushrooms, halved crosswise
  • 2 cloves garlic, very finely chopped
  •  salt and freshly ground black pepper
  • 4 soft sub/hoagie rolls (about 6 inches)
  • 4 to 6 slices cheese ( mozzarella, muenster or provolone)

IMG_9346

Preparation:

1.  Preheat oven to 400*F. and line 2 large baking sheets with parchment.

2.  Place eggplant cubes in a large bowl, drizzle with 1  1/2 Tbsp. olive oil, season with salt and pepper and toss to combine. Spread the cubes on one of the prepared baking sheets and set aside.

IMG_9335

3.  Add the peppers, tomato slices, onion rings, and mushrooms to the bowl.  Sprinkle with the chopped garlic, season with salt and pepper and drizzle with the remaining olive oil.  Toss to combine and transfer to the other prepared baking sheet.

IMG_9338

4.  Roast the vegetables until tender and lightly caramelized, 20 to 30 minutes.  Rotate the baking sheets and toss the vegetables about halfway through the cooking time for best results.

IMG_9339

5.  Split the rolls lengthwise and divide the vegetables between them.

Split rolls, add veggies.

Split rolls, add veggies.

Top with slices of cheese.

I used sliced mozzarella.

I used sliced mozzarella.

Place in the oven for  4 to 5 minutes, or until the cheese is melted and bubbly and the rolls are lightly toasted.  Serve with chips or fries.

IMG_9343

A delicious meal!

A delicious meal!

SOURCE:   My Gourmet Connection

Guinness Braised Corned Beef

Guinness-Braised Corned Beef

Guinness-Braised Corned Beef

The St. Paddy’s Day parade took place downtown, the restaurants and bars were overflowing with folks wanting to celebrate and have a good time, and wearing something green made everyone Irish.

I don’t know what it’s like in other parts of the country, but it is traditional here in the Northeast to have corned beef dinner for St. Patrick’s Day.  We had ours this weekend when I had the time to prepare it and we also had the time to enjoy a leisurely dinner.  I’m so glad I did that, so now I can tell you all how wonderfully good it was!!  Along with the corned beef dinner I also made Irish Soda Bread and Irish Whisky Cake.  You’ll be reading about them in upcoming posts, so stay tuned.

IMG_9420

This meal begins with a piece of corned beef packaged in brine with a packet of seasonings included.  With Guinness being the traditional beer of Ireland, it is fitting that Guinness is used as part of the liquid in which the beef slow cooks.

The slow cooker is the perfect way to cook this cut of meat since it requires long slow cooking to achieve it’s perfect tenderness.  I started it in the morning and let it cook on HIGH for about 8 hours.  The meat and all the vegetables were falling apart they were so well done and tender, and the flavor was “out of this world”.  This was the best corned beef I have ever cooked.

IMG_9422

GUINNESS-BRAISED CORNED BEEF

Yield:  Serves 6

Ingredients:

  • 1 cup waterIMG_9400
  • 1 (14.5-oz.) can beef broth
  • 2 cups Guinness stout (if using one bottle, make up the difference with water)
  • 1/3 cup brown sugar
  • 1/4 cup tomato paste
  • 1 tsp. dried dill
  • 2 whole cloves
  • 1 large onion, cut into wedges
  • 3-4 carrots, cut into 1″ pieces
  • 2 stalks celery, cut into 1″ pieces
  • 4 red-skin potatoes, halved
  • 1 (3-pound) cured corned beef brisket, with seasoning packet
  • 1/2 head cabbage, cut into wedges

IMG_9402

Directions:

1.  In a large slow cooker, begin by stirring together all the liquids, then adding the brown sugar and tomato paste, Stir to combine well.  Add the seasonings, including the packet with the corned beef.

2.  Put in all the vegetables except the cabbage.   You may choose to add other vegetables you have on hand.  Some people like turnip in this mixture  or parsnips.

IMG_9404

3.  Lay the corned beef brisket on top of it all.  Cover and cook on HIGH for 8 hours or until beef is tender.  Add wedges of cabbage when there is 1 hour of cooking time remaining.

IMG_9405

Remove beef, slice diagonally across the grain into 1/4-inch slices.  Serve surrounded by the vegetable mixture.  Discard the broth mixture.

IMG_9418

IMG_9419

SOURCE:   AllRecipes.com

Sauteed Mushrooms with Baked Eggs

Sautéed Mushrooms with Baked Eggs

Sautéed Mushrooms with Baked Eggs

Mushrooms and eggs are a classic combo, and with good reason–they compliment each other so well.  This vegetarian dinner stars beefy, juicy sautéed mushrooms along with baked eggs and toasty croutons.  If you enjoy mushrooms and eggs separately, you will certainly enjoy them when combined like this.IMG_9255

Toasted flatbreads such as pita or naan add some crunch to this dish and help round it into a full meal.  Add a green vegetable or salad, you’re ready to sit down to a meatless, but “meaty” entree.

Toasted flatbread adds crunch.

Toasted flatbread adds crunch. This is whole-wheat flour tortilla.

A variety of mushrooms may be used here.   Almost all mushrooms available at the supermarket are cultivated, not wild, and are available year round.  The most common ones are the white button, cremini, or earthy portobellos.  A combination of mushrooms adds variety and a more complex flavor, so if shiitake or oyster “shrooms” are available they can be added also.

Round out your meal with a salad.

Round out your meal with a salad.

Sauteed Mushrooms with Baked Eggs

Yield:  Makes 4 servings

Ingredients:

  • 1 6-inch whole-wheat flatbread, such as naan, pocketless pita, or whole-wheat tortilla
  • 3 Tbsp. EVOO (extra virgin olive oil)

    Sliced mushrooms--any kind will do.

    Sliced mushrooms–any kind will do.

  • 2 cloves garlic, sliced
  • 1 small shallot, diced fine (optional)
  • 1 pound mixed mushrooms, trimmed and sliced 1/8-inch thick
  • coarse salt
  • red pepper flakes, optional
  • 1/4 cup white wine
  • 2 Tbsp. fresh thyme leaves, or 1 tsp. dried thyme
  • 4 large eggs, at room temperature

Directions:

1.  Preheat oven to 425*F.  Toast flatbread over the flame of a gas burner or under broiler.  Tear into 2-inch pieces; set aside.

2.  Heat oil and garlic in a large ovenproof skillet over medium heat, stirring, until garlic is fragrant but not browned, about 1 minute.

I added a little chopped shallot to mine.

I added a little chopped shallot to mine.

Increase heat to medium-high, add mushrooms, and cook, stirring occasionally, until tender and golden brown, about 10 minutes.

Add mushrooms to skillet.

Add mushrooms to skillet.

Season with salt and red-pepper flakes, if using.  Add wine, scraping up browned bits.  Stir in flatbread and thyme;  remove from heat.

Add flatbread and thyme.

Add flatbread and thyme.

3.  Make 4 shallow depressions in mushroom mixture and crack 1 egg into each depression.

I used only 3 eggs.

I used only 3 eggs.

Transfer to oven and cook until egg whites have just set, about 4 minutes.  Season eggs with salt and pepper.

IMG_9257

Note:  Try to keep the egg yolks runny.  When broken, they become an instant sauce that coats the crisp-edged flatbread and mushrooms.

IMG_9254

I served it with a salad consisting of romaine, avocado, and orange sections with  a ginger-sesame dressing.

IMG_9259


SOURCE:   Martha Stewart Living


Bacon Wrapped Meatloaf

Bacon-Wrapped Meatloaf with Ketchup Sauce

Bacon-Wrapped Meatloaf with Ketchup Sauce

Meatloaf, you got that right.  Meatloaf wrapped in bacon.  All the men I know love meatloaf,  and they love bacon.  Well, women do too.  This is another one of those times when bacon just makes it better.  Bacon that gets all crispy surrounding a thick, meaty meatloaf that’s been baked with a catsup sauce over it.  (Please excuse the drool, here.)

This is a recipe from The Pioneer Woman, of The Food Network.   It’s superb!  And it’s an equal opportunity dish;  equally comforting to both men and women–and kids, too.

IMG_0224

This recipe is very easy to make, and takes very little time to put together.  You bake it on a broiler pan so the fat drips away into the pan below, allowing the loaf to bake faster, and gives the bacon a great crisp.  You can bake this in one big loaf, or divide it into two smaller ones and freeze one for a night when you need something quick.  If you have a big family you’ll need it all, and don’t count on leftovers.

Put some foil in the bottom pan to catch the drippings and make clean-up easier.

Put some foil in the bottom pan to catch the drippings and make clean-up easier.

When I made it I used a package of meatloaf mix that was about 1.25 lb. and halved the other ingredients so it stayed proportional.  For two people we ate about half of it,  and I promised Mr. D. a meatloaf sandwich on a hard roll for his lunch.  He just about swooned at that!  See, the psychology here, is that if I make one for him, then I can have one too, and not feel guilty.  🙂

BACON WRAPPED MEATLOAF

Yield:  4 – 6 servings

Ingredients:

  • 1 cup milk
  • 6 slices white bread ( any bread will do, even whole wheat)
  • 2 pounds ground beef (can also use 1 pound each ground pork and beef)
  • 1 heaping cup grated Parmesan cheese
  • 1 medium onion, finely chopped
  • 1/2 tsp. seasoned salt
  • 1/2 tsp. regular salt
  • 1/4 tsp. ground pepper
  • 1/3 cup flat leaf parsley, minced
  • 4 eggs, beaten
  • 10 slices bacon, thin, not thick cut.

For the sauce:

  • 1 1/2 cups ketchup
  • 1/3 cup brown sugar
  • 1 tsp. dry mustard
  • Tabasco sauce to taste
  • (reserve 1/3 of the sauce for serving)

Directions:

1.  Preheat oven to 350*F.  Line the bottom of your broiler pan with foil and spray the top part with non-stick cooking spray.  Have it ready to go.

2.  Place bread slices in a large bowl.  Pour milk over bread.  Allow it to soak for a few minutes.

3.  Add ground beef, onion, Parmesan cheese, salts, pepper and parsley to the bowl with the bread.  Lightly beat the eggs and pour over all of this.

4.  With clean hands, dig in and start squishing and mixing it up until everything is well-blended.  Shape the meat mixture into a loaf, (or two smaller loaves) and place on the broiler pan.   Now lay the bacon slices over the loaf, tucking the ends underneath the loaf.  If you made two loaves, cut the bacon slices in half.  You may need to stretch them a little, but thinner bacon slices will become crispier.

Wrap meatloaf with bacon slices, stretched thin.

Wrap meatloaf with bacon slices, stretched thin.

Note, I didn’t have enough bacon to completely cover the loaf, so I wrapped lengthwise.  If you have enough bacon, wrap crosswise, so the meatloaf is completely covered by the bacon.

5.  Once the meatloaf is wrapped, take 2/3 of the ketchup sauce and spread it over the loaf with a spoon or spatula.

Spoon ketchup sauce over the meatloaf to cover.

Spoon ketchup sauce over the meatloaf to cover.

6.  Bake for about an hour and a half, if making the full recipe.   This is great served with mashed potatoes.

You won't be able to wait for dinner when this is on the menu.

You won’t be able to wait for dinner when this is on the menu.

SOURCE:  The Pioneer Woman via The Ranting Chef, then modified