Keep Your Grill Clean

What is this?   A package on my doorstep addressed to me?     What can it be?    I don’t remember ordering anything!

I was excited to cut the box open for a peek inside.   A Grill Brush…..Mr. Rizzi at Mr. Grill has asked me to try it out and evaluate it.    The brush we have been using is showing a lot of wear, and it’s time to think about getting another one.   So I am happy to try out a new and different one.

IMG_8065

My plans for the weekend included cooking some steaks and vegetables on the grill, so the timing is perfect.

This brush, called Mr. Grill is 18-inches long, so it can reach way to the back of the grill, keeping your hands away from the greasy grill surface.  The “working part” of the brush is brass bristles that are very durable and shaped in a  “T”  that gets along the sides of the grates as well as the surface.

Shaped to clean the sides of the grates as well as the surface.

Shaped to clean the sides of the grates as well as the surface.

If you use it when you finish cooking and while the grill surface is still hot, it will get off all the crusty cooked on debris, and your grill grates will look like new.  I was impressed at how efficiently and quickly the job was done.

For best results, use while the grill is still hot.

For best results, use while the grill is still hot.

Keeps you grill looking like new.

Keeps your grill looking like new.

The handle end of the brush has a hanging rawhide strap for hanging on the grill, so it’s always right where you need it.  This grill brush comes with a promise that it won’t scratch or mark your grill, and includes a 1-year guarantee.   This item may be purchased on Amazon.

Full Disclosure:   I have not received any reimbursement for trying out this product.   I have simply used this grill brush and given my opinion as to how well it works.


Grilled Steak with Chimichurri Sauce

Chimichurri Sauce

Chimichurri Sauce

Although I like a good steak, I’m not a total carnivore.   Whenever I do eat meat, I like a good topping or spice rub to season it up.  Especially if I’m going to be grilling it.

Steak topped with too much A-1 sauce or blue cheese,   hamburgers with waaay too much cheddar cheese.  Yes and yes!  It’s the melted butter that makes the lobster better, the barbecue sauce on ribs, and salsa on tacos.  Please join me in saucing just about anything and everything.

In my refrigerator, you will find a number of little jars filled with sweet, sour, and spicy sauce concoctions.   Butter too…..obviously lots of butter.

Steaks are not regular visitors to my refrigerator.   The good ones are a bit too pricy, but when they are marked down because of “sale date expiration”, that’s when I grab them for the freezer.   So, because it’s the end of summer,  and I want to grill out a few more times, and because I made a “fancy-pants” chimichurri sauce, it’s a special occasion calling for STEAK!

Steak on the grill!!

Steak on the grill!!

In Argentina, a beef-raising country, where everyone loves their beef, chimichurri sauce is a household staple.  Made with fresh and dried herbs, garlic, red wine vinegar and a good quality olive oil,  it brings out the best in meats.  Brush it on both sides of the steak before grilling to lock in moisture and add a depth of flavor to an already flavorful cut of beef.  Then save the remainder of the sauce to serve at the table with the steaks.

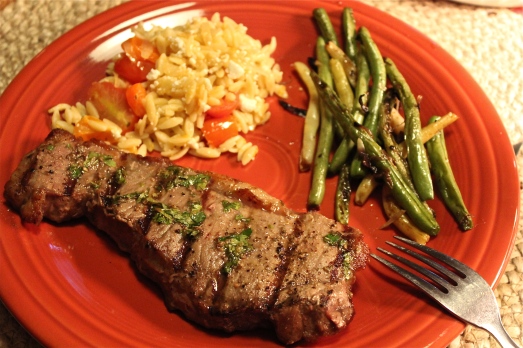
Serving suggestion:   grilled steak with chimichurri sauce, grilled green beans, and orzo with tomatoes and shallots.  A glass of Merlot would be a nice  accompaniment this mighty fine meal.

The perfect meal.

The perfect meal.

GRILLED STEAK WITH CHIMICHURRI SAUCE

Yield:   Serves 4

Ingredients:

  • 4 small steaks, such as sirloin, rib-eyes, strip, or T-bones
  • For the sauce:
  • 1/4 cup mixed chopped fresh Italian flat-leaf parsley and cilantro leaves
  • 1 teaspoon dried oregano
  • 3 cloves garlic, finely minced
  • 1/2 teaspoon red pepper flakes
  • 1/2 teaspoon kosher or sea salt
  • 1/4 teaspoon freshly ground black pepper
  • 1/3 cup virgin olive oil
  • 1/4 cup red wine vinegar

Directions:

1.  Make the sauce:  In a medium bowl, whisk together the sauce ingredients.  Brush some sauce on both sides of the steaks. Set the remaining mixture aside to serve with the steaks.

2   Prepare the grill:  preheat to medium-high.

3.  Place the steaks on the grill grates, and grill for 5 minutes per side for medium-rare  and 6 minutes per side for medium.  Remove from the grill and serve, or cover with foil to keep warm while any other items finish cooking.

IMG_8103


SOURCE:  Week Night Grilling with the BBQ Queens.


Apple Pie Biscuits


Apple Pie Biscuits

Apple Pie Biscuits


Baking is all about sharing.   Sharing the recipes, sharing techniques, and most definitely, sharing what you’ve made.

Today’s offering is all about the most divine biscuits, perfect for the early fall weather we are having here in the Northeast.  I couldn’t wait to share them with you.

IMG_8093

Apple picking time is upon us, or you may be getting yours at the farmer’s market or grocery store.  Apples and pumpkin are probably the two favorites to include when baking in the fall.  So in the coming weeks expect to see a variety of offerings featuring these two ingredients.  Today  it’s apples!  🙂

This recipe uses self-rising flour as an ingredient.  I like to use King Arthur’s Self-Rising Flour.  It’s wonderfully light and includes non-aluminum baking powder and salt.  It’s absolutely perfect for biscuits, pancakes and muffins.  I always have a bag of it in my kitchen because I can guarantee fluffy perfect results whenever I use it.

APPLE PIE BISCUITSIMG_8073

Yield:   12 biscuits

Ingredients:

For the apples:

  • 1 baking apple (such as Fuji, or Gala), peeled, cored and sliced very thin
  • 2 tablespoons unsalted butter
  • 1 teaspoon cinnamon
  • 2 tablespoons packed brown sugar

For the biscuits:IMG_8080

  • 2 cups self-rising flour
  • 1/4 cup cold unsalted butter, cut into small pieces
  • 2 tablespoons granulated sugar
  • 2/3  to 3/4 cup cold buttermilk

For the topping:

  • 1 egg, beaten
  • 2 tablespoons granulated sugar
  • 1/2 teaspoon ground cinnamon
  • pinch of salt

Directions:

1.  Place an oven rack in the center of the oven and preheat the oven to 425*F.  Line a baking sheet with parchment paper and set aside.

2.  Prepare the apples:  Place butter in a medium skillet over medium heat to melt.

IMG_8075


Add the apple slices, cinnamon, and brown sugar.

IMG_8076


IMG_8078

Toss with a wooden spoon until all of the apples are coated and the sugar is melted over the apples, about 2 to 4 minutes.  The mixture will be warm and glossy, but the apples won’t be cooked through.  Remove from the heat and set aside.

IMG_8079

3.  Make the biscuit dough:  Place flour in a medium bowl and add the cold butter pieces.  Using your fingers or a pastry cutter, quickly break down the butter into the flour.  Some of the butter bits will be the size of oats, some the size of small peas.  Stir in the granulated sugar.

IMG_8081

4.  Create a well in the center of the flour mixture and add 2/3 cup buttermilk.  Stir the mixture together until it is well moistened and holds together well.  Biscuit dough should be soft and moist.  Add the remaining buttermilk as needed.

A shaggy dough that doesn't quite come together.

A shaggy dough that doesn’t quite come together.

5.  Use regular all-purpose flour to generously dust a work surface.Turn the dough out onto the floured surface and use your hands to gather it into a ball and gently pat it into a small rectangle.   Use a rolling pin to gently roll the dough into a rectangle that is 1/2 inch thick, and about 7 x 10-inches.

IMG_8084

6.  Arrange cooled apples in a single layer over half of the rolled out biscuit dough.

IMG_8085

Fold the bare side of the dough over the apples and gently press the edges to seal in the apples.  Use your hands to nudge/ encourage the dough into a 6 x 8-inch rectangle if the edges are looking a bit rounded.

IMG_8086

7.  Use a sharp knife to slice the dough into a total of 12 biscuits.  Flour the knife a bit if it gets too sticky.  Use a spatula to place each biscuit onto the prepared baking sheet, about 2-inches apart.

IMG_8087

8.  In a small bowl, whisk together sugar for topping, cinnamon, and salt.  Brush each biscuit top with beaten egg and sprinkle generously with the cinnamon sugar mixture.

IMG_8088

9.  Bake for 12 to 14 minutes until the biscuits are risen and golden brown.  Remove from the oven and serve warm, or cool completely before storing in an airtight container.

IMG_8091

  Biscuits are best served the day they are made or the day after.  They may be rewarmed in the microwave.

IMG_8094

Tender and  light….you won’t be able to stop at just one!


SOURCE:   Joy the Baker

Avocado and Tomato Grilled Cheese Sandwich

Avocado and Tomato Grilled Cheese Sandwich

Avocado and Tomato Grilled Cheese Sandwich

I thought I heard someone singing  just outside my back door while I was making these sandwiches for lunch.

She wasn’t the best singer in the world, but ya got to hand it to her, she was brave.  I’m sure if I had the nerve to sing outside in public, I’d be less than average, too.  But a lot of times it’s more about guts than anything else when it comes to singing.  You just have to step out there and mean it.  That’s what it takes. ( Not that I would really know, but that’s what I’ve heard, anyway.)

I felt that way when I stepped into the kitchen around noon on a Saturday, and started pulling ingredients out of the refrigerator for lunch.  It takes guts to make something you’ve never made before, but I’ve had every intention of making these sandwiches for a long time now.  I think that’s called procrastination, or making excuses like I’m missing one of the necessary ingredients.   Sometimes the best plans take time to activate.  Yep, that’s what it takes;  intention, plans, and guts.  I’m telling you, it’s real.

IMG_7961

The idea that was floating around in my head was to put avocado into a grilled cheese sandwich.  I was imagining an irresistible gooeyness, but realized that it needed something else to contrast with all that richness, so I included firm, ripe tomato slices.  Tomatoes that are not overly ripe work best, so they don’t give off too much juice as they grill.  A leap of faith is what it was,  but one that turned out to be right on the money.    Whoo-Hoo!

This is a sandwich to make when you want to impress someone with your culinary skills!


AVOCADO AND TOMATO GRILLED CHEESE SANDWICHES

Yield:  Makes 4 sandwichesIMG_7959

Ingredients:

  • 3 ounces white cheddar cheese, shredded (about 3/4 cup) or any other cheese of choice
  • 8 slices seedless rye bread
  • 8 tomato slices
  • 1 ripe peeled avocado, cut into thin slices
  • 1/4 tsp. salt
  • 1/4 tsp, black pepper
  • cooking spray

Directions:

1.  Sprinkle 3 tablespoons cheese over each of 4 bread slices.  If using sliced cheese, use 2 slices.  Top each with 2 tomato slices.  Arrange avocado slices evenly over tomato slices.  Sprinkle with salt and pepper.   (In place of salt and pepper, I often use Penzey’s Sandwich Sprinkle for an added flavor boost.)

IMG_7958

2.  Top with remaining 4 bread slices.  Lightly coat outsides of sandwiches with cooking spray.

3.  Heat a grill pan (or panini pan) over medium heat.  Place sandwiches in pan; cook 3 minutes on each side or until bread is toasted and well marked and cheese melts.  Cut each sandwich in half and serve immediately.

IMG_7960

IMG_7963


SOURCE:    A Carolyn Original


Spiced Shrimp with Peach Salsa

Spiced Shrimp with Peach Salsa

Spiced Shrimp with Peach Salsa

Back in the spring our church had a goods and services auction as a fund raiser.  A friend and I got together and offered a catered dinner for up to 6 people.   Two couples teamed up and bid on it, winning the bid.  The date chosen for the dinner was this past weekend.   We had a lot of fun planning the menu, shopping, cooking and then serving the meal.   This was so rewarding, and a great way to help out our church.

The menu we served consisted of several dishes that I have already featured here on the blog with the exception of this shrimp appetizer.  The recipe for it follows below.  The full menu was as follows:

Appetizers

IMG_0299

Garlic- Herb  Cucumber Bites

IMG_0170

Spiced Shrimp with Peach Salsa

Salad

Baby Greens with fresh pears, grapes and pistachios

and honey-balsamic dressing

warm rolls and herb dipping oil

IMG_0173

Entree

Greek Style Chicken Breasts with Herb Rice Pilaf

IMG_7176

Desserts

Jamocha Silk Pie

with whipped cream topping

IMG_4884

Fresh Pear Galette

IMG_0168

SPICED SHRIMP WITH PEACH SALSA

Yield:  Serves 8

Ingredients:

     Peach salsa:

  • 3  1/2 cups coarsely chopped peeled peaches   (nectarines may be used, but don’t bother peeling them)IMG_8033
  • 1 cup coarsely chopped red bell pepper
  • 1 cup coarsely chopped green bell pepper
  • 1/3 cup coarsely chopped red onion
  • 1 jalapeño pepper, seeded and chopped
  • 1/4 cup fresh cilantro leaves
  • 1 Tbsp. lime juice
  • 1/4 tsp. salt


Shrimp:IMG_8037

  • 1/4 tsp. salt
  • 3 tsp. brown sugar
  • 2 tsp. ground cumin
  • 1/2 tsp. chili powder
  • 1/4 tsp. black pepper
  • 1  1/2 pounds large shrimp, peeled and deveined
  • 1 Tbsp. olive oil

Directions:

1.  To prepare salsa,  place all the salsa ingredients in a food processor, pulse 8 times.  Set aside.   If the bowl of your processor does not hold all the ingredients, divide in half and process in two batches,  adding the lime juice and salt to the combined batches at the end.

IMG_8035

IMG_8036

2.  To prepare shrimp, combine salt, sugar, cumin, chili powder, pepper, and shrimp in a large bowl or zip-lock bag.  Toss gently to coat.  Heat oil in a large nonstick skillet over medium-high heat.  Add shrimp mixture; sauté  4 minutes or until shrimp are done.  Serve with peach salsa.

IMG_0169


SOURCE:    A Carolyn Original

Three Cheese Zucchini Stuffed Lasagna Rolls

Three Cheese Zucchini Stuffed Lasagna Rolls

Three Cheese Zucchini Stuffed Lasagna Rolls

It’s a good weekend for pasta.   You know how I know?   Every weekend is a good one for pasta.

That was easy!!

If there’s a reading nook and a good book involved in the weekend pasta plans….I’m there.

Seriously, though, there are some really good things happening in this dish of weekend pasta.  It’s the height of summer garden produce, so we’re taking full advantage of …..wait for it….. zucchini!!!    (again)

IMG_7944

This time it’s mixed with ricotta and Parmesan cheeses and stuffed into lasagna rolls that are then  topped with marinara sauce and mozzarella cheese–delicious, kid friendly, and kind to waist watchers.  You can make them a day ahead and refrigerate, or if you like to cook for the week(s) ahead, they are freezer-friendly.  This is a great recipe to make double of and share with someone in need, they’ll thank you!  (BTW they are vegetarian also, perfect for Meatless Mondays!)IMG_7947

By now you’ve discovered that these roll-ups are another way to use zucchini.  I’ve been thinking about lasagna a lot lately, but instead of making the traditional lasagna, these rolls are so much easier to make and they’re great for portion control.  I have made this same recipe using spinach in the filling, but when my neighbor brought me some zucchini from her garden I thought I’d try out this zucchini version instead.  These turned out so good;  light, not too filling but very flavorful.  I’m so glad that I have yet another way to use zucchini.

IMG_7946

If you plan to freeze these, you can freeze them individually in ziplock bags or freeze them as a finished dish ready for the oven.  You can also freeze any that you’ve baked, but didn’t finish eating.

THREE CHEESE ZUCCHINI LASAGNA ROLLSIMG_7933

Yield:   Makes 8 servings  @  240 cal./servings

Ingredients:

  • 8 lasagna noodles, cooked al dente
  • 1 tsp. olive oil
  • 3 cloves garlic, minced
  • 2 medium zucchini ( 7 oz. each), grated and squeezed dry
  • 1 cup + 2 tbsp. part skim ricotta cheese
  • 1/2 cup grated Parmesan cheese
  • 1 large egg
  • 1/2 tsp. salt
  • black pepper
  • 1  3/4 cups Marinara sauce
  • 1/2 cup part skim mozzarella cheese, shredded
  • fresh basil for garnish, (optional)

Directions:

1.  Preheat oven to 350*F.  Lightly grease or spray a 13 x 9-inch baking dish.   Ladle about 1 cup of sauce onto the bottom of the baking dish and set aside.

2.  In a medium nonstick skillet, saute garlic and olive oil over medium heat for about 1 minute;  add zucchini, salt and pepper to taste and cook about 4 -5 minutes, until soft.

Sauté garlic and zucchini till soft.

Sauté garlic and zucchini till soft.

3.  In a medium bowl, combine the zucchini, ricotta cheese, Parmesan cheese, egg, salt and pepper.  Stir to mix well.

Mix ricotta with the zucchini, Parmesan and egg.

Mix ricotta with the zucchini, Parmesan and egg.

4.  Lay out the lasagna noodles on a clean work surface.  Pat noodles dry with paper towels.  Spread about 1/3 cup filling evenly over each noodle.

Spread each noodle with 1/3 cup filling.

Spread each noodle with 1/3 cup filling.

Roll carefully and place seam side down into peppered baking dish.  Repeat with remaining noodles.

IMG_7941

5.  Ladle the remaining sauce over the lasagna rolls and top each one with 1 Tbsp. mozzarella cheese.

Ladle on more sauce and mozzarella cheese.

Ladle on more sauce and mozzarella cheese.

Cover dish with foil and bake for about 40 minutes or until the rolls are heated through and the cheese is melted.  Top with fresh basil if desired and serve hot.

IMG_7945

IMG_7948


SOURCE:   Skinny Taste

(Healthy) Peanut-Butter Cookies

Cookies packed into lunch boxes, cookies as after school snacks, cookies for anytime that urge for a sweet takes over.  Today we are making back to school cookies that are as “healthy” as I can make them after several attempts to take them from “big and bad” to “big and (almost) good for you”.  I really wish I could do something about eliminating those darn calories!!

We like our cookies really big around here.  I’m talkin’ Peanut Butter Cookies, here.   I like my peanut butter cookies to be really BIG. Big in diameter and big in thickness.  Thin little peanut butter cookies just don’t do it for me.  They need to be so  big that  two people can share one cookie and be satisfied with their half of it.

Are you wondering where I could have had such a cookie?  At a local Cider Mill near where I live.  Every Fall Mr. D. and I go for a ride to view the Fall foliage, and we stop at the cider mill to get apples, cider and a cookie.  Yep, just one, and we share it.  That cookie is my ideal where peanut butter cookies are concerned,  and I keep playing around with recipes trying to duplicate it.  The cookie recipe I’m presenting here comes pretty close, but they are still not quite thick enough.  I need to keep working on getting that right, but in the mean time  these are very good indeed.

First, are they chewy inside?  Check.  Are they really big?  They can be as big as you care to make them.  Are they crunchy?  Check,  I used chunky peanut butter.  How healthy are they?  Pretty healthy, really.  I used whole wheat flour for fiber (which you would never know if I didn’t tell you),  honey for some sweetness, that allowed me to cut back on the sugar, and only 4 Tablespoons of butter.  The remaining fat comes from the peanut butter and I used an “all natural” brand, so no corn syrup or other added stuff.  I used a 1/4 cup cookie scoop to measure out the dough.  The cookies spread while baking and puff up, but flatten out some as they cool so you get that chewy interior.

HEALTHY PEANUT-BUTTER COOKIES

YIELD:   about 20 cookies

INGREDIENTS

  • 1/3 cup granulated sugar
  • 1/2 cup packed brown sugar
  • 1/2 cup all natural peanut butter
  • 1/4 cup (4 Tbs.) butter, softened
  • 1 egg
  • 2 Tablespoons honey
  • 1  1/4 cup whole wheat flour ( I used white whole wheat)
  • 3/4 teaspoon baking soda
  • 1/2 teaspoon baking powder
  • 1/4 teaspoon salt
  • additional sugar for sprinkling on top

PREPARATION

1.  Preheat oven to 375 degrees.  Line two cookie sheets with parchment paper.

2.  In a large mixer bowl, beat together the sugar, brown sugar, butter and peanut butter on low speed until well mixed.  Beat in honey and egg until well blended.

3.  Beat in as much flour as you can, then stir in the rest with a wooden spoon to create a smooth dough that is quite thick.

Ready for the oven.

4.  Measure out dough using a cookie scoop,  or form the dough into balls (about 1 1/2 inch).  Place on cookie sheets about 3 inches apart.  Flatten with a fork to form a crisscross pattern.  Sprinkle lightly with additional sugar.

Freshly baked, just out of the oven.

5.  Bake 7 to 9 minutes or until lightly browned. If cookies are really large, you may need an additional 1-2 minutes. Cool for 1 minute and remove from cookie sheets to cooling racks and cool for another 15 minutes.


If any of you know how to make these thicker while keeping their size, please share your secret with me.  I’m aiming for the kind of thick cookie you can get in a bakery.  Thanks, readers.

SOURCE:   This recipe is several adaptations removed from the recipe my mother used to bake.

Soup’s On


A pot of soup for a cool fall evening.

A pot of soup for a cool fall evening.

With Fall just a few short weeks away, and school back in session, many of you (me included) are thinking about warm bowls of soup for cool autumn evenings.  Soups can be the main course or served as a starter.  Making a pot of delicious soup is easier than you may think with prepping being the most time consuming aspect of the whole thing.

Those of you who have been reading this blog for a while are familiar with the fact that I’m a soup lover, and have produced quite a number of them to share in this space.  New readers, however, may have missed seeing some of them, so today I’m going back into the recipe files and pulling up some of those nice warming bowls of soup for you to review.

With so many vegetables available now, make sure you use the freshest ingredients you can get and also be sure to include grains, pasta and beans for great variety.  Originally soup was made up of anything that was left over, so don’t be afraid to toss in bits and pieces and get creative with your leftovers!

IMG_0434


Bacon and Corn Chowder

IMG_6088

Broccoli-Cheddar Soup

IMG_1550

Butternut Bisque

IMG_0566

Fall Minestrone Soup

IMG_5743

Mexican Ham and Bean Soup

IMG_5149

Tomato Curry Soup

IMG_5394

Tuscan sausage and bean soup

BLT Pizza

BLT Pizza with White Sauce

BLT Pizza with White Sauce

All the world seems to love bacon.  Although I am not really a bacon fanatic, I do love a good BLT sandwich, so the thought of enjoying all the flavors of the classic sandwich in the form of a pizza seemed fantastic.  I wish I had thought of it myself.   I knew that I had an open package of bacon from our favorite meat shop in the fridge, and some fresh ripe tomatoes from our local farm stand.  I also had a package of arugula and baby greens intended for a salad, so the moment I saw this pizza, I knew it was meant to be.

IMG_7855

This turned out to be so good I thought about it for days afterwards.   Mr. D. says it’s the best pizza I’ve ever made.  All the components of your favorite sandwich are here including the mayonnaise.  By adding some oil to the mayo it makes a creamy sauce that is used to fully cover the dough and gives a richer taste to the pizza.   We both enjoyed this pizza so much that I know that I’ll be making this one again and again.   It’s a keeper!

BLT PIZZA WITH WHITE SAUCE

Yield:   1 10-inch pizza

Ingredients:

  • 1 pound ripe tomatoes, seeded and cut into 1/4-inch-thick slices
  • 1 teaspoon dried oregano
  • 1/2 teaspoon black pepper
  • 1/4 cup mayonnaise
  • 1 tablespoon extra-virgin olive oil
  • 1 tablespoon minced fresh chives, or green onions (tops only)
  • 2 garlic cloves, grated, or finely minced
  • 4 center-cut slices lean bacon
  • 1 pound fresh pizza dough
  • 1 tablespoon cornmeal
  • 2 ounces part-skim mozzarella cheese, shredded
  • cooking spray
  • 1 cup baby arugula
Roast tomatoes, cook bacon, prepare sauce.

Roast tomatoes, cook bacon, prepare sauce.

Directions:

1.  Preheat oven to 400*F.  Place a pizza stone in the oven to preheat.  (If you don’t have a pizza stone, use a round or flat baking sheet)

2.  Arrange tomato slices on a piece of parchment paper;  sprinkle with oregano and pepper. Place on a baking sheet or pizza stone, and bake for 20 minutes or until tomatoes are no longer wet.  Remove tomatoes and and allow to cool slightly while you make the sauce and prepare the dough.

3.  Combine mayonnaise, oil, chives, and garlic in a small bow.

4.  Cook bacon in a skillet over medium heat until crisp;  drain on paper towels.  Break into pieces.

5.  Increase oven temperature to 450*F.  Using floured hands, pat dough into a 10-inch circle.  Place on the baking sheet or pizza stone that has been sprinkled with corn meal.  Pierce dough with a fork; transfer to preheated oven.  Bake at 450*F for 5 minutes.

6.  Carefully remove from the oven.  Brush mayonnaise mixture over crust, leaving a small border;   top with tomatoes.

Cover crust with mayo mixture then top with tomato slices.

Cover crust with mayo mixture then top with tomato slices.

Sprinkle with bacon and cheese; coat crust edges with cooking spray.

Add bacon and cheese next.

Add bacon and cheese next.

IMG_7853

7.  Bake 10 minutes or until cheese melts and crust browns.  Before serving top with arugula.  Cut into 8 wedges.

A BLT on a pizza--the best of both.

A BLT on a pizza–the best of both worlds.


SOURCE:   Cooking Light

Cherry Almond Ricotta Drop Scones

Cherry Almond Ricotta Drop Scones

Cherry Almond Ricotta Drop Scones

Knowing what to eat for breakfast when you are dancing in a competition is difficult.  It’s important to eat foods for energy, but equally important  to avoid foods that will make you feel full or sluggish.  In any hotel a full breakfast is always available, but it is not my habit to partake of them.  Instead I usually bring along simple foods that I can eat quickly with some coffee while I am getting ready.

IMG_7928

These scones  were the ones I made to take along on my trip.  They met my requirements for easy to eat, nutritious, low in fat, and a good source of energy.

Most scones fall into one of two categories:  the English version which is very dry and crumbly, a platform for slathering on jam and clotted cream; or the Americanized version that folds the cream directly into the batter, along with a hefty measure of butter and sugar.  Either way you’re starting your day with about 500 calories, and that’s way too much for me.  So I was on the hunt for a recipe for a lightened up scone that would still provide a fruity, whole-grain, buttery  biscuit.   I found it in this recipe.

IMG_7929

The key is part-skim ricotta cheese.  It has a richness similar to that of whipping cream with a fraction of the fat.  Whole wheat pastry flour is worked in, and some of the butter is replaced by heart-healthy canola oil for scones that bake up light and fluffy.  Dried cherries are plumped up in orange juice for a flavor boost, and nutty almonds add crunch.  If you wish you can use half the ricotta, whipped with vanilla and citrus zest, to dollop on the freshly baked scones in place of clotted cream or butter.   I felt that having one of these crumbly, cake-like biscuits early in the day got me off to a good start.

CHERRY ALMOND RICOTTA DROP SCONES

Yield:  Makes about 10 sconesIMG_7912

Ingredients:

  • 1/2 cup dried tart cherries
  • 1/4 cup fresh orange juice
  • 1 cup part-skim ricotta cheese
  • 1/4 cup packed brown sugar, divided
  • 1 tsp. grated orange rind
  • 1 tsp. vanilla extract
  • 1/3 cup plus 1 tbsp. fat-free buttermilk, divided
  • 2 tbsp. canola oil
  • 4.5 ounces whole-grain pastry flour (about 1 cup)
  • 3.4 ounces unbleached all-purpose flour (about 3/4 cup)
  • 1 tbsp. baking powder
  • 1/2 tsp. salt
  • 4 tbsp. cold unsalted butter, diced
  • 1/3 cup sliced almonds, toasted
  • 1 large egg, lightly beaten

Directions:

1.  Preheat oven to 425*F.   Line a baking sheet with parchment paper.

2.  Combine cherries and juice in a small microwave-safe bowl.   Microwave at HIGH 1 minute; let stand 5 minutes.  Drain;  discard liquid.  Finely chop cherries.

3.  Combine ricotta cheese, 1 tablespoon sugar, rind, and vanilla in a medium bowl.  Reserve 1/2 cup of the ricotta mixture.  Add 1/3 cup buttermilk and canola oil to remaining ricotta mixture, stirring until smooth.

Combine vanilla and orange zest with ricotta cheese.

Combine sugar, vanilla and orange zest with ricotta cheese.

4.  Weigh or lightly spoon flours into dry measuring cups;  level with a knife.  Combine flours, remaining 3 tablespoons sugar, baking powder, and salt in a large bowl; cut in butter with a pastry blender or 2 knives until mixture resembles coarse meal.

Cut in butter with a pastry blender.

Cut in butter with a pastry blender.

Add cherries and almonds; toss.  Add buttermilk mixture; stir just until combined.

5.  Drop dough by 1/4 cupfuls 3-inches apart onto the prepared baking sheet.  Combine egg and remaining 1 tablespoon buttermilk, stirring with a whisk.  Gently brush top and sides of dough with egg mixture.

Brush tops with buttermilk-egg mixture.

Brush tops with buttermilk-egg mixture.

Bake at 425*F. for 15 to 16 minutes or until golden.  Remove from the pan and cool slightly on a wire rack before serving.

Bake till golden brown.

Bake till golden brown.

6.  Beat the reserved ricotta mixture at medium speed 3 minutes or until fluffy.  Serve with warm scones.

IMG_7927

IMG_7930


As a finale to this recipe, I’m including here the photos I’ve been waiting for that show me dancing rhythm dances.  This costume has a lot of fringe that moves with the dancing, and shows the judges that you are using your hips correctly.  This will be the end of my show and tell about the competition,  I promise.

GRN1415_143511-(ZF-0011-31094-1-004)

GRN1415_142059-(ZF-0011-31094-1-003)


GRN1415_132836-(ZF-0011-31094-1-001)


SOURCE:  Cooking Light