Spinach Artichoke Bread

Spinach Artichoke Bread

Spinach Artichoke Bread

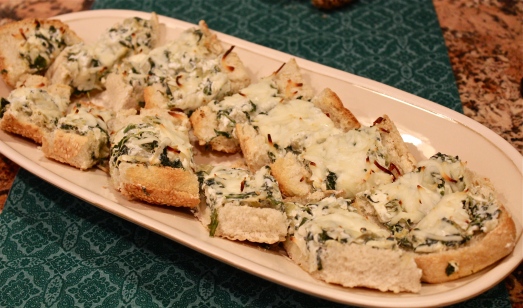
In my experience one of the most popular appetizers around is hot spinach dip, or a combination of spinach and artichoke dip.  Hot, cheesy, gooey spinach dip.  Oh yes,  addictively delicious with crackers or chips.

Since we would be sitting at a table with a plate onto which we could place our appetizers, I thought that in place of crackers or chips I would use bread to do two things;  add more substance, and provide a larger surface to carry all that lucious dip.  So this recipe seemed like the perfect solution.

This is great for parties, or could be used as a snack or light lunch, which is what we did with the leftovers.  Wrapped in foil and reheated in a warm oven, they were as good as new.

IMG_6011

 SPINACH ARTICHOKE BREAD

Yield:   12  servings

Ingredients:

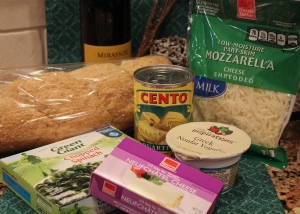
  • 8 oz. cream cheese, softened ( low-fat is OK)

    Only low-fat ingredients allowed!  :D

    Only low-fat ingredients allowed! 😀

  • 3/4 cup (6oz.) plain, nonfat Greek yogurt
  • 1 pkg. frozen chopped spinach,  defrosted and well drained
  • 12 oz. can artichoke quarters, in water, drained
  • 1 tsp. onion powder
  • 1 tsp. garlic powder
  • 1 tsp. salt
  • 1/2 cup shredded mozzarella cheese, divided
  • 1/4 cup shredded Parmesan cheese
  • 4 French rolls, or 2 French baguettes

Directions:

1.  Preheat oven to 375*F

2.  With an electric mixer, beat cream cheese until smooth.  Add yogurt, continue mixing until smooth.

3.  Chop artichokes, and squeeze out spinach to remove excess liquid.  Add to cheese-yogurt mixture.  Add onion powder, garlic powder, salt, 1/4 cup mozzarella and Parmesan.  Fold well to incorporate into a uniform mixture.

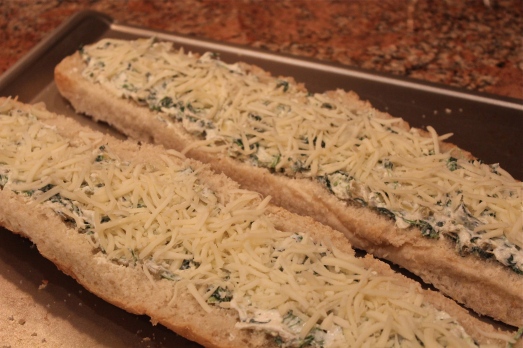
4.  Cut the French bread in half.  Slightly hollow each half by removing some of the bread from the middle.  Fill with the spinach-artichoke mixture and level the filling.  Sprinkle with the remaining mozzarella.

Breads filled and ready for the oven.

Breads filled and ready for the oven.

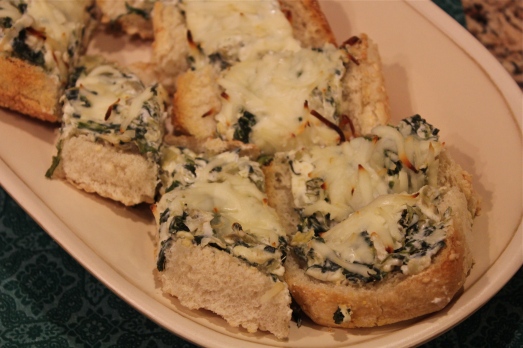
5.  Place the loaves on a baking sheet.  Bake for 15 – 20 minutes, until filling is bubbly and the cheese on top is browned slightly.  Allow to cool for several minutes before slicing and serving.

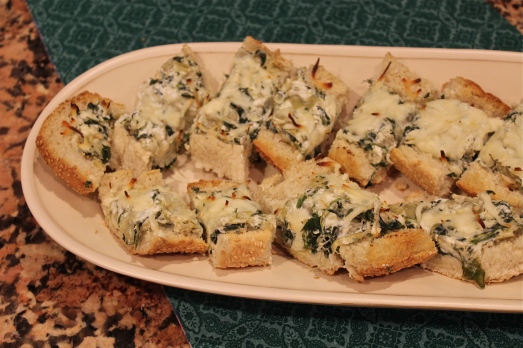
The bread gets toasty, and the filling gets melty and warm.

The bread gets toasty, and the filling gets melty and warm.

IMG_6012

SOURCE:   Happier Holidays Recipe Book

Baked Brie Bites

Baked Brie Bites

Baked Brie Bites

Christmas Day was fast approaching and we (my family, who we were visiting, and I) were planning a big meal, so for Christmas Eve. we decided to make a meal out of just appetizers.   We each made a couple, and there was a nice variety.

Awesome !!

Awesome !!

Since appetizers are useful at any time, but especially now with New Year’s Eve coming up, I thought you might be interested in what we had.  The major requirement was that they be pretty simple to prepare and, of course, delicious to eat.

Steamed shrimp with cocktail sauce

Cocktail meatballs in barbecue sauce

Spinach Artichoke Bread*

Cheese Stuffed Mushrooms

Baked Brie Bites*

Hot cider with Honey Liqueur

The starred items were my contributions, so you will find recipes for them here today and tomorrow.

Brie cheese pairs so well with fruit, and this particular mixture of apples, walnuts, bacon and orange is an outstanding combination.  Each one is topped with a cranberry, making them festive and cute.  They can be eaten with your hands and each one is just a bite or two.  These are the perfect option for a snack or to take along to a party.  They will definitely be a crowd pleaser.  Once you taste them, you will be making them time and time again.  Socks optional because they will be blown off!

IMG_6017

BAKED BRIE BITES WITH CRANBERRIES

Yield:   Makes 24 bites

Ingredients:

Get all the ingredients ready.

Get all the ingredients ready.

  • 2 Tbsp. unsalted butter
  • 1 orange, zested and juice reserved
  • 2.5 oz. pkg. real bacon bits
  • 1/2 cup chopped walnuts
  • 1/2 cup chopped apple
  • 1 tsp. ground cinnamon
  • 3  Tbsp. brown sugar
  • 2  8-oz. pkgs. Crescent Rolls
  • cooking spray
  • 8 0z. Brie cheese round
  • dried cranberries

Directions:

1.  Preheat oven to 375*F.  Coat 2 mini muffin pans with cooking spray.  (or use 1 large pan with 24 cups)

2.  In a small saucepan, melt butter.  Add orange juice, bacon bits, walnuts, apple, cinnamon and 3 tablespoons broan sugar.  Cook over medium-high heat, stirring frequently, until sugar has dissolved and apples begin to brown, 3 – 5 minutes.  Remove from heat and stir in orange zest.  Allow this mixture to cool a bit while you prepare the dough and cheese.

Cooking up the apple mixture.

Cooking up the apple mixture.

3.  Unroll crescent rolls and pinch together seams to create 1 large sheet with each package of dough.

Pinch the seams together to make one square of dough.

Pinch the seams together to make one rectangle of dough.

Cut each rectangle into 12 squares.  Place a square of dough in each muffin cup.

Put a square of dough in each cup and add a piece of brie.

Put a square of dough in each cup and add a piece of brie.

4.  Cut brie into 24 pieces and place in the center of the dough squares.  Top with apple walnut mixture.

Top with some apple mixture.

Top with some apple mixture.

Bring edges of the dough to the center and pinch to create a seal.  Place one dried cranberry in the center of each bite.

Fold each one closed and center a cranberry on top.

Fold each one closed and center a cranberry on top.

5.  Bake for 10 minutes or until golden brown.   Serve warm.

IMG_6019

SOURCE:    Happier Holidays Recipe Book

Onion Chicken in Balsamic Sauce

Onion Chicken in Balsamic Sauce

Onion Chicken in Balsamic Sauce

It’s been snowing here all day and the inches are accumulating.  A good day for staying indoors.  My oven was already warmed up from having baked a dessert, so I decided to put together a meal that would be mostly cooked/baked in the oven with only a short period on the stove top for some pre-browning.  I love it when the whole meal is in the oven, and I can set the table and relax while its cooking, don’t you?

This chicken dish was served with stuffed acorn squash.  I thought that chicken would be good with the squash, but wasn’t sure how I wanted to prepare it, so I went looking on the all recipes.com web site and came up with this recipe.  Everyone who had made it rated it very highly for ease of preparation and outstanding flavor.  So I decided to give it a try.  I’m sure glad I did, because I have joined the ranks of all those other folks who made it and loved it.  Although I was missing one of the ingredients, I substituted roasted red peppers for the sun-dried tomatoes with equally tasty results.  I don’t think that I would ever have made a sauce from chicken broth and balsamic vinegar, but here it works and the aroma of this dish while it’s cooking will certainly get your taste buds salivating.

Roast red peppers were a tasty addition.

Roast red peppers were a tasty addition.

ONION CHICKEN IN BALSAMIC SAUCE

Yield:  serves 2  Adjust amounts accordingly to serve more.

Ingredients:

  • 1 Tbsp. olive oil
  • 1 onion, chopped
  • 1 chicken leg quarters
  • 3 cloves garlic, chopped
  • 1  1/2 cups chicken stock
  • 1/2 cup balsamic vinegar
  • 1/2 cup chopped sun-dried tomatoes
  • salt and pepper to taste

Directions:

1.  Preheat oven to 350*F.   Lightly spray a 9-inch baking dish or 13 x 9-inch pan.

2.  In a large skillet, heat oil over medium heat.  Add onion and reduce heat to low.  Allow onion to caramelize, stirring only enough to prevent sticking and to be sure that all sides are fully cooked.  Add garlic and sauté briefly.  Transfer to prepared baking dish.

3.  Increase heat to medium.  Add chicken pieces to skillet and brown on both sides.  Remove chicken and place in baking dish.

Pre-browning the chicken before baking.

Pre-browning the chicken before baking.

4.  Combine the chicken stock and vinegar.  Deglaze the skillet with this mixture, then bring to a boil and continue to simmer, stirring occasionally, until the mixture has thickened.  Add in the sun-dried tomatoes, or in this scenario, roast red peppers.  Pour mixture over chicken.  Cover dish tightly with foil and bake in the preheated oven for 45 – 50 minutes, or until chicken is cooked through and juices run clear.

This chicken went very well with the stuffed squash.

This chicken went very well with the stuffed squash.

Note:  Some modifications can be made to this recipe such as using chicken breasts or thighs instead of leg quarters, add sliced mushrooms to the onion/garlic mixture, serve over pasta of some sort to take advantage of the great sauce.  These are all suggestions by others who made this dish.

SOURCE:   Allrecipes.com

Slow-cooked Ragu

Slow-cooked ragu served over cheese-filled ravioli.

Slow-cooked ragu served over cheese-filled ravioli.

My slow cooker has been a life saver during the past couple of weeks.  I call it “Old Faithful” because I’ve had it for a long time and it just keeps on going and going, working for me, while I’m busy attending to other things.  On those days when I planned on baking several batches of cookies, I would get something started in the slow cooker early in the day, then not worry about dinner except for some finishing touches.

Maybe, like me, you’ve had some disappointments using a slow cooker.  Rather than getting an entree that’s luscious and tasty, it emerged rather tired, defeated and exhausted.  Unless you are following a recipe specially written for a slow cooker that can happen because of the added moisture that a slow cooker/crockpot produces.  Meat can also become dried out and stringy instead of tender due to overcooking.  So how do we solve those problems?   First I’ll talk about the four main ingredients, then I’ll give you a recipe for a well-seasoned meat sauce – a ragu- that you can use in a variety of ways.

1.  Meats:  For the slow cooker, select meats with a moderate amount of fat or internal marbling, such as chuck roast or pork shoulder.  For poultry that is immersed in liquid, try to keep cooking time to about 4 hours; longer than that you will get dry stringy remnants.

2.Vegetables:  Only hearty vegetables like root vegetables can survive 8 hours in a slow cooker and they need to be cut into large pieces, not bite-sized.  Place them in the bottom of the cooker with meat and sauce or liquids poured over the top.  Other vegetables, like tomatoes, will stew down nicely and become sauce-like.  Tender, more delicate vegetables like green beans, corn, squash, and greens should be added in the last 30 minutes of cooking time.

3.  Seasoning:  If a recipe calls for 1 teaspoon of oregano, use 2.  Slow cookers have a funny way of diluting flavor so you will need to add more at the start.  When converting a conventional recipe for the slow cooker, double the amount of herbs or spices you think you need, even ones that are intense, like crushed red pepper.

4.  Garnishes:   When something looks good, it seems to taste better, so sprinkling a fresh garnish onto a completed dish is an easy way to bring the meal to life.  Try using fresh herb leaves or sprigs, or ingredients with a crunch like bread crumb topping or crisp chips to contrast with the softer textures of the dish.

The recipe for this meaty sauce is great ladled over any kind of pasta.  I also use it when making lasagna, sometimes thinning it with traditional spaghetti sauce, and it makes the dish more hearty with veggies.  It makes a large quantity and leftovers freeze well.

SLOW-COOKED RAGU

Yield:  Makes about 12 ( 2/3) cup servings

Ingredients:

  • 2 ounces pancetta, chopped.  Use bacon in a pinch.IMG_5942
  • 1 pound ground beef, 90% lean
  • 12 ounces ground pork
  • 1 (4-ounce) hot Italian sausage link, casing removed
  • 1 Tbsp. canola oil
  • 1  1/3 cup diced onion
  • 2/3 cup diced carrot
  • 2/3 cup celery
  • 1/4 cup unsalted tomato paste
  • 2 Tbsp. minced fresh garlic
  • 1/2 cup dry white wine
  • 2 cups unsalted chicken stock
  • 1 (15-ounce) can unsalted crushed tomatoes
  • 1 tsp. salt, divided
  • 1 tsp. ground black pepper
  • 1 bay leaf

Directions:

1.  Place pancetta or bacon in a large skillet over medium-high heat;  cook 4 minutes or until beginning to brown, stirring occasionally.  Add ground beef;  cook 3 minutes or until browned, stirring to crumble.  Place beef mixture in a 6-quart electric slow cooker.

Browning up the beef.

Browning up the beef with bacon.

2.  Return skillet to medium-high heat.  Add ground pork and sausage;  cook 5 minutes or until browned, stirring to crumble.  Add pork mixture to slow cooker.

Browning the pork and sausage.

Browning the pork and sausage.

3.  Return skillet to medium-high heat once again.  Add oil and swirl to coat.  Add onion, carrot, and celery; sauté 4 minutes.

The big three:  onions, carrots and celery.

The big three: onions, carrots and celery.

Add tomato paste and garlic;  Cook 2 minutes, stirring frequently.  Add wine; bring to a boil.  Cook 2 minutes or until wine mostly evaporates, scraping pan to loosen browned bits.  Add chicken stock, tomatoes, 3/4 tsp. salt, pepper, and  bay leaf;  bring to a boil.  Carefully pour this mixture into slow cooker; cover and cook on LOW for 6 hours.  Discard bay leaf.  Stir in remaining 1/4 tsp. salt.

Everything together in the crock pot.

Everything together in the crock pot.

The hands-on time spent in the preparation of this sauce is about 30 minutes.  Then you will need a few minutes before dinner to cook up some pasta.   A great dinner without a lot of your time spent on preparation.  I hope you enjoy it.

Easy meal, yet so good!!

Easy meal, yet so good!!

SOURCE:   The Slow Cooker Recipe Book
Christmas, A Time for Giving

By now many of you know that one of very favorite things to do is read.  I’ve been an avid reader all my life.  But I find that the kinds of books that I read change somewhat with the seasons.  In summer, for instance, I like a good “beach read”.  You know the kind of book I mean:  light, entertaining, and not requiring too much thought.  But as the weather becomes cooler and turns down right cold, I can really get into some serious reading,  something with some weight to it.  Like putting on my winter coat, or snuggling under a heavy blanket.

I’m a hugely sentimental person, but even more so at this time of year.  I feel so incredibly lucky to have so many wonderful people in my life, but come December and Christmas I think a lot about how fortunate we are to have all that we have when so many others may not have even the basic needs that we take for granted;  food, shelter, clothing.

IMG_5996

The book that I have just finished reading brought all this vividly to mind.  The title of the book is An Invisible Thread by Laura Schroff and Alex Tresniowski, and it tells the story of an 11 year old boy who is a panhandler in New York City and a busy sales executive, who met just by chance.  That unlikely meeting had a profound effect on each of them.  The boy is Maurice, who asked her, Laura, for some spare change because he was hungry.  She walked right on by without stopping,  but halfway down the block, she did stop, turned and went back to him, and said, “I won’t give you change, but I will take you to get something to eat.”  That was the beginning of their relationship that continued for many years.

An ancient Chinese Proverb says “An invisible thread connects those who are destined to meet, regardless of time, place, and circumstance.  The thread my stretch or tangle. But it will never break.”  The two people in this book were destined to meet and in doing so, each of their lives was changed.  They continued to meet on a regular basis, having dinner together on most occasions.  Food, cooking and meals are prominent features throughout the book and in these instances Laura teaches Maurice  many things he never had the opportunity to learn because of his chaotic and dysfunctional living conditions.  Getting to know his situation makes her reflect on her own growing up years, often chaotic because of an abusive alcoholic father.

The stories of these two people are often heartbreaking, yet illustrate so well the power each of us has to elevate someone else’s life and how our own life is enriched in the process.

A portion of the royalties from this book is being donated to NoKidHungry, a campaign that aims to end childhood hunger in America, by ensuring all children get the healthy food they need, every day. This campaign has my wholehearted support, so in honor of so many wonderful people in my life and in thanks for all you, my wonderful readers, I will be making a donation to this campaign for Christmas this year.

I urge you all to read this book, and about the NoKid Hungry organization and the work they are doing.  You will never forget it.

Cranberry-Pecan Cinnamon Rolls

Cranberry-Pecan Cinnamon Rolls

Cranberry-Pecan Cinnamon Rolls

In case you are still frantically searching for something to serve on Christmas morning, or for a holiday brunch,  these breakfast rolls are just the ticket.  Easy to make at the last minute, a beautiful cheery color, and divine flavor.  They are a cinch to put together.  No yeast dough, no kneading, no rolling of dough.   They get baked in muffin tins with all the good cranberry filling on the bottom, and a tender dough that’s a lot like scones on top.  After they are baked, turn them upside down on a serving platter, and there you are.  A gorgeous color for the holidays, not too sweet, just right with coffee or tea.

My food processor was out and I was chopping cranberries for cranberry relish, and also to make a batch of my Cranberry Liqueur.  So while I was on a roll, (pun intended) I continued chopping enough cranberries to quickly make up these cranberry rolls.   Because I was also chopping up orange to put in the cranberry relish,  I put about 1/4  cup chopped orange in the topping of my rolls too.  WOW!  Spur-of-the-moment decisions are often the best.   Deeelish!

CRANBERRY-PECAN CINNAMON ROLLS

Yield:  Makes 12 rolls

This is what makes the topping.

This is what makes the topping.

Ingredients:

  • 3 Tbsp. butter, melted
  • 1/4 cup light brown sugar, packed
  • 1/4 cup brown rice syrup or light corn syrup
  • 1 cup chopped fresh cranberries
  • OR,  3/4 cup cranberries and 1/4 cup chopped orange, optional
  • 1/3 cup chopped pecans
  • 1 1/2 tsp. ground cinnamon, divided
  • 1 cup white whole wheat flour
  • 1 cup all-purpose flour
  • 2 Tbsp. granulated sugar
  • 1 Tbsp. baking powder
  • 1/2 tsp. baking soda

    Ingredients for dough.

    Ingredients for dough.

  • 2 Tbsp. cold butter, cut into pieces
  • 1 cup cold buttermilk
  • 2 Tbsp. canola oil

Directions:

1.  Preheat oven to 375*F.  Coat a 12-cup muffin tin with cooking spray.

2.  Combine melted butter, brown sugar, brown rice syrup ( or corn syrup), cranberries, pecans and 1 teaspoon cinnamon in a small bowl.  Divide among the muffin cups, spreading about 1 tablespoon in the bottom of each.

Put in the bottom of muffin cups.

Put in the bottom of muffin cups.

3.  Whisk the flours, sugar, baking powder, baking soda, salt and remaining 1/2 tsp. cinnamon in a large bowl.  Add cold butter and, using two knives or a pastry cutter, cut in the butter until it’s the size of small peas.  Pour in buttermilk and oil, stir just until combined.  Spoon the batter on top of the cranberry mixture, using about 2 Tablespoons for each.

Spoon dough over cranberry topping.

Spoon dough over cranberry topping.

4.  Bake rolls until lightly brown around the edges, 18 to 20 minutes.

Bake till lightly browned around the edges.

Bake till lightly browned around the edges.

Cool in the pan for 10 minutes, then run a knife around the edges of each to loosen. Place a large serving tray over the pan and invert the rolls onto it.  Spoon any topping left in the pan onto the rolls.  Serve warm.

These are so pretty,

These are so pretty,

If all the rolls are not eaten when served, they rewarm very well in the microwave.

SOURCE:   Slightly adapted from Eating Well

St. Lucia Buns

St Lucia Buns

St Lucia Buns

As I write this post it is St. Lucia day.  The day that Scandinavian families celebrate Saint Lucia, a symbol of hope and light in dark times.    Briefly, the festival of St. Lucia begins the Christmas season in Swedish custom, and she comes as a young girl crowned with fresh greens and lit candles carrying a tray of baked goods.  These sweet spiral buns are traditionally served on this day.  However they can be served anytime, and so I include the recipe today with thoughts of how special they would be on Christmas morning.IMG_5988

Originally candles were woven into the greens making up the wreath, but now-a-days, battery operated candles are used instead.  A young girl is chosen to represent St. Lucia and wearing a long white garment with a crown of greens and candles on her head, she carries the tray of buns and leads a procession of young girls and boys, singing the traditional St. Lucia songs.

Lucia celebrations include ginger snaps and sweet saffron-flavored buns shaped like curled up cats.  Sometimes raisins are placed in the center of the spirals to represent eyes.  You eat them with glögg (spiced wine) or coffee.

Delicious with coffee for breakfast.

Delicious with coffee for breakfast.

St. Lucia Buns are also called Swedish Saffron Christmas Bread.  This is one of the easiest yeast breads I’ve ever made.  It’s almost no-knead, and the dough can be refrigerated overnight, which is a nice convenience if you’re considering these for breakfast.  The flavor of these buns is outstanding and the golden color is achieved through the inclusion of saffron.  They are light and airy with a sprinkle of pearl sugar on top.  Swedish pearl sugar is a non-melting sugar that can be found in some large grocery stores or ordered online.

St. LUCIA BUNS:  SWEDISH SAFFRON CHRISTMAS BREAD

Yield:  24 buns

Ingredients:

  • 2 packages active dry yeast
  • 1/2 cup warm water, 110*F to 115*
  • 1/2 cup sugar
  • 1/2 cup unsalted butter, melted
  • 1/2 cup heavy cream
  • 1/2 cup whole milk
  • 1/4 tsp. crushed saffron threads
  • 1/2 tsp. salt
  • 2 eggs, room temperature
  • 4 to  4  1/2 cups all-purpose flour

Glaze:

  • 1 egg
  • 2 Tbsp. milk
  • Swedish pearl sugar

Directions:

1.  In the bowl of an electric mixer, combine the yeast in the warm water;  stir gently and briefly with a fork.  Add 1 Tablespoon of the sugar;  stir again.  Let the mixture stand until the yeast foams, about 5 minutes.  Add the remaining sugar, butter, cream, milk, saffron, salt and eggs.  Fit mixer with the paddle attachment and beat well on medium-low speed until combined.  Remove paddle attachment from mixer and fit with the dough hook.  Add flour 1 cup at a time mixing well with each addition to keep the dough smooth and satiny.  You may not need to use all of the flour.

2.  Cover and refrigerate for a minimum of 2 hours, or up to 24 hours.

3.  Preheat oven to 375*F.  Line two baking sheets with parchment paper.

4.  Turn dough out onto a lightly floured surface and cut into 24 even pieces (about 2-inches square.)

Divide the dough into 24 equal pieces.  (good luck with that!)

Divide the dough into 24 equal pieces. (good luck with that!)

Roll each square into a long rope, about 12-inches long.  Curl each end of a rope in opposite directions, creating an “S” shape.

Form the ropes of dough into spiral shapes.

Form the ropes of dough into spiral shapes.

Lift the bun onto the parchment; repeat curling with remaining dough ropes until there are 12 per baking sheet.

IMG_5968

5.  For the glaze, beat the egg in a custard cup and stir in the milk.  Brush each bun with the glaze then sprinkle pearl sugar over the top.  Place baking sheets in a warm place to rise until doubled, about 45 minutes.

6.  Bake for 15 minutes, or until golden brown and puffy.

An egg wash before going into the oven makes a shining golden crust.

An egg wash before going into the oven makes a shiny golden crust.

St Lucia Buns

St Lucia Buns

SOURCE:   The Big Book of Bread Recipes

Speculoos Buttons

Speculoos Buttons

Speculoos Buttons

Speculoos, or Speculatius, are lightly spiced little cookies that are often made with a special rolling pin, that imprints a design on the cookie.  In this version the dough is formed into a log, then sliced; thus making them small and round like a button.  To keep this idea going I put only a small round disc of frosting on the top of each one and sprinkled colored sugar or pearls on it.  These cookies are quite small and dainty, with their edges sparkling with sugar, and the dab of frosting on top, each one is just a quick little bite of deliciousness.

IMG_5977

I modified the original recipe to include a more elaborate mix of spices that make a nice blend with the light brown sugar and mild-flavored light molasses.  You might wish to make these little gems somewhat larger than I did, if you wish to decorate the top surface with piping or add more colored sugar.

IMG_5973

SPECULOOS BUTTONS

Yield:  About 8  dozen cookies

Ingredients:

A nice blend of spices give these cookies their yummy flavor.

A nice blend of spices give these cookies their yummy flavor.

  • 2 cups all-purpose flour
  • 1 tsp. ground cinnamon
  • 1/2 tsp. ground cardamom
  • 1/4 tsp. ground nutmeg
  • 1/8 tsp. ground cloves
  • 1/4 tsp. ground mace
  • 1/2 tsp. salt
  • 1/2 cup (1-stick) unsalted butter, softened
  • 1/2 cup packed light brown sugar
  • 1/4 cup granulated sugar
  • 2 Tbsp. mild-flavored (light) molasses
  • 1 large egg, room temperature
  • 1 tsp. vanilla extract
  • 1 egg white
  • sanding, or other decorative sugar

    Decorative sugars to roll the logs in.

    Decorative sugars to roll the logs in.

Glaze:

  • 1  1/2 cups powdered sugar
  • sprinkles, colored sanding sugar, or dragées

Directions:

1.  Whisk the dry ingredients (flour through salt) in a medium bowl; set aside.  Using an electric mixer at medium speed, beat butter in a medium bowl until smooth, about 2 minutes.  Add both sugars and molasses; continue to beat until mixture is smooth and creamy, about 3 minutes.  Beat in egg and vanilla, mix for 2 minutes.  Reduce speed to low;  add dry ingredients and mix to blend well.

2.  Scrape dough from bowl and divide into thirds.  Using your palms, roll each piece of dough into an 8″ log.  Wrap logs tightly in plastic or parchment paper and freeze for at least 3 hours.

Roll the dough into 3 logs, wrap in plastic wrap and freeze.

Roll the dough into 3 logs, wrap in plastic wrap and freeze.

I left mine overnight before baking.  For neater edges, remove logs from freezer after 1 hour and roll on counter.   Do Ahead:  These cookies can be made up to 2 months ahead. Keep frozen until ready to bake.

3.  Preheat oven to 375*F.  Line 3 baking sheets with parchment paper or silicone baking mats.

4.  Whisk egg white in a small bowl to loosen, lightly brush all over 1 log.  Sprinkle with (or roll in) sanding sugar.  Using a long slender knife, slice off a sliver of dough from each end of log to make ends flat. Cut log into 1/4″-thick rounds.  Transfer to baking sheet, spacing 1/2″ apart;  place in freezer while you cut the next log.  (The cookies hold their shape better if you bake when dough is cold.)  Repeat with remaining dough.

Slice the logs into "coins" before baking.

Slice the logs into “coins” before baking.

5.  Bake the cookies for 11 – 13 minutes, until tops are golden brown and centers are almost firm.  Transfer cookies to wire racks and let cool.  Repeat with all of the baking sheets.  Do Ahead:  Cookies may be baked up to 2 days before glazing.  Store airtight at room temperature.

6.  Glaze:  Mix powdered sugar and 1 – 2 teaspoons cold water in a medium mixing bowl.  Add more water a little at a time if needed.  Glaze should be quite thick.  You may spoon about 1/2 tsp. glaze onto each button, or fill a resealable plastic bag with glaze and cut a small hole in 1 corner, and pipe an even circle onto the cookies.  Decorate with sprinkles, colored sugar, or dragées, if desired.

Decorate each cookie with a little glaze and some colored sugar.

Decorate each cookie with a little glaze and some colored sugar.

Let stand on rack at room temperature for at least 30 minutes for glaze to set.  Cookies may be stored at room temperature in a tightly sealed container.

IMG_5972

SOURCE:   Slightly modified recipe from Dorie Greenspan, via Bon Appetit.com

Cocoa Thumbprints

Cocoa Thumbprints

Cocoa Thumbprints

Today, because I don’t already have enough browned, crisp, sugary, buttery thoughts swirling around in my head, I’m going to talk about chocolate, thumbprints, white sugar, sprinkles and all sorts of other decorative garnishes.  So just let me get suited up in my mask, and super-woman cape and gallop into my kitchen with a sense of urgency.  Not so fast, time, I’m coming, I’m coming. Wait for meeee…….

IMG_5971

Something would be noticeably absent if I didn’t include a chocolate cookie in my gifts and platter of Christmas cookies.  I have too many such recipes to count, but if you’ll remember I’m trying to keep my cookie choices to ones that are simple to make, yet have great texture and outstanding flavor.  So this great recipe got my vote this year.  At this point, I’ve made them and we’ve eaten a few, and I can say for certain they get a “standing ovation”.  You can mix them up by hand, no electric mixer to get out, butter is melted so you don’t have to take it out in advance to soften, and once they come out of the oven they are finished and ready to eat.  If you’re in a hurry, these are perfect!

Thumbprints are easy to make and traditionally filled with jam, but these are much more fun.  Even though the cookies are all the same, they look different due to the variety of garnishes I used in the centers.  Try chocolate kisses, crushed candy canes or a dollop of frosting.  Colored sprinkles, mini marshmallows,  M&M’s, or dried fruit would work out nicely as well.  Let your imagine go wild, use what ever you have on hand.  They will be delicious no matter how you decorate them.

COCOA THUMBPRINTS

Yield:    Makes about 3 dozen cookies

Ingredients:

Dutch process cocoas makes a nice dark cookie.

Dutch process cocoa makes a nice dark cookie.

  • 1  1/2 cups all-purpose flour
  • 3/4 cup granulated sugar, plus 1/2 cup for rolling
  • 1/2 cup unsweetened Dutch-process cocoa powder
  • 1 tsp. baking powder
  • 1/2 tsp. salt
  • 6 Tbsp. unsalted butter, melted
  • 2 large eggs, lightly beaten
  • 1/2 cup confectioners’ sugar
  • various decorative sprinkles, nuts, mini marshmallow, candies etc. for filling

Directions:

1.  Whisk the flour, 3/4 cup granulated sugar, the cocoa powder, baking powder and salt in a medium bowl.  Add the melted butter and eggs and stir until combined.  Cover and refrigerate the dough until firm, about 30 minutes to 1 hour.  If you’re really in a hurry I think you could shape these without chilling, but the cookies may spread more while baking.

2.  Preheat the oven to 325*F.  Line 2 baking sheets with parchment.  Place the confectioners’ sugar and the remaining granulated sugar into 2 separate small bowls.  Roll scant tablespoonfuls of dough into balls;  roll in the granulated sugar and then in the confectioners’ sugar.

Roll first in regular sugar, then in powdered sugar.

Roll first in regular sugar, then in powdered sugar.

Place 1 inch apart on the prepared baking sheets.  Lightly flatten each ball with your fingers and make a deep 1/2-inch wide indentation in the centers with your thumb.  (TIP:  use a cork to make perfect indentations, taking care not to press all the way to the bottom of the cookie.)

3.  Place your choice of filling in the indentations.

Red and green glacée cherries fill these cookies.

Red and green glacée cherries fill these cookies.

4.  Bake cookies until puffed and slightly cracked, about 10 minutes.  Let cool 3 minutes on the baking sheets, then transfer to racks to cool completely.

Cocoa Thumbprints with various fillings.

Cocoa Thumbprints with various fillings.

SOURCE:   Food Network Magazine, Dec. 2011

Oatmeal Ginger Cream Cookies

Oatmeal Ginger Cream Cookies

Oatmeal Ginger Cream Cookies

These large sandwich cookies made their way onto my cookies-to-give list.  The moist filling and the soft oatmeal cookie are both delicious separately, but when you put them together they become sublime.  I chose to include them in my cookie collection this year because they are BIG, not some little dainty cookie that’s gone in two bites.  (Although I love those, too!)  I think guys will really like them because they’re “manly”.

These are generously sized cookies, with a cream cheese filling that has bits of crystalized ginger in it.  (Did you notice what happened there?  I found another way to sneak in some ginger. :P)  The cookie part is a nice soft, oatmeal that’s got lots of spices in it.  The oats are toasted in the oven before incorporating them into the batter, making them crispier and toasting the oats also brings out their nutty flavor.  When two oatmeal cookies are sandwiched together with the ginger cream filling the flavors fuse and compliment each other so well.  Mr. D. described them as YUMMO!!IMG_5676

The recipe expects you to get 12 cookies, but I must have made mine a little smaller, because I got 15 sandwich cookies, and they were plenty big for my taste.  They are not low in calories, but I tried to reduce the fat and calories somewhat by using low-fat cream cheese.  These are definitely cookies that guys will like.

Without the filling these are still very good oatmeal cookies, and I think the addition of raisins in that case would really enhance them.

OATMEAL GINGER CREAM COOKIES

Yield:  Makes 12-15 sandwich cookies

Ingredients:

  • 1  1/2 cups rolled oats

    These cookies are nicely spiced.

    These cookies are nicely spiced.

  • 1 cup all-purpose flour
  • 3/4 tsp. baking powder
  • 1/2 tsp. baking soda
  • 1/2 tsp. cinnamon
  • 1/4 tsp. ground nutmeg
  • 1/4 tsp. ground ginger
  • 1/4 tsp. salt
  • 1 stick butter, at room temperature
  • 1/2 cup granulated sugar
  • 1/2 cup packed light brown sugar
  • 1 large egg
  • Ginger Cream  (recipe follows)

Directions:

1.  Preheat oven to 350*F.  Position racks in the top and bottom levels of the oven.  On a baking sheet, bake oats on the top rack, shaking the pan intermittently to prevent burning, until lightly browned, 10 minutes.  Transfer pan to a wire rack to cool, leaving oven on.

Begin by toasting the oats on a baking sheet.

Begin by toasting the oats on a baking sheet.

2.  Meanwhile, in a medium bowl, whisk together flour, baking powder, baking soda, cinnamon, nutmeg, ginger, and salt.  In a large bowl, using an electric mixer on medium speed, beat butter and sugars until light and fluffy….

Cream butter, sugars and egg.

Cream butter, sugars and egg.

Beat in the egg.  Add the flour mixture, beating until just combined.  Stir in the toasted oats.

This is a thick dough.

This is a thick dough.

3.  Line 2 baking sheets with parchment paper.  Roll dough ( about 2 tablespoons/cookie), into balls, or use a #30 (1-ounce) ice cream scoop.  For each baking sheet, drop 12 balls 2 inches apart.  With dampened hands, flatten each ball to 1/2-inch thickness.

Flatten dough balls prior to baking.

Flatten dough balls prior to baking.

Using the bottom and top racks, bake until cookies are lightly browned around the edges and set, 12 minutes, switching the baking sheets from top to bottom and rotating them from front to back halfway through baking.  Remove from the oven and let cool for 5 minutes on baking sheets, then transfer cookies to a wire rack to cool completely.

After baking, browned but not crispy.

After baking, browned but not crispy.

4.  Frost the bottoms of 12 cookies with Ginger Cream, then top with the remaining 12 cookies.

IMG_5674

For Ginger Cream:IMG_5670

  • 8 ounces cream cheese, at room temperature (low-fat cream cheese is OK)
  • 1/3 cup confectioners’ sugar
  • 1/4 cup finely chopped crystallized ginger

In a medium bowl, using an electric mixer on medium speed, beat the cream cheese and sugar until smooth.  Beat in the ginger.

IMG_5675

IMG_5678

SOURCE:  The Beekman Boys via Country Living Magazine