Loaded Nachos

Loaded Nachos

Loaded Nachos

Around here we take our nachos very seriously.  Very, very seriously.

What this means is that we really do love nachos, and both Mr. D. and I agree we like them loaded with as much stuff as I can get my hands on.

When making nachos, it’s a little like building a house.  First you start with a good foundation (tortilla chips), then you build up the structure, a tower of multi layers of  seasoned beef, beans, crisp waffle fries, and cheeses.  Then you top it all off with some pico de gallo, that you made yourself; savory, colorful, and so delish.

IMG_8897

When you look at the ingredient list for these nachos, it looks like a lot, but really it isn’t.  It all comes together when you experience that first perfect bite that contains a little bit of everything.  Yes, indeed!

I made these for New Year’s Eve.  They served as our supper, but you can serve them as an appetizer, or a snack.  (Think Super Bowl coming up.)  Once you start on them it’s hard to stop so take my advice and make a lot.

LOADED NACHOS

Yield:  Servings:  4

Ingredients:

  • 1 Tbsp. olive oil
  • 1 medium onion, diced
  • 2 lb.  ground beef
  • 1/2 tsp. chili powder
  • 1/2 tsp. paprika
  • 1/2 tsp. cumin
  • 1/4 tsp. crushed red pepper
  • 1/2 tsp. salt
  • 1/4 tsp. pepper
  • 1 can (14.5 oz.) pinto beans, chili beans, or ranch style beans
  • 1/2 cup hot water
  • tortilla chips
  • frozen waffle potato fries
  • 1 1/2 cup grated cheddar cheese
  • 1 1/2 cup Mexican Blend, Taco blend or Monterey Jack cheese
  • 3 – 4 plum tomatoes, diced
  • 1 whole jalapeño, finely diced (optional)
  • 1/2 bunch cilantro, chopped (or use parsley)
  • juice of 1 lime
  • 1/2 tsp. salt
  • 1 avocado, pitted and diced
  • sour cream, (optional)

Directions:

Start by cooking the waffle fries.  Follow package directions for oven temperature and length of time needed to get them  crispy on the edges.  Once cooked, remove from oven and set aside. If you prefer you may omit the waffle fries and use all tortilla chips throughout.  I prefer the fries because I like the texture contrasts in the finished nachos.

IMG_8875

Next, dice up half the onion….

IMG_8876

Heat up a non-stick skillet with a little olive oil….

IMG_8877

and add in the chopped onion.

IMG_8878

Cook the onions for a minute or two, then add in the ground beef.

IMG_8879

Break it up and let it cook until the meat is browned.  Drain off any fat that has accumulated in the bottom of the pan.

IMG_8880

Open the beans and add them to the pan along with the seasonings.    Stir it around to mix in the spices and blend the flavors.

Pour in the hot water to make it a little more saucy.  Reduce the heat to Low and let it simmer while you get the rest of the ingredients ready.

IMG_8875

Next, chop up the rest of the onion, making a fine dice.

IMG_8881

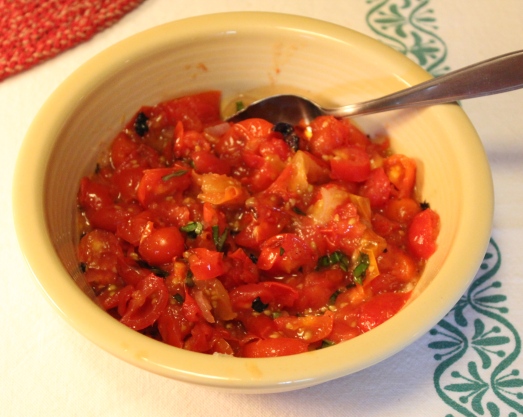
Next up,   chop up those tomatoes.  This is how I do it:  cut off the tops, then cut them into slices, then cut the slices into strips.  Now cross-cut the strips to dice them.  If you are using a jalapeño, use the same technique to dice it.

IMG_8885

Peel and seed the avocado, cut into strips, then crosscut into cubes.

Now, throw the onions, tomatoes, avocado and jalapeño into a bowl.  Tell them to get acquainted, you’ll be right back.

IMG_8886

Tear the leaves off half a bunch of cilantro (or parsley) and chop roughly.   Throw that into the bowl.

Cut a lime in half, and squeeze in the juice.  Add a little salt and pepper.

IMG_8887

And  stir it all together.  That’s your Pico de Gallo!!

We like it a little chunky, but if your family likes it more finely chopped, that’s great.  It will all taste the same.

Finely, the cheese 🙂  I grated a yellow cheddar and used a package of Taco Blend.  I did not mix them together.  You’ll see why in a minute.

IMG_8888

To assemble the nachos, make a single layer of chips on a platter or large plate.

IMG_8889

Scoop up a big ole spoonful of the beef/bean mixture and sprinkle it all over the chips.  Messy is good, so let it be!

IMG_8890

Sprinkle on a layer of cheddar,

IMG_8891

This is where the goodness-level jumps up a notch:  Put on a layer of waffle fries….

IMG_8892

And another layer of beef and beans…

IMG_8893

Then a nice layer of Taco blend, and another layer of waffle fries.

IMG_8894

Now use up the remainder of the beef/bean mixture to top it all,  and a final layer of Taco blend or cheddar (your choice).

IMG_8895

I put mine back into the still warm oven (turned off), and let the cheese melt.  Alternately, you could nuke the whole shebang for about 45  seconds until the cheese is perfectly melted.

AND THEN….

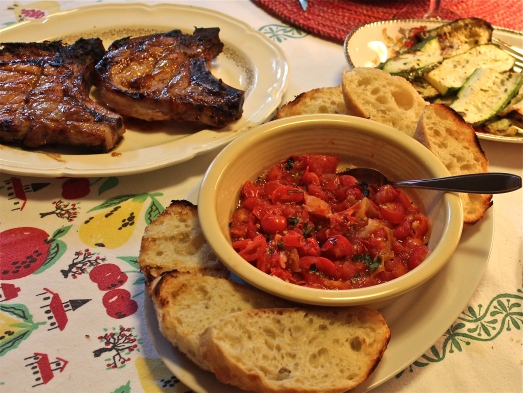
Spoon the Pico de Gallo on top of it all.   Why?   Because this is the roof on the house, or the flowers in the garden.   It’s the finishing touch that keeps you going back for more.   And it looks so pretty!

AND, because it’s all the veggies that makes this platter of nachos healthy.  I know for sure it’s what makes them so delicious!

IMG_8897

I hope you enjoy my approach to making nachos.  Try them real soon, and of course, you can add whatever extras you like:  sour cream, chopped black olives, chopped green onions–anything.  My favorite part are the chips on the bottom that start to soften under all the gooey ingredients, while the waffle fries stay crisp.  Divine!

SOURCE:   Adapted from The Pioneer Woman Cooks

Advertisement

Baked Broccoli Parmesan Dip

Baked Broccoli Parmesan Dip

Baked Broccoli Parmesan Dip

Believe me, I went through some major mental arguments with myself before making this dip.   Really silly isn’t it?  Why would I need to convince myself to make something so unbelievably good?

With broccoli as its primary ingredient you’d expect it to be really healthy right?   A reason to make it.

Cream cheese, sour cream, and cheddar cheese….all healthy in their own way, but collectively, that’s a lot of  fat and calories    A reason not to make it.

Serve with toasted French bread slices;   oh, oh more calories.   Do I really want to make this?

While all this was going through my mind, a little voice kept saying, ” just go for it, you know you want to.”

Well, as you might guess, the little voice won out,  and boy am I glad.   Once tasted, never forgotten!

I did make some concessions by using low-fat cream cheese, sour cream and milk.


BAKED BROCCOLI PARMESAN DIP

Yield:   about 4 cups Dip

Ingredients:IMG_8382

  • 2 tsp. olive oil
  • 1/4 cup Panko crumbs
  • 8 oz. cream cheese ( I used low-fat)
  • 2  1/2 cups broccoli florets (thaw if frozen)
  • 3/4 cup shredded cheddar, divided
  • 1/2 cup sour cream (used low-fat)
  • 1/4 cup grated Parmesan
  • 1/4 cup milk
  • 1 Tbsp. creole seasoning ( I used cajun spice)
  • 1/2 tsp. garlic powder
  • 1/2 tsp. onion powder
  • salt and pepper to taste
  • loaf of French bread, sliced 1/4-inch thick and toasted

Directions:

1.  Preheat the oven to 375*F.  Lightly spray a shallow baking dish or casserole.

2.  Heat the olive oil, add Panko and cook, stirring till browned and toasted, about 3 minutes.  Set aside.

Melt butter and add Panko crumbs to toast them.

Melt butter and add Panko crumbs to toast them.


Remove when the crumbs are golden and crunchy.

Remove when the crumbs are golden and crunchy.

3.  In a bowl, combine cream cheese, sour cream, milk, seasonings and salt and pepper.  Mix well to blend.


Whip together cream cheese, sour cream, milk and seasonings.

Whip together cream cheese, sour cream, milk and seasonings.

Stir in broccoli, cheddar, and Parmesan cheeses.

Stir in cheddar and Parmesan cheeses.

Stir in cheddar and Parmesan cheeses.

4.  Spread into prepared pan, sprinkle top with remaining 1/4 cup cheddar.

Spread in baking dish,

Spread in baking dish,


Sprinkle with remaining cheddar cheese.

Sprinkle with remaining cheddar cheese.

Bake till bubbly, about 20 – 25 minutes.

5.  Sprinkle with Panko,  serve warm with sliced, toasted bread.

Baked Broccoli Parmesan Dip

Baked Broccoli Parmesan Dip


SOURCE:   Emeril Lagasse

Mr. D’s Birthday & Salsa Hot Wings

Salsa Hot Wings

Salsa Hot Wings

As birthdays come and go we, as a rule, don’t do much to celebrate them, but every once in a while there’s one that needs some special attention.  Mr. D. celebrated his most recent one, a number ending in O, this past weekend, so I thought it would be fun to surprise him with a party.  The surprise turned into a double whammy when we got the news that we had become grandparents with the baby being born just after midnight on 10/19,  so Mr. D. and the baby now have the same birthday.   This baby was born in N.C. so we have only seen pictures of her at this point.  I can’t wait to see and hold her!!

Trying to throw a surprise party for someone who lives in the same house with you is certainly tricky and sneaky.  I think I did very well right up until the end when he figured it out.  But it was fun and all went well.   Someone made the comment that they love to come to our house because the food is always so good.  I hope you think so too, as I plan to share  the recipes for the starred items below, and they will cover several posts this week and next.

Because folks were invited for early afternoon on Sunday, I wanted to provide foods that were substantial, but I didn’t have the luxury of time to cook a big meal, so this is how the menu evolved:

Appetizers

Salsa Hot Wings*

Baked Broccoli Parmesan Dip*

Apple Wedges with Caramel Dip*, Grapes and Cheeses

Entreé

A variety of Pizzas that were ordered from a local pizzeria

Spinach salad with roast peppers, and black olives

Desserts

Spice Cake with Chocolate Ganache*

Pumpkin Chocolate Chip Cookies*

Vanilla and Pumpkin Spice Ice Creams

Beverages

Apple Cider

Assorted Soft Drinks

Coffee

With the menu as an overview of what’s to come, today the recipe is for the Salsa Hot Wings.  These are not the usual Buffalo Hot Wings that many of you know and love.  I think these are easier to make and very tasty with the heat level open to your preference.  Everyone seemed to enjoy them.  I know they disappeared quickly and I had only one small piece to vouch for how good they are.  Luckily I took the photos as I was making them and the one shot of them in the serving dish just prior to serving them, else you’d be looking at an empty bowl.

Salsa Hot Wings

Salsa Hot Wings

What I like about this recipe is that the sauce is largely based on a jar of ready made salsa, so you can use your favorite kind,  mild to hot, whatever you like.  This gets mixed with some honey and some grated fresh ginger for a little “kick”, pureed in a blender till smooth, then cooked down for a while to thicken it.  Lastly a tad of fresh lime juice finishes it off.    Pour this sauce over the cooked chicken wing portions and toss to coat.  Serve with lime wedges.

Sectioning chicken wings can be a time consuming task, but I was fortunate in finding Perdue frozen wings, already sectioned, in 5-pound bags, ready to cook.  I cooked 2 bags of them and made a double recipe of the sauce.

Easy–Peasy–Delish!

SALSA HOT WINGS

Yield:  Serves 6 – 8

Salsa pureed with honey and ginger.

Salsa pureed with honey and ginger.

Ingredients:

  • 2 cups ( 16-oz.jar) salsa
  • 1/3 cup honey
  • 1 Tbsp. grated ginger
  • 2 tsp. fresh lime juice
  • 3 lbs. chicken wings, split at the joint
  • salt and pepper to taste
  • lime wedges for serving

Directions:

1.  Preheat oven to 475*F.  Line a large baking sheet with foil.

2.  Combine the salsa, honey and ginger in a blender container and puree until smooth.

3.  Transfer to a medium saucepan and bring to a boil.  Reduce heat and cook for 15 – 20 minutes till reduced by about half.  Stir in the lime juice.

4.  Meanwhile, lay wings in a single water on baking sheet.  Season with salt and pepper.  Bake till golden and crisp, and cooked through, about 30 minutes.

Lay wing pieces on foil-lined pan and cook till golden and crisp.

Lay wing pieces on foil-lined pan and cook till golden and crisp.

5.  Transfer to a big bowl, toss with the sauce to coat well.  Serve with lime wedges.   Smile and absorb the compliments:)

These have a very high "YUM" factor.

These have a very high “YUM” factor.


SOURCE:   Martha Stewart’s Everyday Foods


Spiced Shrimp with Peach Salsa

Spiced Shrimp with Peach Salsa

Spiced Shrimp with Peach Salsa

Back in the spring our church had a goods and services auction as a fund raiser.  A friend and I got together and offered a catered dinner for up to 6 people.   Two couples teamed up and bid on it, winning the bid.  The date chosen for the dinner was this past weekend.   We had a lot of fun planning the menu, shopping, cooking and then serving the meal.   This was so rewarding, and a great way to help out our church.

The menu we served consisted of several dishes that I have already featured here on the blog with the exception of this shrimp appetizer.  The recipe for it follows below.  The full menu was as follows:

Appetizers

IMG_0299

Garlic- Herb  Cucumber Bites

IMG_0170

Spiced Shrimp with Peach Salsa

Salad

Baby Greens with fresh pears, grapes and pistachios

and honey-balsamic dressing

warm rolls and herb dipping oil

IMG_0173

Entree

Greek Style Chicken Breasts with Herb Rice Pilaf

IMG_7176

Desserts

Jamocha Silk Pie

with whipped cream topping

IMG_4884

Fresh Pear Galette

IMG_0168

SPICED SHRIMP WITH PEACH SALSA

Yield:  Serves 8

Ingredients:

     Peach salsa:

  • 3  1/2 cups coarsely chopped peeled peaches   (nectarines may be used, but don’t bother peeling them)IMG_8033
  • 1 cup coarsely chopped red bell pepper
  • 1 cup coarsely chopped green bell pepper
  • 1/3 cup coarsely chopped red onion
  • 1 jalapeño pepper, seeded and chopped
  • 1/4 cup fresh cilantro leaves
  • 1 Tbsp. lime juice
  • 1/4 tsp. salt


Shrimp:IMG_8037

  • 1/4 tsp. salt
  • 3 tsp. brown sugar
  • 2 tsp. ground cumin
  • 1/2 tsp. chili powder
  • 1/4 tsp. black pepper
  • 1  1/2 pounds large shrimp, peeled and deveined
  • 1 Tbsp. olive oil

Directions:

1.  To prepare salsa,  place all the salsa ingredients in a food processor, pulse 8 times.  Set aside.   If the bowl of your processor does not hold all the ingredients, divide in half and process in two batches,  adding the lime juice and salt to the combined batches at the end.

IMG_8035

IMG_8036

2.  To prepare shrimp, combine salt, sugar, cumin, chili powder, pepper, and shrimp in a large bowl or zip-lock bag.  Toss gently to coat.  Heat oil in a large nonstick skillet over medium-high heat.  Add shrimp mixture; sauté  4 minutes or until shrimp are done.  Serve with peach salsa.

IMG_0169


SOURCE:    A Carolyn Original

Lemony Ricotta Galette with Summer Squash

Lemony Ricotta Galette with Summer Squash

Lemony Ricotta Galette with Summer Squash

I know that being swamped with zucchini is a continuing problem for some of you with gardens, so I’m here to help with that.  Even if you don’t have a garden (like me), you may be looking for some different ways to use zucchini or yellow summer squash.

Summer squashes are about as versatile a vegetable as they come.  Delicious in so many ways–grilled, sautéed, baked or paired with other vegetables, you name it, they’re great.  They can become the main entree in a meatless meal, a savory side dish, or baked into a dessert.  Today I am making a galette that can be the centerpiece of your meal, or served as a side dish, or appetizer.

A side salad is all that's needed for this meal.

A side salad is all that’s needed for this meal.

Galettes are known for their flaky flat crust and irresistible fillings, and this zucchini/summer squash-stuffed pastry is no exception.  The tender veggies are paired with three kinds of cheeses, lemon, and a drizzle of olive oil, then baked until brown and crisp.

Here’s a tip that will make the squash less moist and save your crust from becoming soggy:  Salt the squash well and allow to drain in a colander for about 15 minutes.  Pat dry with a paper towel before putting them into the pastry.

LEMONY RICOTTA SUMMER SQUASH GALETTE

Yield:   Makes 6 servings

Ingredients:IMG_7875

  • 2 medium zucchini and/or yellow squash, thinly sliced (2  1/2 cups)
  • salt
  • 1/2  (15-oz.) package rolled refrigerated piecrust (A time saver,  but make your own if you must.)
  • 3/4 cup ricotta cheese
  • 1/2 cup grated Parmesan cheese
  • 1/4 cup shredded mozzarella cheese
  • 1 clove garlic, minced
  • 1 tbsp. olive oil
  • 2 tsp. finely shredded lemon peel
  • 1 tbsp. lemon juice
  • 1/4 tsp. salt
  • 1.4 tsp. ground black pepper
  • 1 egg yolk  ( or small amount egg beater/egg substitute)
  • Italian seasoning blend or dill weed for garnish

Directions:

1.  Sprinkle sliced zucchini lightly with salt.  Transfer to a colander; drain for 15 minutes.  Pat dry with paper towels.  Preheat oven to 400*F.

Pat squash dry before using.

Pat squash dry before using.

2.  Meanwhile, on a large piece of lightly floured parchment paper, roll pie dough to a 12-inch circle.  Transfer parchment and dough to a large baking sheet and set aside.

IMG_7878

3.  Make ricotta filling:  In a medium bowl whisk together ricotta, Parmesan, mozzarella, garlic, 1 tsp. olive oil, lemon peel, lemon juice, salt, and pepper.  Using a spatula, spread over dough, leaving a 1  1/2-inch border at edge.

Spread ricotta filling on dough leaving a border.

Spread ricotta filling on dough leaving a border.

Top with squash slices.  Drizzle with remaining olive oil.  Sprinkle seasoning blend over squash.

Top with squash slices and seasonings.

Top with squash slices and seasonings.

Gently fold up pastry edges over filling, pleating as necessary.

Fold up edges, and brush with egg mixture.

Fold up edges, and brush with egg mixture.

4.  In a small bowl, whisk egg yolk and 1 tsp. water.  (Or use egg substitute)  Lightly brush pastry edges with egg mixture.  Transfer galette to oven.  Bake 35 – 40 minutes or until edges are golden brown.  If using dill weed as a seasoning, some dill fronds make a colorful garnish.  Serve warm or at room temperature.

IMG_7882

So delicious!

So delicious!


SOURCE:   Better Homes and Gardens


Roast Tomato Bruschetta

Roast Tomato Bruschetta

Roast Tomato Bruschetta

It’s a fact that the majority of foods that we love and that I prepare here at home make their way to the pages of this blog.  However, there are some recipes that I make over and over again and somehow never think to share them with you.  Usually that’s because they are so simple, I don’t view them as a “recipe’, but they are non-the-less-good in spite of it.

IMG_7518

A few weeks ago I shared a picture on Facebook of an appetizer that I was making to bring to a family picnic,  and almost instantly I was getting questions about what it was, and requests for the recipe.   All it consisted of was roast tomatoes, coarsely chopped then mixed with some diced shallots, olive oil, and chopped basil.   Spread this mixture on some  toasted whole-wheat baguette slices, and you have yourself  one delicious appetizer, an accompaniment to a salad, or a little extra something to round out a meal.

I make this using whatever kind of tomatoes I have in abundance, but my favorite is to use small heirloom varieties.  I like the mixture of colors.  The tomatoes can be roasted in the oven on a cookie sheet, or on the grill if you already have it heated up.  One quick way to do this on the grill is to thread the tomatoes on skewers (6-8/skewer) and lay them on the grill, turning every 2 – 3 minutes until the tomatoes start to crack and begin to look charred.  Then bring them into the kitchen, chop them up, add the remaining ingredients, and its done!

ROAST TOMATO BRUSCHETTA

Yield:   Make about 2 cups

I get the dressing ready before roasting the tomatoes.

I get the dressing ready before roasting the tomatoes.

Ingredients:

  • 2 cups cherry tomatoes, or any variety of tomatoes you desire
  • 4 teaspoons olive oil, divided
  • 2 tablespoons chopped fresh basil
  • 1 small shallot, chopped  (or finely minced red onion)
  • 1 whole wheat French bread baguette, sliced
  • 1 garlic clove, halved

Directions:

1.   Preheat oven to 375*F.   or heat grill to medium-high heat.

2.  Thread tomatoes evenly on 4 skewers;  lay on a cookie sheet and brush all over with 2 teaspoon olive oil.  If using grill, brush tomatoes with oil and lay on grill .   Turn the skewers several times for even roasting, and when the tomatoes start to crack and look charred ( about 5 minutes on the grill) remove from heat.

Roasting the tomatoes on skewers.

Roasting the tomatoes on skewers.

3.  Remove tomatoes from skewers; chop coarsely.  Place tomatoes, 2 teaspoons olive oil, 1/4 teaspoon salt, 1/4 teaspoon pepper, basil, and shallot in a small bowl, stirring to combine.

IMG_7612

4.  Brush bread slices evenly with some olive oil,  Grill for about 30 seconds on each side or until toasted.

Toasting the bread.

Toasting the bread.

Rub cut sides of garlic over one side of bread slices, top evenly with tomato mixture.

Once you try this, you will want it with every meal. 🙂


IMG_7617


SOURCE:  Carolyn’s Creations

Avocado-Mango Salsa (with roasted corn chips)

Avocado-Mango Salsa with roast corn chips.

Avocado-Mango Salsa with roast corn chips.

Sometimes you just gotta have a snack!   And if that snack is good for you, you’ll have waaay less guilt while you munch away.  So is anything better to snack on than salsa and chips?    Not in my house there isn’t.

Munch away on this!!

Munch away on this!!

I think most people know how good avocados are for us.  Each serving of this snack provides more than half the daily requirement of  potassium and is also a good source of fiber and monounsaturated fat.  A serving of 3 tablespoons of salsa and 6 chips is only 92 calories.  Use your own judgement in deciding if you can have more than 1 serving?????  It is so good I think you will want to have more.

Whoever had the idea to combine these ingredients was really on to something:  creamy avocado, sweet mango, spicy cilantro, and tangy lime.  They just belong together.  Add in the crispiness of corn tortillas sprinkled with a little salt.   WOW!  Mr. D. says it’s the best salsa he’s ever had.  He’s become bored with the usual red salsa(s) that are tangy and spicy.  This makes a nice change from all that and it might even be considered “addicting”.

IMG_7263

If you would love to have a bowl of this yumminess pop up in front of you right now, you are not alone.  But hang on for a bit, because it only takes a few minutes to make it.  Part of the enjoyment of this salsa is the chunkiness of the avocado and mango, so don’t mash them.  Once mixed, let the mixture stand for 10 minutes to allow flavors to blend.  We loved the home-made chips too.  They are very crisp and have just a tad of salt sprinkled on them.  A tiny bit more salt in the salsa is all that’s needed to bring this whole taste experience together in a big way.

IMG_7262

AVOCADO-MANGO SALSA with ROASTED CORN CHIPS

Yield:   about 12 servings  (serving size is 3 tablespoons salsa and 6 chips)

The colors of the ingredients make it appetizing.

The colors of the ingredients make it appetizing.

Ingredients:

  •  12 (6-inch) corn tortillas, each cut into 6 wedges
  • cooking spray
  •  1/4 teaspoon kosher salt, divided
  • 1 1/4 cups chopped peeled avocado
  • 1 cup chopped peeled mango (the golden mango is an Ataulfo mango)
  • 1 tablespoon finely chopped cilantro
  • 4 teaspoons fresh lime juice
  • cilantro sprigs, for garnish, optional

Directions:

1.  Preheat oven to 425*F.

2.  Arrange tortillas wedges in a single layer on baking sheets coated with cooking spray.  Coat wedges with cooking spray.  Sprinkle 1/8 teaspoon salt evenly over the wedges.  Bake at 425* for 8 minutes or until crisp.

Cut each tortilla into 6 wedges.

Cut each tortilla into 6 wedges.

Spread out on a baking sheet and spray with cooking spray,

Spread out on a baking sheet and spray with cooking spray,

They become crispy and golden.

They become crispy and golden.

3.  Combine remaining 1/8 teaspoon salt, avocado, mango, chopped cilantro, and juice, tossing gently.  Garnish with cilantro sprigs, if desired.  Let stand 10 minutes.  Serve with chips.

IMG_7265


SOURCE:  Cooking Light

Pizza Puffs

Pizza Puffs

Pizza Puffs

These are little bites that contain all the flavors that you love about pizza!   I made these awesome nibbles as part of a brunch buffet and everyone loved them.  They are extremely easy to make, and you can vary what you put into them according to your taste.  Whatever you like for pizza toppings can go into these delicious little morsels.   I’m going to keep these in my file as an appetizer or a great snack when game watching, or having an outdoor barbecue. These delicious little puffs will have everyone wanting more.

IMG_7229

I used some crumbled pre-cooked sausage and chopped pepperoni in mine plus I added some pizza dough flavoring to the batter.  I also included shredded mozzarella cheese because, really, what is pizza without the cheese?  When you serve these you will want to have a bowl of warm marinara sauce nearby to spoon over the puffs, or for dipping.

PIZZA PUFFS

Yield:   24 mini puffs

Ingredients: 

  • 3/4 cup all-purpose flourIMG_7200
  • 3/4 tsp. baking powder
  • 1/2 tsp. garlic powder
  • 1/2 tsp. pizza seasoning (optional, but good)
  • 3/4 cup milk
  • 1 egg, lightly beaten
  • 4 ounces, shredded mozzarella cheese (about 1 cup)
  • 2 ounces chopped pepperoni,  about 1/2 cup
  • 4 ounces italian sausage, cooked and crumbled
  • 1/2 cup pizza sauce

Directions:

1.  Preheat the oven to  375*F.  Grease 24 mini muffin cups.

2.  In a large bowl whisk together all the dry ingredients. (flour through pizza seasoning)

2.  In another small bowl or measuring cup, whisk together the milk and egg.   Add to the dry ingredients.  Mix to incorporate, then stir in the cheese, pepperoni and sausage.

IMG_7202

Let stand 10 minutes.  (This is important, it’s what makes them really puff up)

3.  Stir batter again, and divide among the muffin cups.   Bake till puffed and golden, 20 – 25 minutes.

IMG_7204


4.  Warm the pizza sauce and serve with the puffs for dipping.


IMG_7228

It occurred to me after making these that they could be well suited to a breakfast menu by substituting bacon and chopped ham for the meats, and cheddar cheese for mozzarella.    I must try that next time I make these.


SOURCE:   adapted from a recipe from Little Kitchen

Garlic-Herb Cucumber Bites

Garlic Herb Cucumber Bites

Garlic Herb Cucumber Bites

This is the time of year when many springtime events take place.  It might be a bridal shower or baby shower, or even a Mother’s Day gathering taking place at mid-day when brunch would be served.  Light refreshments are welcome at these events especially if you’re “waist-watching”.

I made these little cucumber appetizers recently and they were so well received that it’s only fair that I share them with you.  I think they would be great on a buffet table to nibble on while waiting for the rest of the refreshments.  They are light -in content and in calories- so they are not too filling for what’s to follow.

IMG_0300

I made these without a recipe, because they are so simple, but I made an attempt to write something here for you to follow if you care to make them, too. I used Boursin cheese  because  I love it, and because it’s already perfectly seasoned.  Why put yourself through the task of starting with cream cheese and trying to achieve the perfect blend of herbs and seasonings, when this one is already done for you.  I thinned it a little with some heavy cream to get a thinner consistency that would be well suited to piping onto the cucumbers if you wanted to make them extra fancy, but all I did was put a small spoonful onto the cucumbers.

These are ridiculously easy, pretty cute and impressive too.  Nice for a party!

GARLIC HERB CUCUMBER BITES

IMG_7070

A two-step appetizer. Nothing could be easier.

Yield:    About 18 pieces

Ingredients:

  • 1  (5.2 oz.) package garlic herb Boursin cheese
  • 2-3 tablespoons heavy cream
  • 1 long English cucumber, peeled partially or totally, as desired

Directions:

1.  Make the filling:  Place Boursin in a small bowl.  Add in 2 tablespoons of heavy cream and stir with a fork until lightened and smooth.  If needed, sir in an additional tablespoon of cream until the mixture is a good consistency for piping.  Transfer the mixture to a pastry bag fitted with a decorative tip; set aside.

2.  Slice the cucumber into 1/2-inch thick slices.  Gently scoop out most of the seeds from the center of each slice, leaving a small portion to keep the filling from falling out.  I found a 1/4-teaspoon measuring spoon did the job very well, using it as you would a melon baller.  Arrange the slices on a serving platter.  Pipe or spoon a dollop of the filling onto each cucumber slice.  Serve chilled.

Kind of cute, yes?

Note:  These can be assembled and refrigerated up to 6 hours in advance of serving.

Kielbasa Apple Skewers

Kielbasa-Apple Skewers

Kielbasa-Apple Skewers

Whenever our family gets together for a holiday gathering we usually start around mid-afternoon, but dinner is not served for several more hours.  Of course, everyone is hungry so we always have appetizers, and each of us brings one to share.  These were part of my contribution to the family gathering.  Bonkers awesome is what they were.  The men just loved them, and all that I brought disappeared in a flash.  Had I anticipated how good these would be I would have prepared more.

IMG_0297

Even when our main entreé is ham, I like to have kielbasa for Easter as well.  So I thought these appys would be a good way to work it in.  I used a precooked kielbasa that weighed about 1 pound, and warmed it through before cutting it up for the appetizers.  I paired it with Granny Smith apples because of their tartness.  I did not want a sweet apple.  The dipping sauce I made consisted of light sour cream,  whole-grain mustard and horseradish.  These were hearty enough to quiet the “hungries”, but not heavily laden with fat and calories.

Dipping sauce, all made, and its ingredients.

Dipping sauce, all made, and its ingredients.

These can be put together at the last minute by simply slicing the kielbasa, slicing up the apples, match them up in pairs, thread onto  skewers, and serve with the dipping sauce.  Easy.  Beautiful.  Deeeelish!

IMG_0295

KIELBASA APPLE SKEWERS

Yield:   I made about 36 skewers with the quantities given below.

Ingredients:

  • 1   (1-pound) precooked kielbasa, warmed through in a saucepan with some water, or grilled.
  • 1 -2 Granny Smith apples, cored and sliced or cubed
  • 1/2 cup sour cream
  • 2 tablespoons, chopped parsley
  • 2 tablespoons whole grain mustard
  • 2 teaspoons horseradish
  • 1/4 teaspoon salt

Directions:

1.  Slice the kielbasa into 1/4-inch thick slices.

2.  Cut the green apples into thin slices or small cubes.   Thread kielbasa and apples onto skewers. (toothpicks)

3.  In a small mixing bowl,  stir together the sour cream, parsley, mustard, horseradish and salt.

4.  Arrange the skewers on a serving tray and serve with the dipping sauce.

IMG_0296


SOURCE:   Adapted from Food Network Magazine