Kale and Melted Cheese Panini

Kale and Melted Cheese Panini

Kale and Melted Cheese Panini

Farmer’s Markets are starting to open or move outdoors now that the weather has warmed up.  I’m tired of making do with supermarket produce, even if some of it is locally grown.  I love going to the open market and seeing first-hand the stalls and rows of fresh vegetables. So on most Thursdays I’ll be part of the crowd strolling in the sunlight from stall to stall, with my bags and basket in hand.  I’ve gotten to know a few of the vendors, so we chat and they keep me informed as to what’s in season right now, right here.  Local to me means having been grown in a 25 mile radius of where I live.

IMG_7469

Dinner inspiration waits at every turn.   A bunch of dark green kale and a juicy early tomato go into my bag.  These will be layered with melty cheese in a savory, cheesy panini.  (today’s post)  I have plans for using the rest of the kale in a  meatless meal that will soon be appearing on these pages also.    Rhubarb goes into my bag next,  ooooh, so many things to make with rhubarb.  What shall be first?   Asparagus, standing in tall bunches, just waiting for me.   Again, I have so many ideas of what to do with them.  Oh, I’m happy.  I’m doing the happy dance!!   1-2-3-cha,cha, cha.

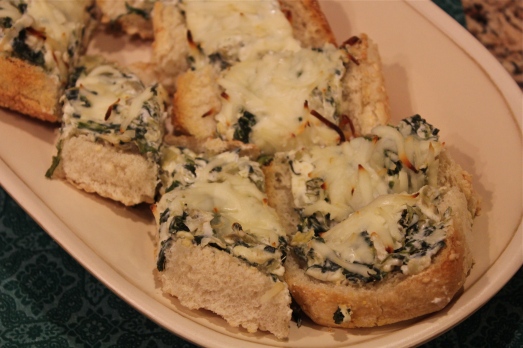
For this vegetarian panini sandwich, layers of sautéed kale, garden-fresh tomatoes and a fine melting cheese get toasted to ultra-deliciousness.  Gruyère or fontina have complex flavors and melt beautifully, but any cheese you have on hand will do.  I particularly like muenster cheese as it too melts nicely, and has a mild nutty flavor that blends with the other flavors of this sandwich.  For anyone who absolutely must have some meat in their sandwich, well, a little bacon never hurt anything, and  it makes a great addition.  As you can see by the photos, I did just that!

KALE AND MELTED CHEESE PANINI

Yield:   makes 4 servingsIMG_7461

Ingredients:

  • 1 tablespoon extra virgin olive oil
  • 1 small onion, finely chopped
  • 3 tablespoons balsamic vinegar
  • 1 clove garlic, minced
  • 8 cups chopped kale
  • 1/4 cup water
  • 1/4 teaspoon salt
  • 8 slices country bread (1/4 inch thick), preferably whole wheat
  • cooking spray
  • 1 cup shredded Gruyère or fontina cheese ( or any other cheese of choice)
  • 1 medium tomato, cut into 8 thin slices
  • 2 slices precooked bacon/sandwich (optional)

IMG_7464

Directions:

1.  Heat oil in a large skillet over medium heat.  Add onion and cook, stirring frequently, until golden brown, 5 – 7 minutes.  Add vinegar and cook until almost evaporated, about 1 minute.  Add garlic and cook, stirring, until fragrant, about 30 seconds.

Onion and garlic sautéed with balsamic vinegar.

Onion and garlic sautéed with balsamic vinegar.

Add kale, water and salt  (the pan will be full).  Stir, cover and cook, stirring occasionally, until the kale is wilted and the water has evaporated, about 5 minutes.  Remove from heat.

Add the kale and cook until it is wilted.

Add the kale and cook until it is wilted.

2.  To prepare the panini:  Preheat panini maker to high.  Coat one side of each slice of bread with cooking spray. With sprayed side down, spread the kale mixture on 4 slices of bread ( about 1/2 cup per sandwich).  Top each with 1/4 cup cheese and 2 slices tomato.

All layered up, ready for the bun top.

All layered up, ready for the bun top.

Top with the remaining bread, sprayed-side up.  Press in the panini maker until crispy,  3 to 5 minutes.

IMG_7466


This is unbelievably good!

This is unbelievably good!


SOURCE:   Eating Well Magazine


Advertisement

Broccoli Calzones

Broccoli Calzones

Broccoli Calzones

Oh. My. Gosh.   These are soooo good,  I did not want to stop eating them.  Do I have any regrets?   Yes, I wish I had made more to freeze.

Some calzones can be rather heavy because they are so loaded with filling that includes meat and cheeses, that after eating one, you’re done.  These, however, are lighter than that. The filling consists of chopped broccoli, ricotta cheese, Parmesan cheese and mozzarella used in moderation.  A pizza dough makes the outside, holding all that great filling.  Served with warm tomato sauce, i.e., spaghetti or pizza sauce, and a side salad,  this is a delicious and satisfying meatless meal.

IMG_7370

This recipe makes eight calzones that can be frozen before baking, so when you’re in the mood for one–or two–, just remove the quantity you want, and bake them frozen.  I made only half the recipe for a quantity of four calzones, and I’m regretting that I didn’t make the whole recipe.  It doesn’t take much extra time or effort to make more to freeze, and you’ll be so glad you did.  One of these would be great with a bowl of soup, or with a salad for a light meal.

Note:  the following recipe calls for frozen, chopped broccoli, but fresh broccoli may also be used.  Cut the broccoli into small florets and steam until tender before proceeding with the recipe.  The convenience of frozen store-bought pizza dough helps to speed up and simplify making this recipe, as does jarred tomato sauce.

IMG_7366

BROCCOLI CALZONES

Yield:   8 calzonesIMG_7356

Ingredients:

  • 1 tablespoon extra virgin olive oil
  • 1 medium onion, chopped
  • 2 packages (10 oz.) chopped broccoli, thawed
  • 4 garlic cloves, chopped
  • red pepper flakes to taste
  • 2 ( 1 pound) packages frozen pizza dough, thawed
  • 1 cup ricotta cheese ( can use small curd cottage cheese instead)
  • 1/2 cup grated Parmesan cheese
  • 1 1/2 cup shredded mozzarella, or pizza blend cheese
  • salt and pepper to taste
  • tomato sauce

Directions:

1.   Heat oil in a medium skillet over medium-high heat.  Add onion and cook till soft ( 4-5 minutes).  Add broccoli, garlic, and red pepper flakes.  Cook 5-7 minutes till any liquid has evaporated and mixture is hot.  Set aside to cool.

IMG_7358

2.  Preheat the oven to 400*F.  Prepare 2 baking sheets by lining with parchment paper.

3.  Divide each ball of dough into four ( 4) pieces.  On a lightly floured surface stretch each piece out.  First to a 3 x 4″ oval, then stretch again to 6 x 8″ oval.  Let dough rest as needed to relax before continuing to stretch it. Don’t worry if the ovals are not perfect, they almost never are.

Stretch dough pieces out into oval shapes.

Stretch dough pieces out into oval shapes.

4.  Stir cheeses into cooled broccoli mixture.  Season with salt and pepper.

Add cheeses to broccoli mixture.

Add cheeses to broccoli mixture.

5.  To assemble:  Spread about 1/2 cup broccoli mixture onto half of each dough piece.  Leave 1/2-inch border all around.  Fold over to form a semi-circle/ half moon.  Press edges to seal.  Cut two slits in the top of each one.

IMG_7362

Fold dough over filing the press edges to seal.

Fold dough over filling then press edges to seal.


6.  Using a wide spatula or bench knife, transfer the calzones to the baking sheets.  Reshape as needed.

IMG_7363

7.  Bake at 400*F for about 25 minutes, till golden brown.   Serve with warm sauce.


Serve with warm sauce.

Serve with warm sauce.

IMG_7369

To freeze for later use:  Proceed through step #5 above, then tightly wrap each calzone in plastic wrap, freeze until firm.  Transfer to zip-lock bags; label and date.  Freeze up to 2 months.  To cook and serve, unwrap and place on parchment-lined baking sheet.  Bake without thawing until golden, 35 – 40 minutes.

IMG_7368


SOURCE:   MarthaStewart.com


Hash Browns, Bacon and Egg Bake

Hash Browns, Bacon and Egg Bake

Hash Browns, Bacon and Egg Bake

It was a holiday weekend with time to prepare a leisurely breakfast.  One of our favorite breakfasts consists of bacon and eggs with home fries or hash browns.  But instead of preparing them all separately, my thought was to mix them all up into a baked casserole.   This is how it all came together….

IMG_7383

It took about 15 minutes to assemble, and 45 – 50 minutes baking time, so while it baked I was able to make a fresh fruit salad to go along with it.  This turned out to be a savory mixture of eggs, cheese, bacon, hash brown, and spices, that got us off to a great start.  Keep this one in mind if you’re planning a busy weekend, and need a hearty start to get you going.

HASH BROWNS, BACON AND EGG BAKE

Yield:  about 6 servings

Ingredients:

  • 4 cups frozen shredded hash brown potatoes,
  • 1 1/2 cups shredded Colby-Jack cheese blend
  • 6 eggs,  or 3 whole eggs, and 1/2 cup egg beater substitute
  • 1/2 cup milk
  • 1 teaspoon garlic-herb seasoning blend
  • 1/2 tsp. red pepper sauce
  • 4 – 5 slices bacon, precooked and crumbled
  • jarred salsa, if desired, for serving

Directions:

1.  Spray an 8-inch square baking dish with non-stick spray.  Preheat the oven to 350*F.

2.  In a large bowl, mix together the potatoes, crumbled bacon, and 1 cup of cheese.  Spread evenly in the baking dish.

Spread potatoes, bacon and cheese evenly in bottom of baking dish,

Spread potatoes, bacon and cheese evenly in bottom of baking dish,

3.  In a medium bowl, beat the eggs thoroughly with a wire whisk.  Add the milk,  herb blend seasoning and hot sauce.  Blend well.  Pour over potato-cheese mixture.


Mix up egg mixture and pour over potato layer,

Mix up egg mixture and pour over potato layer,

Sprinkle remaining 1/2 cup cheese evenly over all.

Top with remaining cheese.

Top with remaining cheese.

4.  Bake in 350* oven for 45-50 minutes.  When cooked, a knife inserted just off-center, should be “clean” when removed.  Let stand 10 minutes before cutting into squares for serving.  Serve with salsa if desired.


Cheese on top gets browned and crusty.

Cheese on top gets browned and crusty.

Cut into squares to serve.

Cut into squares to serve.

Nice with a little salsa to spice it up.

Nice with a little salsa to spice it up.

IMG_7382


SOURCE:   A Carolyn’s Original

Pizza Puffs

Pizza Puffs

Pizza Puffs

These are little bites that contain all the flavors that you love about pizza!   I made these awesome nibbles as part of a brunch buffet and everyone loved them.  They are extremely easy to make, and you can vary what you put into them according to your taste.  Whatever you like for pizza toppings can go into these delicious little morsels.   I’m going to keep these in my file as an appetizer or a great snack when game watching, or having an outdoor barbecue. These delicious little puffs will have everyone wanting more.

IMG_7229

I used some crumbled pre-cooked sausage and chopped pepperoni in mine plus I added some pizza dough flavoring to the batter.  I also included shredded mozzarella cheese because, really, what is pizza without the cheese?  When you serve these you will want to have a bowl of warm marinara sauce nearby to spoon over the puffs, or for dipping.

PIZZA PUFFS

Yield:   24 mini puffs

Ingredients: 

  • 3/4 cup all-purpose flourIMG_7200
  • 3/4 tsp. baking powder
  • 1/2 tsp. garlic powder
  • 1/2 tsp. pizza seasoning (optional, but good)
  • 3/4 cup milk
  • 1 egg, lightly beaten
  • 4 ounces, shredded mozzarella cheese (about 1 cup)
  • 2 ounces chopped pepperoni,  about 1/2 cup
  • 4 ounces italian sausage, cooked and crumbled
  • 1/2 cup pizza sauce

Directions:

1.  Preheat the oven to  375*F.  Grease 24 mini muffin cups.

2.  In a large bowl whisk together all the dry ingredients. (flour through pizza seasoning)

2.  In another small bowl or measuring cup, whisk together the milk and egg.   Add to the dry ingredients.  Mix to incorporate, then stir in the cheese, pepperoni and sausage.

IMG_7202

Let stand 10 minutes.  (This is important, it’s what makes them really puff up)

3.  Stir batter again, and divide among the muffin cups.   Bake till puffed and golden, 20 – 25 minutes.

IMG_7204


4.  Warm the pizza sauce and serve with the puffs for dipping.


IMG_7228

It occurred to me after making these that they could be well suited to a breakfast menu by substituting bacon and chopped ham for the meats, and cheddar cheese for mozzarella.    I must try that next time I make these.


SOURCE:   adapted from a recipe from Little Kitchen

Southwestern Egg Casserole

Southwestern Egg Casserole

Southwestern Egg Casserole

With Mother’s Day this weekend you may be thinking about having a mid-day brunch.  Egg-based casseroles are often what anchor a brunch menu, but sometimes they can be time consuming to prepare or you don’t get the timing right so they’re hot and ready to serve when everyone is ready to eat.   It gets a little tricky there.  I’ve had that experience, so when I want to serve a large egg casserole, I like to have it prepared in advance so I can pop it in the oven at just the right time and it will be cooked and served hot when everyone is ready.

IMG_7240

This casserole will meet that requirement.  It can be made in parts, and the parts put together quickly just before putting it in the oven.  What you do is cook up the sausage with onion and pepper,  mix up the eggs and cream, combine the two parts and add cheese. Now, all that can be done ahead and refrigerated.  The last part involves cutting up refrigerated  biscuits, laying them in a skillet or casserole, and pouring the egg-sausage mixture over them.  Top with more grated cheese and bake for 25 – 30 minutes.  Really easy and so so good.  This is a dish that can be spicy if you like it that way, or go easy on the spicy stuff to tame it down to your liking.

Mom will love this dish, especially if someone else is making it for her.   Hint, hint.  🙂

An egg casserole that Mom will love.

An egg casserole that Mom will love.

SOUTHWESTERN EGG CASSEROLE

Yield:  Servings,  8 – 10IMG_7230

Ingredients:

  • 1 package  (12-oz.) bulk chorizo or spicy pork breakfast sausage
  • 1/2 cup chopped onion
  • 3/4 cup chopped bell pepper, any color
  • 10 eggs
  • 1/4 cup milk or cream
  • 2 cups shredded pepper Jack or Mexican cheese blend ( 8-oz)
  • 1 teaspoon red pepper flakes
  • 1 can (16.3-oz.)  Grands Flaky Layers refrigerated original biscuits (Pillsbury or store brand)
  • 1 tablespoon vegetable oil

Directions:

1.  Heat oven to 375*F.  In a 12-inch ovenproof skillet, cook sausage, onion and bell pepper over medium-high heat, stirring frequently, until sausage is no longer pink; drain.  Remove mixture from skillet; set aside.

Cooking up the sausage, onion and pepper.

Cooking up the sausage, onion and pepper.

2.  In a large bowl, beat eggs and cream.  Stir in 1 cup of cheese, the pepper flakes and sausage mixture.

Mix sausage mixture into egg and cream mixture.

Mix sausage mixture into egg and cream mixture.

Separate dough into 8 biscuits.  Cut each biscuit into 6 pieces.

Cut each biscuit into 6 pieces.

Cut each biscuit into 6 pieces.

3.  Spread oil in bottom of skillet.  Place biscuits in skillet in an even layer.  Pour egg-sausage mixture over biscuits.  Top with remaining 1 cup cheese.

Ready for the oven.

Ready for the oven.

4.  Bake 25 to 30 minutes or until egg mixture is set and crust is deep golden brown.  Cool 5 minutes before serving.

Using the same skillet you cooked the sausage in is easy, and a black iron skillet conveys that “southwestern look”, but if you don’t have an oven-proof skillet, you can bake it in a greased or sprayed 13 x 9-inch baking dish.  Baking time should be the same, but start checking for doneness at around 20 minutes.

Puffed and golden, smelling wonderful.

Puffed and golden, smelling wonderful.

If you’re like me, and you like to have breakfast for supper sometimes,  this is a great dish to serve.  Just add a side salad.

Breakfast for supper.

Breakfast for supper.


SOURCE:    Pillsbury


Monte Cristo Sandwich

Monte Cristo Sandwich

Monte Cristo Sandwich

The Sunday morning after we change our clocks ahead for Daylight Savings Time, I always sleep late.  (We did lose an hour of sleep after all).  As a result breakfast is on the late-side, getting close to lunch. So I combine the two and one meal serves as two, i.e. brunch.

That event took place not long ago, and I ended up making this breakfast sandwich that, served with some fruit, was hearty enough to last us till dinnertime.

I used croissants to make these.

I used croissants to make these.

I don’t know what it is, but we seem to love the convenience of a whole meal in one package!  Or maybe its because these handheld meals are so darn delicious, but I am seeing breakfast sandwiches everywhere.  Whether you choose to use a knife and fork, or just grab them and go, these will certainly make you want to get out of bed and get going!

The Monte Cristo sandwich is an American classic, where you dip ham and swiss cheese sandwiches in egg batter and pan-fry them.  Dust the hot sandwiches with confectioners’ sugar and serve with some jam on the side if you like, or drizzle them with maple syrup for a real treat.

MONTE CRISTO SANDWICH

Yield:   Makes 4 servings/sandwiches

Ingredients:

  • Dijon mustard
  • 8 slices country bread (I used croissants for mine)
  • swiss cheese slices ( I used Muenster cheese)
  • sliced ham
  • 4 large eggs
  • 1/2 cup milk
  • 1 teaspoon salt
  • 1/2 teaspoon pepper
  • 1/4 teaspoon nutmeg
  • 4 tablespoons butter
  • confectioners’ sugar, if desired

Directions:

1.  Spread mustard on bread.  Layer 4 bread slices with Swiss cheese, ham, and cheese again.  Place remaining bread slices on top.

Layer up the ham and cheese, then dip the sandwich in egg.

Layer up the ham and cheese, then dip the sandwich in egg.

2.  In a shallow dish, whisk together eggs, milk, salt, pepper and nutmeg.  Dip each sandwich in the egg mixture, turning to coat well.

3.  In a large skillet, melt butter over medium heat.  When butter is foamy, add the sandwiches, and cook, turning once, until golden brown on both sides, 6 to 8 minutes total.

Cooking on the griddle.

Cooking on the griddle.

Second side getting browned.

Second side getting browned.

Serve immediately, dusted with confectioners’ sugar.

Forgot to dust them with sugar.  :D

Forgot to dust them with sugar. 😀

SOURCE:   Everyday Food

Spinach Artichoke Bread

Spinach Artichoke Bread

Spinach Artichoke Bread

In my experience one of the most popular appetizers around is hot spinach dip, or a combination of spinach and artichoke dip.  Hot, cheesy, gooey spinach dip.  Oh yes,  addictively delicious with crackers or chips.

Since we would be sitting at a table with a plate onto which we could place our appetizers, I thought that in place of crackers or chips I would use bread to do two things;  add more substance, and provide a larger surface to carry all that lucious dip.  So this recipe seemed like the perfect solution.

This is great for parties, or could be used as a snack or light lunch, which is what we did with the leftovers.  Wrapped in foil and reheated in a warm oven, they were as good as new.

IMG_6011

 SPINACH ARTICHOKE BREAD

Yield:   12  servings

Ingredients:

  • 8 oz. cream cheese, softened ( low-fat is OK)

    Only low-fat ingredients allowed!  :D

    Only low-fat ingredients allowed! 😀

  • 3/4 cup (6oz.) plain, nonfat Greek yogurt
  • 1 pkg. frozen chopped spinach,  defrosted and well drained
  • 12 oz. can artichoke quarters, in water, drained
  • 1 tsp. onion powder
  • 1 tsp. garlic powder
  • 1 tsp. salt
  • 1/2 cup shredded mozzarella cheese, divided
  • 1/4 cup shredded Parmesan cheese
  • 4 French rolls, or 2 French baguettes

Directions:

1.  Preheat oven to 375*F

2.  With an electric mixer, beat cream cheese until smooth.  Add yogurt, continue mixing until smooth.

3.  Chop artichokes, and squeeze out spinach to remove excess liquid.  Add to cheese-yogurt mixture.  Add onion powder, garlic powder, salt, 1/4 cup mozzarella and Parmesan.  Fold well to incorporate into a uniform mixture.

4.  Cut the French bread in half.  Slightly hollow each half by removing some of the bread from the middle.  Fill with the spinach-artichoke mixture and level the filling.  Sprinkle with the remaining mozzarella.

Breads filled and ready for the oven.

Breads filled and ready for the oven.

5.  Place the loaves on a baking sheet.  Bake for 15 – 20 minutes, until filling is bubbly and the cheese on top is browned slightly.  Allow to cool for several minutes before slicing and serving.

The bread gets toasty, and the filling gets melty and warm.

The bread gets toasty, and the filling gets melty and warm.

IMG_6012

SOURCE:   Happier Holidays Recipe Book

Broccoli-Cheddar Oven Risotto

Broccoli-Cheddar Oven Risotto

Broccoli-Cheddar Oven Risotto

Risotto is one of those old-time comfort foods that I grew up on.  It was prepared by my Northern Italian grandfather who was so fussy about how it was made that he didn’t trust anyone to get it right except himself.  My mother’s sister, my aunt, watched him carefully as he made the risotto in a big copper kettle, and after my grandfather passed on, she was the keeper of the “secret” of how to make a good risotto. And she was the one who continued the tradition of making it for us.

By watching my aunt make this simple rice dish I too learned how to make a “good” risotto.  Without a lot of details here, let me just say it required lots of stirring, and adding the hot chicken broth in small amounts until it was absorbed, then adding a little more, and so on…. Risotto also needed to be flavored with saffron which gave the rice a light yellow color, and enticing aroma and flavor.

IMG_5628

Although we all loved risotto, it was not made frequently, because it was labor intensive beginning with stewing a whole chicken to get the rich broth needed to cook the rice.  All the meat was saved and stirred into the rice at the end of its cooking time, making this dish very filling and hearty.   My Dad particularly loved my aunt’s rice,  rather unusual for a Swede, but you can’t account for a person’s taste, and like him, I love it too.

With this back story in mind, you can imagine my delight when I came across this recipe for risotto, baked in the oven, and no lengthy stirring required.  Well, I was all over that recipe like flies on a dead pig!!

I made it for the first time this week.   Mr. D. thought it was marvelous and I thought it was great, too.  The addition of broccoli that is roasted in the oven while the rice bakes, then added in at the end with cheddar cheese, produces a tasty, cheesy and filling main dish. I treated it as a side dish, and served it with sliced ham.   Not quite the same as the risotto I remember, but certainly a rendition that I plan to make again.

Baked risotto with ham.

Baked risotto with ham.

Times and cooking methods change.  More and more of the old ethnic dishes are being modernized and fused with new ingredients, so that what was once old is new again.  I, for one, like this trend.

BROCCOLI-CHEDDAR OVEN RISOTTO

Yield:    Serves 4

Ingredients:

Use Arborio rice which produces a very creamy risotto.

Use Arborio rice which produces a very creamy risotto.

  • 4 cups low-sodium chicken broth (use vegetable broth for a vegetarian version)
  • 1 bunch broccoli, cut into small florets
  • 1 Tbsp. extra virgin olive oil
  • 3 Tbsp. unsalted butter, divided
  • 1/2 small onion, chopped
  • 1 3/4 cups arborio rice
  • 1/4 cup white wine
  • Kosher salt and black pepper
  • 1 cup grated sharp cheddar cheese (about 4 oz.)

Directions:

1.  Position oven racks in the upper and lower thirds of the oven and preheat to 425*F.    Bring chicken broth to a low simmer in a saucepan.

Warm the chicken broth.

Warm the chicken broth.

Toss the broccoli with the olive oil on a rimmed baking sheet.

Prepare the broccoli for roasting.

Prepare the broccoli for roasting.

2.  Melt 2 Tbsp. butter in a large Dutch oven or ovenproof pot over medium-high heat.  Add the onion and cook, stirring occasionally, until slightly softened, about 2 minutes.

Sauté onions in butter.

Sauté onions in butter.

Add the rice and stir to coat.

Add the rice to butter and onions and stir to coat.

Add the rice to butter and onions and stir to coat.

Pour in the wine and cook until evaporated, about 1 minute.  Add the hot both, 3/4 tsp. salt, and pepper to taste;  bring to a boil.

Add the wine and chicken broth all at once.

Add the chicken broth all at once.

3.  Cover the pot and set on the bottom oven rack.  Place the broccoli on the upper rack.  Bake, stirring the rice and broccoli once halfway through cooking, until most of the liquid has been absorbed in the rice and the broccoli is tender, 20 to 25 minutes.

4.  Remove the rice and broccoli from the oven.  Add 3/4 cup hot water, the remaining 1 Tbsp. butter, and the cheese to the rice and stir until creamy (add a little more hot water to loosen, if necessary).  Stir in the broccoli.

Add cheese to baked rice.

Add cheese to baked rice.

Stir in roast broccoli.

Stir in roast broccoli.

Incredibly good served with ham.

Incredibly good served with ham.

SOURCE:    Cooking Light

Grapes, You Need Them!

Grapes,  juicy and sweet.

Grapes, juicy and sweet.

Grapes are ancient.  So ancient that some vines have been growing on this planet long before people arrived.  In certain areas of Italy there is still evidence of late Bronze Age vineyard posts used to train grapevines.  Over the years we’ve been trying to find  ways to make them bigger and sweeter.  Some of the grapes I see at the market are so plump and ripe, I just want to reach out and grab one or two for a juicy bite.  Don’t you?

Red, purple or green, plump or petite, grapes are a healthy pop-in-your-mouth snack.  I love grapes when they are cold as a refreshing way to cool off.  And when we travel, I like to bring along a big bunch of grapes to snack on.  One 3/4 cup serving of grapes is a good source of vitamin K, providing 25% of your daily needs.  Recent studies suggest that Vitamin K reduces the risk of bone fractures, particularly in older women.  Other studies have shown the benefits of having a glass of red wine to reduce the risk of heart and artery problems.  Grapes, particularly red  and black ones, are also rich in antioxidants.  So we know about their benefits, and we eat grapes fresh as a fruit/snack, or drink their juice fermented as wine,  but how many of you cook with grapes?  I’m not taking about making grape jam or jelly, but really incorporating them into a main dish, side dish or salad.

IMG_5263

I’m guessing not many people would even think of cooking with grapes.  Small and juicy with a hint of acid and sweet, they make perfect partners with some foods.  In the weeks ahead, I would like to introduce you to some recipes that utilize grapes in ways you may not have  considered.

Grape and Rosemary Focaccia

Grape and Rosemary Focaccia

The first one is this recipe for Grape-Rosemary Focaccia.  Scattered over the top of the focaccia, the grapes subtly sweeten each bite.  The sweet/salty combination of grapes, Parmesan cheese and rosemary is surprising, and delicious.  It can be served with a soup, or salad, as a dinner accompaniment in place of dinner rolls, or as an appetizer.  To make it quickly, use prepared whole wheat pizza dough from your supermarket, fresh or frozen.  If frozen, defrost thoroughly in the refrigerator or at room temperature.  Open the bag to give the dough room to expand, i.e. “rise”, prior to stretching and shaping.   Once the focaccia is prepared, allow it to sit at room temperature for about half an hour for another small “rise” before baking.

GRAPE-ROSEMARY FOCACCIA

Yield:    Makes 12 servings

Whole wheat pizza dough, grapes, rosemary, and Parmesan cheese.

Whole wheat pizza dough, grapes, rosemary, and Parmesan cheese.

Ingredients:

  • 1 pound prepared pizza dough, preferably whole wheat
  • 1 Tbsp. extra-virgin olive oil
  • 1/2 cup shredded Parmesan cheese
  • 2 tsp. fresh rosemary leaves or 1 tsp. dried
  • 2 cups seedless grapes.  ( If large ones, cut in half.)

1.  Position rack in upper third of oven;  preheat to 425 *F.  Coat a large baking sheet with cooking spray.

2.  Working on a lightly floured surface, pat and stretch dough with damp hands into a 10 by 12-inch oval.  If the dough will not stretch easily, let it rest for 10 minutes, then stretch it again.  Transfer to the prepared baking sheet.

Stretch dough out on a baking sheet and sprinkle with cheese.

Stretch dough out on a baking sheet, drizzle with oil and sprinkle with cheese.

3.  Drizzle the oil over the dough;  sprinkle with Parmesan cheese and rosemary.  Arrange grapes on top and press lightly into the dough.   At this point I let mine sit at room temperature for about 30 minutes to give the dough a chance to rest and rise again a little bit.

Add chopped rosemary and grapes.

Add chopped rosemary and grapes.

4.  Bake until golden around the edges and some of the grapes have burst,  18 – 25 minutes.   (Note:  Mine was done at 15 minutes, so watch carefully,)   Let cool at least 5 minutes before serving.  (The grapes will be very hot inside.)

Golden brown with a heavenly aroma after baking.

Golden brown with a heavenly aroma after baking.

Serve warm with additional olive oil for dipping.

Serve warm with additional olive oil for dipping.

SOURCE:    Eating Well

Ham and Apple Butter Panini

Ham and apple butter  panini.

Ham and apple butter panini.

The foliage this year in New England is awesome, probably due to the few chilly mornings we had a couple of weeks ago.  Even though it is still developing in our area,  north of us it has almost reached its peak.  So this year we took our annual foliage ride to New Hampshire.   It was a beautiful sunny day and we totally enjoyed our day-cation.  One of the highlights of the day was our lunch at a small cafe, situated with a  river running behind it.  There was a patio out back where we sat to enjoy not only our lunch, but also the foliage along the river.

We both ordered a bowl of soup and this Ham and Apple Butter Panini.  It was awesome, and after we returned home the thought of it kept running through my mind.  I wished I could have another one, so I made it happen.  The combination may sound a little unusual, but let me assure you, it’s all good.  Somehow it just works.  The sweet apple butter, the salty ham, crisp apple slices and melted cheese.  Irresistible.

Cheese, apples, ham and apple butter.  Superb!

Cheese, apples, ham and apple butter. Superb!

If you go to an apple orchard and come away looking for ideas to use up your apples, this sandwich is a great place to start.

HAM AND APPLE BUTTER PANINI

Yield:   4 sandwiches

Ingredients:

  • 8 slices sturdy bread, such as sourdough, or a rustic white like Scala.
  • 3 – 4 Tbsp. butter, softened
  • sliced cheddar cheese, white or yellow,
  • 2 – 3 thinly sliced apples, such as Macoun, Macintosh, or whatever is available in your area.
  • thinly sliced deli ham, about 6 – 8 oz.
  • 1/2 cup apple butter (available at the supermarket where jams are sold, or you can make your own.)

Directions:

To assemble the sandwiches, separate the slices of bread into pairs.  Generously butter one side of each slice of bread, and then place them butter side down on a work surface.  (This will be the outside of the sandwich.)

On one side of each pair, layer cheese, apple slices, and ham.

IMG_5246

On the remaining slice of each pair, spread a generous layer of apple butter.  Sandwich the two slices of each pair together with the buttered sides facing outward.

Butter the outside of bread on both sides and grill it.

Butter the outside of bread on both sides and grill it.

Warm a cast iron skillet or panini grill over medium heat.  Cook the sandwiches, turning once, until both sides are golden and the cheese is melted.  Slice in half and serve immediately.

Sweet, salty, cheesy, melty.  What's not to love?

Sweet, salty, cheesy, melty. What’s not to love?

IMG_5251