Chocolate Plum Cake
The last day of summer has come and gone and we are now officially into the fall season. However stone fruits are still widely available at the farm stands in my area and in the supermarkets. All these fruits reach their peak of ripeness in the summer sun, and they are delicious and appealing when you cook with them. They lend themselves to every kind of preparation: poaching, sautéing, roasting, grilling, and baking. So you can work them into your early fall dessert recipes.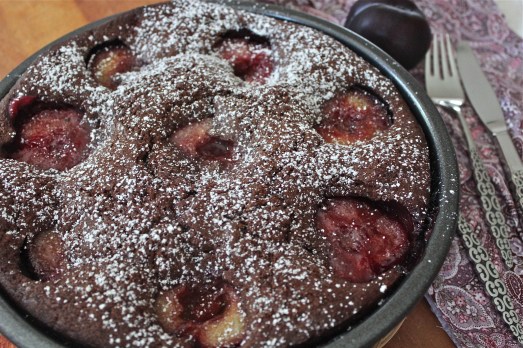
In this recipe for Chocolate Plum Cake you can interchange the fruits, and perhaps use nectarines instead of plums. I decided to make it with plums because I have always enjoyed chocolate with wine; port wine or other dessert wine goes best with chocolate. Since purple plums have a sweet, wine-like flavor they pair beautifully with chocolate in this moist, single-layer cake. Another stone fruit that would work well here is the pluot–a cross between apricots and plums. They are now sold in many supermarkets in the summer.
I loved making the batter for this cake. There is only 1/4 cup flour (whole wheat) in it. The rest of the dry ingredients consist of ground almond flour, with baking powder and a little salt. This makes the texture of the cake very fine and a little crumbly. Almond is not noticeable in the taste, instead you’re bombarded with dense chocolate. The recipe calls for chocolate that is at least 64% cocoa, but I had a bar that was 70% cocoa, so I used that. With baking, the plums become tender and retain their juiciness. Oh, boy, this is good!

Tender and moist cake, juicy plums.
CHOCOLATE PLUM CAKE
Yield: 8 servings
Ingredients:
- 1 stick softened butter, divided (7 Tablespoons plus 1 Tablespoon.)

Beautiful black plums and chocolate. Yum-yum!!
- 4 black or purple plums
- 1 Tablespoon, plus 1/3 cup sugar
- 1 cup almond meal**
- 1/4 cup buckwheat or whole-wheat flour##
- 1/2 teaspoon baking powder
- 1/4 teaspoon kosher salt
- 3 large eggs, at room temperature
- 3.5 ounces dark chocolate ( around 64% cocoa content), melted
- 1/4 cup heavy cream
- Garnish: confectioners’ sugar
** Almond meal – also called almond flour–is sold in the health-food aisle of many supermarkets. The brand I used is by Bob’s Red Mill. You can substitute other nut meals, or make your own by pulsing blanched almonds in a food processor until finely ground but not yet nut butter.
## Substitute a gluten-free baking mix for the flour and this can be a gluten-free dessert.
1. Preheat the oven to 350*F. Butter a 9 – inch round cake pan; then line the bottom with parchment paper and set aside.
2. In a frying pan, melt 1 Tablespoon butter over medium heat. Add the plums, cut side down, and sprinkle with 1 Tablespoon granulated sugar. Cook 2 minutes and flip onto the other side. Continue to cook 2 minutes more. Remove pan from heat and set aside.
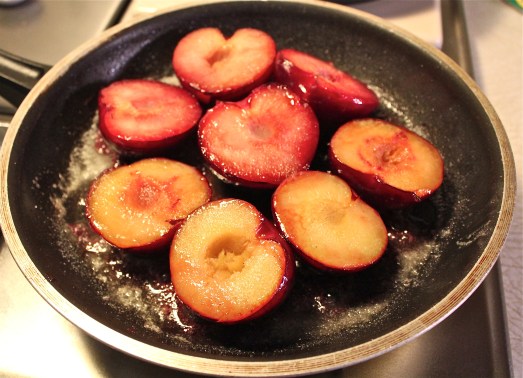
Sauté the plums in butter and sugar.
3. In the bowl of your mixer beat the remaining 7 tablespoons butter and 1/3 cup sugar until pale in color. Add eggs, one at a time, beating well after each. Scrape the sides of the bowl as you go. Stir in the melted chocolate and then the heavy cream.
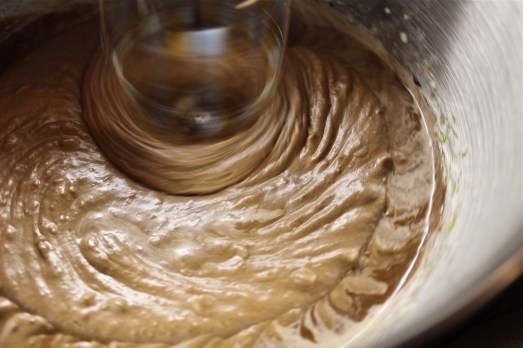
Mix melted chocolate and cream into the batter.
4. Add the dry ingredients, and stir until the batter is smooth.

Almond flour as part of the dry ingredients.
Pour into the prepared pan and arrange the sautéed plums on top, cut side up.

Pour into a round baking pan.

Arrange plums on top.
Drizzle any pan juices over the plums.
5. Bake until the blade of a sharp knife inserted into the middle comes out clean, 40 to 45 minutes. Let the cake cool 5 minutes before removing it from the pan, Dust with confectioners’ sugar.


Each wedge gets a half plum.
SOURCE: slightly modified from Yankee Magazine