

Chicken Cacciatore with Polenta
I love this meal served over polenta or pasta but I make it rather infrequently because it takes quite a bit of time to make. Especially when you slow cook it the way I usually do. This past weekend I decided to try this recipe that is prepared using a slow-cooker. By using boneless chicken thighs, the chicken doesn’t need all day to become falling apart tender. A cooking time of 4 – 5 hours is perfect.
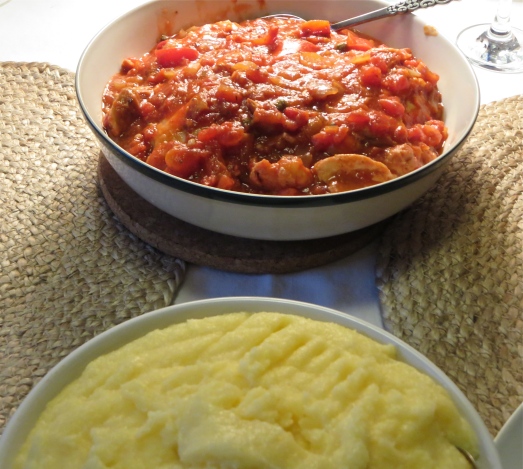
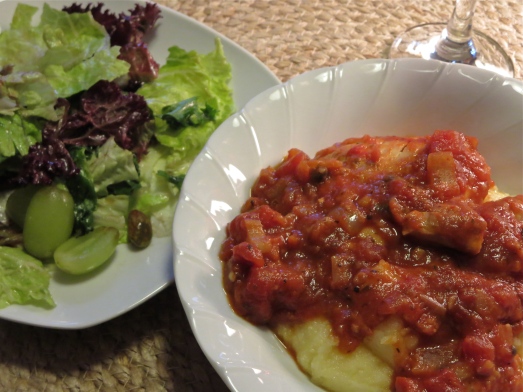
Starting around noon, I browned the chicken as the recipe directs, made the sauce and put it all in the slow cooker and in about 4 hours it had reached saucy perfection, and the aroma in my kitchen was wonderful. I continued with the “quick” approach and made instant polenta to serve the cacciatore over. That along with an inventive green salad and a glass of wine was a perfect ending to a busy weekend.

When I make polenta I usually use Bob’s Red Mill Whole Grain Polenta which takes about 30 minutes to cook, and requires constant attention and stirring. This time I opted for Scalafani Instant Polenta, that cooks in only 3 minutes. You still need to stir it constantly, but for a much shorter time.

Hint: when making polenta always use a long handled spoon ( wooden is best) for stirring, because as it thickens it will “pop” as it boils and can burn your hands. (Ask me how I know.)
CHICKEN CACCIATORE
Yield: Serves 8
Ingredients:
- 1/2 cup all-purpose flour
- 8 skinless, boneless chicken thighs (about 2 pounds)
- 1 tablespoon olive oil
- 1 large onion, chopped
- 1 large red bell pepper, chopped
- 6 cloves garlic, minced
- 1/2 cup dry red or white wine
- 1/2 cup tomato puree ( 1 6-ounce can tomato paste)

- 2 tablespoons capers
- 1 1/2 teaspoons crushed red pepper
- 1 teaspoon dried oregano
- 1 teaspoon black pepper
- 3/4 teaspoon salt
- 1 (14.5-ounce) can unsalted petite diced tomatoes, undrained
- 1/4 cup chopped fresh parsley
Directions:
1. Place flour in a shallow dish; dredge chicken in flour, shaking off excess.
2. Heat a large skillet over medium-high heat. Add oil; swirl to coat pan. Add half of chicken; cook 4 minutes on each side or until browned.

Browning the chicken.
Place chicken in a 6-quart electric slow cooker. Repeat procedure with remaining chicken. Reduce heat to medium.
3. Add a drizzle more oil if necessary. Add onion, bell pepper, and garlic, sauté 4 minutes.

Saute onions, pepper and garlic.
Add wine and tomato puree, stirring to blend ingredients.

Add puree and wine.
Bring to a simmer, adding diced tomatoes, capers, salt , peppers, and oregano.
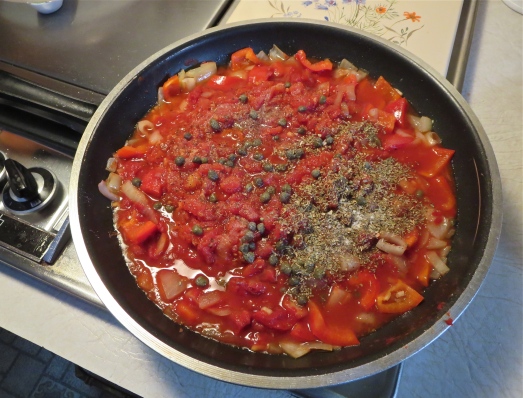
Add tomatoes and seasonings.
Heat through. Add to slow cooker, pouring over chicken.
4. Cover and cook on LOW for 4 hours or until chicken is tender. Sprinkle with parsley.

Slow-cooker chicken cacciatore.

Serve it over polenta or pasta.
If you have leftovers, they can be easily transformed into soup: Shred the chicken, and place in a pot with sauce. Add unsalted chicken stock, diced zucchini, and diced carrots; simmer until veggies are tender. Add in any leftover pasta at the end. Serve with a little grated cheese on top. One meal becomes two. YUM!
SOURCE: Cooking Light


