Grilled Green Beans

Grilled Green Beans

Grilled Green Beans

Sometimes I wish there was a kind of Willy Wonka-style candy factory that produced chocolate covered vegetables instead of candy 🙂    OK, call me crazy, but don’t you think that sort of factory would be totally AMAZING?   Be honest now….you want it.   There’s no shame in that.

Since there’s no fantasy-land vegetable candy factory (not yet, anyway), I’ve had to settle for roasting a big ole batch of green beans with shallots and garlic and then tossing them with some soy sauce and sesame oil.  They weren’t chocolate covered, but we ate them like candy.  What’s with me going on about candy?—-enough, already.

IMG_8109

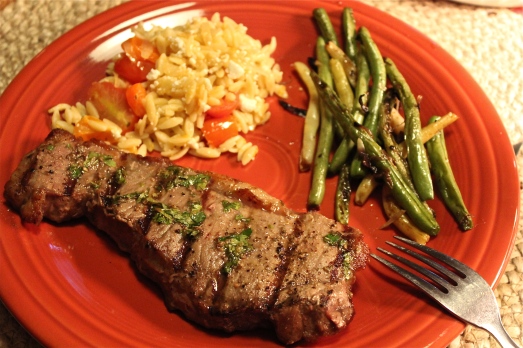
Haven’t you ever considered grilling green beans?   This is a fantastic approach, giving the vegetables a little smoky char.  A grill basket or similar grill-top devise exposes all the surfaces to the flame, but if you don’t have a grill basket,  grill them on a piece of heavy-duty foil.  Be sure you don’t skip the step of covering them and letting the mixture stand, so it all steams to perfect doneness during that time.

IMG_8104

The flavor of these beans is extraordinary. Kind of like something you expect to get in a fine restaurant.   We loved them and I think you will too. So while fresh green beans are still available at the market, give them a try.

GRILLED GREAN BEANS

Yield:   Serves 6

Ingredients:IMG_8096

  • 3 large shallots or 1 small red onion, vertically sliced
  • 2 garlic cloves, minced
  • 1 pound green beans, trimmed ( I used a mixture of green beans and wax beans)
  • 2 tablespoons canola oil
  • 2 teaspoons low-sodium soy sauce
  • 1 teaspoon dark sesame oil
  • 1/4 teaspoon kosher salt
  • 1/4 teaspoon freshly ground black pepper

IMG_8097

Directions:

1.  Preheat grill to medium-high heat.

2.  Place a grill basket on hot grill; preheat for 5 minutes.

3.  Place shallots, garlic, and green beans in a large bowl.  Drizzle with canola oil; toss well to coat.

Toss vegetables with olive oil.

Toss vegetables with canola oil.

Arrange mixture in hot grill basket; cover grill, and cook 7 minutes or until beans are lightly charred, tossing occasionally.

Toss occasionally for even cooking and browning.

Toss occasionally for even cooking and browning.

Place bean mixture in a large bowl; cover and let stand 5 minutes.  Add soy sauce and remaining ingredients; toss to combine.  Serve hot.

IMG_8109


SOURCE:   COOKING LIGHT

Salad: Apple and Fennel with Pistachios and Apricot

Salad:  Apple+Fennel+Arugula+Apricots+Pistachios

Salad: Apple+Fennel+Arugula+Apricots+Pistachios

How strange it is!   It’s not quite over, but it’s over.  Is it the same where you are?  Here where I live, September should have felt like the soft days at the end of summer, but instead it’s gotten cool way too soon.   Mornings have been down right chilly–sweater and jacket chilly.   I’m hoping that Mother Nature will change her mind (just like a woman does), and bring back some warmth.

But now that October is here, we’re in the middle of things;  in a transition period, when we have to put away the bathing suits, shorts and flip flops, and maybe bring out that infinity scarf.  A pumpkin spice latte tastes really good.  Seasons don’t change in a snap, there’s always a transition period, a time to settle in, take a deep breath, absorb the last of warm breezes, and get ready for crisp, cool nights, apples and cider, and the world around us bursting with vibrant color.

This salad feels like a lovely transition.  Fresh apples and fennel make it easy to move into Autumn.  Add some arugula for its peppery notes, salty roasted pistachios, sweet dried apricots, and some salty Parmesan.  It’s all about balance–sweet, salty, and spicy!

Pretty colors go into this salad.

Pretty colors go into this salad.

It’s also very versatile!   Substitute currants or dried cranberries for the apricots.  Add spinach and parsley instead of arugula.  Try a balsamic vinaigrette instead of lemon juice.  This salad can be exactly what you want it to be.IMG_8138

What’s also great about this salad is that most of it can be assembled long before it’s served.  Everything but the greens can be tossed together and left covered in the refrigerator for a day and then tossed with the arugula ( or your preferred greens), just before serving.    Easy breezy as we transition into Autumn.

SALAD:  APPLE + FENNEL+PISTACHIOS+ APRICOT

Yield:  Serves 4   Adjust ingredients accordingly to make more.

Ingredients:

  • 1 large Fuji or Golden Delicious apple, cored and thinly slicedIMG_8139
  • 1 large fennel bulb, thinly sliced
  • 2 large handfuls arugula, coarsely chopped
  • 2 tablespoons finely diced red onions
  • 2 tablespoons fresh lemon juice
  • 1 tablespoon apple cider vinegar
  • 2 tablespoons olive oil
  • 1/3 cup finely diced dried apricots
  • 1/2 cup coarsely chopped pistachios
  • 1/4 cup shaved Parmesan
  • salt and pepper to taste

Directions:

1.  In a large bowl toss together the thinly sliced apples, fennel, arugula, and red onions.  Drizzle with lemon juice, vinegar, and olive oil.  Add the dried apricot pieces, pistachios and cheese.  Toss to incorporate.  Season with salt and pepper and toss just before serving.   Serve soon after assembling.

IMG_8144


SOURCE:  All Recipes

Orzo, Spinach and Tomatoes

Orzo with tomatoes, (but not the spinach).

Orzo with tomatoes, (but not the spinach).

Every once in a while you need a dinner that’s especially man-pleasing without going the whole steak and potatoes route.  This is it!

Grilled steak and green  beans with orzo mixture.

Grilled steak and green beans with orzo mixture.

If you’re queen in your kitchen, as I am,  give yourself the smaller steak and load up on the orzo mixture and green beans.  Everyone will be well pleased.  Guaranteed!!   And if there should be any leftover steak,  slice it up and and serve it over the remains of this orzo side dish for the next day’s lunch or a deja-vue dinner.

I’m well-known for making a big pot of something-or-other and eating it (sometimes begrudgingly) for several days.   Usually it’s soups—they’re always good for on-going consumption, especially if you keep adding a little something like an extra pat of butter or a few left over veggies after each reheating.  Soups can get more delicious the longer they last.  Did you know this?

Since Monday is staring us in the face, I thought I’d start off the week with this last-all-week staple.  Something savory and healthy to help us get through the week with a smiley face.    This dish will taste best if the spinach and tomatoes are on sale!!!


ORZO, SPINACH AND TOMATOES

Please note:   I decided to make this dish without the spinach this timeIMG_8113

Yield:   Serves 4

Ingredients:

  • 1/2 pound orzo, cooked according to package directions
  • 1/2 pound baby spinach, or larger-leafed spinach, torn into smaller pieces
  • 1 pint cherry or grape tomatoes, cut in half
  • 1 tablespoon butter
  • 1 large shallot, chopped
  • 1 cup crumbled feta cheese
  • 4 tablespoons olive oil
  • 1 tablespoon fresh lemon juice
  • 2 cloves garlic, minced
  • fine kosher or sea salt and freshly ground black pepper to taste

Directions:

1.  In a large sauce pan, melt the butter.  Add the shallot and sauté to soften.  Add the tomatoes and continue to sauté them until they start to release their liquid, and they soften.

Saute the shallots and tomatoes till they soften.

Saute the shallots and tomatoes till they soften.

2.  Add the cooked orzo to the pan along with the spinach, and toss to coat and integrate all the ingredients.   Transfer to a large serving bowl.

Add the cooked orzo and stir to combine.

Add the cooked orzo and stir to combine.

3.  In a small bowl, whisk together the olive oil, lemon juice and minced garlic, plus salt and pepper to taste.  Pour over the orzo mixture and stir to mix well.  Crumble the feta cheese over the top.

IMG_8111

TIP:   Double the batch of orzo and serve as a cold side dish later in the week.  Just toss with a little additional olive oil before storing in the refrigerator in an airtight container.   Adding some chopped kalamata olives really perks up this dish also.   This is delicious hot or cold.

SOURCE:   Week Night Grilling with the BBQ Queens

Pumpkin Spice Blondies

Pumpkin Spice Blondies

Pumpkin Spice Blondies

Do you ever play the “what if” game?  It goes like this…..”What if I use a different kind of flour here?”    What if I use all butter instead of shortening in this cake?”

Today’s recipe came about when I asked ” what if I used a cookie mix to make some squares”?    Yes, I know there are a gazillion recipes out there that use cake mixes to make cookies, but what I had on hand was a boxed pumpkin spice cookie mix, but I didn’t really want to make cookies.  This is how I changed the directions to make blondies with all the flavors you would expect in a pumpkin square, and then some!!

Soooo Good!

Soooo Good!

These came out chewy, and chunky because of the extra add-ins.  I found that by using miniature marshmallows, they melt while baking leaving an extra gooey spot in the bar.   I also used caramel bits and dried cranberries in these and all the flavors combined will remind you of fall.  To make the glaze on top I used about a cup of powdered sugar and 1/2 teaspoon pumpkin pie spice mixed with about 4 teaspoons of water.  This was spread on after the bars had cooled completely.     Today’s game of “what if”  was successful…. my experiments don’t always turn out as well.  So I invite you to try them for yourself.  Any brand of pumpkin cookie mix will work, using the amount of butter and egg specified on the package.

IMG_8069


PUMPKIN BLONDIES

Yield:  Makes 16 barsIMG_8053

Ingredients:

  • 1 package ( 16.5-oz.) pumpkin spice cookie mix
  • 1 egg
  • 1/2 cup ( 1-stick) butter, softened at room temperature
  • 1/3 cup each caramel bits, mini marshmallows, and dried cranberries
Disregard the can of pumpkin…I didn't use it.

Disregard the can of pumpkin…I didn’t use it.

Directions:

1.   Preheat oven to 350*F.  Lightly grease an 8x8x2-inch pan.

2.  In a medium bowl, stir together the cookie mix, egg and butter until a dough forms.

3.  Stir in the caramel bits, mini marshmallows, and dried cranberries until well incorporated.

4.  Scrape dough into prepared pan and press in evenly.

5.  Bake for 28-32 minutes or until a toothpick inserted in center comes out clean.  Cool completely before topping with glaze.

Cool the baked squares before adding glaze.

Cool the baked squares before adding glaze.

6.  Glaze:  1 cup powdered sugar, 1/2 tsp. pumpkin pie spice,  3-4 teaspoons water.  Whisk together to form a loose glaze that you can spread on top of the blondies.

IMG_8067


SOURCE:    a Carolyn’s Original


Grilled Steak with Chimichurri Sauce

Chimichurri Sauce

Chimichurri Sauce

Although I like a good steak, I’m not a total carnivore.   Whenever I do eat meat, I like a good topping or spice rub to season it up.  Especially if I’m going to be grilling it.

Steak topped with too much A-1 sauce or blue cheese,   hamburgers with waaay too much cheddar cheese.  Yes and yes!  It’s the melted butter that makes the lobster better, the barbecue sauce on ribs, and salsa on tacos.  Please join me in saucing just about anything and everything.

In my refrigerator, you will find a number of little jars filled with sweet, sour, and spicy sauce concoctions.   Butter too…..obviously lots of butter.

Steaks are not regular visitors to my refrigerator.   The good ones are a bit too pricy, but when they are marked down because of “sale date expiration”, that’s when I grab them for the freezer.   So, because it’s the end of summer,  and I want to grill out a few more times, and because I made a “fancy-pants” chimichurri sauce, it’s a special occasion calling for STEAK!

Steak on the grill!!

Steak on the grill!!

In Argentina, a beef-raising country, where everyone loves their beef, chimichurri sauce is a household staple.  Made with fresh and dried herbs, garlic, red wine vinegar and a good quality olive oil,  it brings out the best in meats.  Brush it on both sides of the steak before grilling to lock in moisture and add a depth of flavor to an already flavorful cut of beef.  Then save the remainder of the sauce to serve at the table with the steaks.

Serving suggestion:   grilled steak with chimichurri sauce, grilled green beans, and orzo with tomatoes and shallots.  A glass of Merlot would be a nice  accompaniment this mighty fine meal.

The perfect meal.

The perfect meal.

GRILLED STEAK WITH CHIMICHURRI SAUCE

Yield:   Serves 4

Ingredients:

  • 4 small steaks, such as sirloin, rib-eyes, strip, or T-bones
  • For the sauce:
  • 1/4 cup mixed chopped fresh Italian flat-leaf parsley and cilantro leaves
  • 1 teaspoon dried oregano
  • 3 cloves garlic, finely minced
  • 1/2 teaspoon red pepper flakes
  • 1/2 teaspoon kosher or sea salt
  • 1/4 teaspoon freshly ground black pepper
  • 1/3 cup virgin olive oil
  • 1/4 cup red wine vinegar

Directions:

1.  Make the sauce:  In a medium bowl, whisk together the sauce ingredients.  Brush some sauce on both sides of the steaks. Set the remaining mixture aside to serve with the steaks.

2   Prepare the grill:  preheat to medium-high.

3.  Place the steaks on the grill grates, and grill for 5 minutes per side for medium-rare  and 6 minutes per side for medium.  Remove from the grill and serve, or cover with foil to keep warm while any other items finish cooking.

IMG_8103


SOURCE:  Week Night Grilling with the BBQ Queens.


Apple Pie Biscuits


Apple Pie Biscuits

Apple Pie Biscuits


Baking is all about sharing.   Sharing the recipes, sharing techniques, and most definitely, sharing what you’ve made.

Today’s offering is all about the most divine biscuits, perfect for the early fall weather we are having here in the Northeast.  I couldn’t wait to share them with you.

IMG_8093

Apple picking time is upon us, or you may be getting yours at the farmer’s market or grocery store.  Apples and pumpkin are probably the two favorites to include when baking in the fall.  So in the coming weeks expect to see a variety of offerings featuring these two ingredients.  Today  it’s apples!  🙂

This recipe uses self-rising flour as an ingredient.  I like to use King Arthur’s Self-Rising Flour.  It’s wonderfully light and includes non-aluminum baking powder and salt.  It’s absolutely perfect for biscuits, pancakes and muffins.  I always have a bag of it in my kitchen because I can guarantee fluffy perfect results whenever I use it.

APPLE PIE BISCUITSIMG_8073

Yield:   12 biscuits

Ingredients:

For the apples:

  • 1 baking apple (such as Fuji, or Gala), peeled, cored and sliced very thin
  • 2 tablespoons unsalted butter
  • 1 teaspoon cinnamon
  • 2 tablespoons packed brown sugar

For the biscuits:IMG_8080

  • 2 cups self-rising flour
  • 1/4 cup cold unsalted butter, cut into small pieces
  • 2 tablespoons granulated sugar
  • 2/3  to 3/4 cup cold buttermilk

For the topping:

  • 1 egg, beaten
  • 2 tablespoons granulated sugar
  • 1/2 teaspoon ground cinnamon
  • pinch of salt

Directions:

1.  Place an oven rack in the center of the oven and preheat the oven to 425*F.  Line a baking sheet with parchment paper and set aside.

2.  Prepare the apples:  Place butter in a medium skillet over medium heat to melt.

IMG_8075


Add the apple slices, cinnamon, and brown sugar.

IMG_8076


IMG_8078

Toss with a wooden spoon until all of the apples are coated and the sugar is melted over the apples, about 2 to 4 minutes.  The mixture will be warm and glossy, but the apples won’t be cooked through.  Remove from the heat and set aside.

IMG_8079

3.  Make the biscuit dough:  Place flour in a medium bowl and add the cold butter pieces.  Using your fingers or a pastry cutter, quickly break down the butter into the flour.  Some of the butter bits will be the size of oats, some the size of small peas.  Stir in the granulated sugar.

IMG_8081

4.  Create a well in the center of the flour mixture and add 2/3 cup buttermilk.  Stir the mixture together until it is well moistened and holds together well.  Biscuit dough should be soft and moist.  Add the remaining buttermilk as needed.

A shaggy dough that doesn't quite come together.

A shaggy dough that doesn’t quite come together.

5.  Use regular all-purpose flour to generously dust a work surface.Turn the dough out onto the floured surface and use your hands to gather it into a ball and gently pat it into a small rectangle.   Use a rolling pin to gently roll the dough into a rectangle that is 1/2 inch thick, and about 7 x 10-inches.

IMG_8084

6.  Arrange cooled apples in a single layer over half of the rolled out biscuit dough.

IMG_8085

Fold the bare side of the dough over the apples and gently press the edges to seal in the apples.  Use your hands to nudge/ encourage the dough into a 6 x 8-inch rectangle if the edges are looking a bit rounded.

IMG_8086

7.  Use a sharp knife to slice the dough into a total of 12 biscuits.  Flour the knife a bit if it gets too sticky.  Use a spatula to place each biscuit onto the prepared baking sheet, about 2-inches apart.

IMG_8087

8.  In a small bowl, whisk together sugar for topping, cinnamon, and salt.  Brush each biscuit top with beaten egg and sprinkle generously with the cinnamon sugar mixture.

IMG_8088

9.  Bake for 12 to 14 minutes until the biscuits are risen and golden brown.  Remove from the oven and serve warm, or cool completely before storing in an airtight container.

IMG_8091

  Biscuits are best served the day they are made or the day after.  They may be rewarmed in the microwave.

IMG_8094

Tender and  light….you won’t be able to stop at just one!


SOURCE:   Joy the Baker

Avocado and Tomato Grilled Cheese Sandwich

Avocado and Tomato Grilled Cheese Sandwich

Avocado and Tomato Grilled Cheese Sandwich

I thought I heard someone singing  just outside my back door while I was making these sandwiches for lunch.

She wasn’t the best singer in the world, but ya got to hand it to her, she was brave.  I’m sure if I had the nerve to sing outside in public, I’d be less than average, too.  But a lot of times it’s more about guts than anything else when it comes to singing.  You just have to step out there and mean it.  That’s what it takes. ( Not that I would really know, but that’s what I’ve heard, anyway.)

I felt that way when I stepped into the kitchen around noon on a Saturday, and started pulling ingredients out of the refrigerator for lunch.  It takes guts to make something you’ve never made before, but I’ve had every intention of making these sandwiches for a long time now.  I think that’s called procrastination, or making excuses like I’m missing one of the necessary ingredients.   Sometimes the best plans take time to activate.  Yep, that’s what it takes;  intention, plans, and guts.  I’m telling you, it’s real.

IMG_7961

The idea that was floating around in my head was to put avocado into a grilled cheese sandwich.  I was imagining an irresistible gooeyness, but realized that it needed something else to contrast with all that richness, so I included firm, ripe tomato slices.  Tomatoes that are not overly ripe work best, so they don’t give off too much juice as they grill.  A leap of faith is what it was,  but one that turned out to be right on the money.    Whoo-Hoo!

This is a sandwich to make when you want to impress someone with your culinary skills!


AVOCADO AND TOMATO GRILLED CHEESE SANDWICHES

Yield:  Makes 4 sandwichesIMG_7959

Ingredients:

  • 3 ounces white cheddar cheese, shredded (about 3/4 cup) or any other cheese of choice
  • 8 slices seedless rye bread
  • 8 tomato slices
  • 1 ripe peeled avocado, cut into thin slices
  • 1/4 tsp. salt
  • 1/4 tsp, black pepper
  • cooking spray

Directions:

1.  Sprinkle 3 tablespoons cheese over each of 4 bread slices.  If using sliced cheese, use 2 slices.  Top each with 2 tomato slices.  Arrange avocado slices evenly over tomato slices.  Sprinkle with salt and pepper.   (In place of salt and pepper, I often use Penzey’s Sandwich Sprinkle for an added flavor boost.)

IMG_7958

2.  Top with remaining 4 bread slices.  Lightly coat outsides of sandwiches with cooking spray.

3.  Heat a grill pan (or panini pan) over medium heat.  Place sandwiches in pan; cook 3 minutes on each side or until bread is toasted and well marked and cheese melts.  Cut each sandwich in half and serve immediately.

IMG_7960

IMG_7963


SOURCE:    A Carolyn Original


Three Cheese Zucchini Stuffed Lasagna Rolls

Three Cheese Zucchini Stuffed Lasagna Rolls

Three Cheese Zucchini Stuffed Lasagna Rolls

It’s a good weekend for pasta.   You know how I know?   Every weekend is a good one for pasta.

That was easy!!

If there’s a reading nook and a good book involved in the weekend pasta plans….I’m there.

Seriously, though, there are some really good things happening in this dish of weekend pasta.  It’s the height of summer garden produce, so we’re taking full advantage of …..wait for it….. zucchini!!!    (again)

IMG_7944

This time it’s mixed with ricotta and Parmesan cheeses and stuffed into lasagna rolls that are then  topped with marinara sauce and mozzarella cheese–delicious, kid friendly, and kind to waist watchers.  You can make them a day ahead and refrigerate, or if you like to cook for the week(s) ahead, they are freezer-friendly.  This is a great recipe to make double of and share with someone in need, they’ll thank you!  (BTW they are vegetarian also, perfect for Meatless Mondays!)IMG_7947

By now you’ve discovered that these roll-ups are another way to use zucchini.  I’ve been thinking about lasagna a lot lately, but instead of making the traditional lasagna, these rolls are so much easier to make and they’re great for portion control.  I have made this same recipe using spinach in the filling, but when my neighbor brought me some zucchini from her garden I thought I’d try out this zucchini version instead.  These turned out so good;  light, not too filling but very flavorful.  I’m so glad that I have yet another way to use zucchini.

IMG_7946

If you plan to freeze these, you can freeze them individually in ziplock bags or freeze them as a finished dish ready for the oven.  You can also freeze any that you’ve baked, but didn’t finish eating.

THREE CHEESE ZUCCHINI LASAGNA ROLLSIMG_7933

Yield:   Makes 8 servings  @  240 cal./servings

Ingredients:

  • 8 lasagna noodles, cooked al dente
  • 1 tsp. olive oil
  • 3 cloves garlic, minced
  • 2 medium zucchini ( 7 oz. each), grated and squeezed dry
  • 1 cup + 2 tbsp. part skim ricotta cheese
  • 1/2 cup grated Parmesan cheese
  • 1 large egg
  • 1/2 tsp. salt
  • black pepper
  • 1  3/4 cups Marinara sauce
  • 1/2 cup part skim mozzarella cheese, shredded
  • fresh basil for garnish, (optional)

Directions:

1.  Preheat oven to 350*F.  Lightly grease or spray a 13 x 9-inch baking dish.   Ladle about 1 cup of sauce onto the bottom of the baking dish and set aside.

2.  In a medium nonstick skillet, saute garlic and olive oil over medium heat for about 1 minute;  add zucchini, salt and pepper to taste and cook about 4 -5 minutes, until soft.

Sauté garlic and zucchini till soft.

Sauté garlic and zucchini till soft.

3.  In a medium bowl, combine the zucchini, ricotta cheese, Parmesan cheese, egg, salt and pepper.  Stir to mix well.

Mix ricotta with the zucchini, Parmesan and egg.

Mix ricotta with the zucchini, Parmesan and egg.

4.  Lay out the lasagna noodles on a clean work surface.  Pat noodles dry with paper towels.  Spread about 1/3 cup filling evenly over each noodle.

Spread each noodle with 1/3 cup filling.

Spread each noodle with 1/3 cup filling.

Roll carefully and place seam side down into peppered baking dish.  Repeat with remaining noodles.

IMG_7941

5.  Ladle the remaining sauce over the lasagna rolls and top each one with 1 Tbsp. mozzarella cheese.

Ladle on more sauce and mozzarella cheese.

Ladle on more sauce and mozzarella cheese.

Cover dish with foil and bake for about 40 minutes or until the rolls are heated through and the cheese is melted.  Top with fresh basil if desired and serve hot.

IMG_7945

IMG_7948


SOURCE:   Skinny Taste

(Healthy) Peanut-Butter Cookies

Cookies packed into lunch boxes, cookies as after school snacks, cookies for anytime that urge for a sweet takes over.  Today we are making back to school cookies that are as “healthy” as I can make them after several attempts to take them from “big and bad” to “big and (almost) good for you”.  I really wish I could do something about eliminating those darn calories!!

We like our cookies really big around here.  I’m talkin’ Peanut Butter Cookies, here.   I like my peanut butter cookies to be really BIG. Big in diameter and big in thickness.  Thin little peanut butter cookies just don’t do it for me.  They need to be so  big that  two people can share one cookie and be satisfied with their half of it.

Are you wondering where I could have had such a cookie?  At a local Cider Mill near where I live.  Every Fall Mr. D. and I go for a ride to view the Fall foliage, and we stop at the cider mill to get apples, cider and a cookie.  Yep, just one, and we share it.  That cookie is my ideal where peanut butter cookies are concerned,  and I keep playing around with recipes trying to duplicate it.  The cookie recipe I’m presenting here comes pretty close, but they are still not quite thick enough.  I need to keep working on getting that right, but in the mean time  these are very good indeed.

First, are they chewy inside?  Check.  Are they really big?  They can be as big as you care to make them.  Are they crunchy?  Check,  I used chunky peanut butter.  How healthy are they?  Pretty healthy, really.  I used whole wheat flour for fiber (which you would never know if I didn’t tell you),  honey for some sweetness, that allowed me to cut back on the sugar, and only 4 Tablespoons of butter.  The remaining fat comes from the peanut butter and I used an “all natural” brand, so no corn syrup or other added stuff.  I used a 1/4 cup cookie scoop to measure out the dough.  The cookies spread while baking and puff up, but flatten out some as they cool so you get that chewy interior.

HEALTHY PEANUT-BUTTER COOKIES

YIELD:   about 20 cookies

INGREDIENTS

  • 1/3 cup granulated sugar
  • 1/2 cup packed brown sugar
  • 1/2 cup all natural peanut butter
  • 1/4 cup (4 Tbs.) butter, softened
  • 1 egg
  • 2 Tablespoons honey
  • 1  1/4 cup whole wheat flour ( I used white whole wheat)
  • 3/4 teaspoon baking soda
  • 1/2 teaspoon baking powder
  • 1/4 teaspoon salt
  • additional sugar for sprinkling on top

PREPARATION

1.  Preheat oven to 375 degrees.  Line two cookie sheets with parchment paper.

2.  In a large mixer bowl, beat together the sugar, brown sugar, butter and peanut butter on low speed until well mixed.  Beat in honey and egg until well blended.

3.  Beat in as much flour as you can, then stir in the rest with a wooden spoon to create a smooth dough that is quite thick.

Ready for the oven.

4.  Measure out dough using a cookie scoop,  or form the dough into balls (about 1 1/2 inch).  Place on cookie sheets about 3 inches apart.  Flatten with a fork to form a crisscross pattern.  Sprinkle lightly with additional sugar.

Freshly baked, just out of the oven.

5.  Bake 7 to 9 minutes or until lightly browned. If cookies are really large, you may need an additional 1-2 minutes. Cool for 1 minute and remove from cookie sheets to cooling racks and cool for another 15 minutes.


If any of you know how to make these thicker while keeping their size, please share your secret with me.  I’m aiming for the kind of thick cookie you can get in a bakery.  Thanks, readers.

SOURCE:   This recipe is several adaptations removed from the recipe my mother used to bake.

BLT Pizza

BLT Pizza with White Sauce

BLT Pizza with White Sauce

All the world seems to love bacon.  Although I am not really a bacon fanatic, I do love a good BLT sandwich, so the thought of enjoying all the flavors of the classic sandwich in the form of a pizza seemed fantastic.  I wish I had thought of it myself.   I knew that I had an open package of bacon from our favorite meat shop in the fridge, and some fresh ripe tomatoes from our local farm stand.  I also had a package of arugula and baby greens intended for a salad, so the moment I saw this pizza, I knew it was meant to be.

IMG_7855

This turned out to be so good I thought about it for days afterwards.   Mr. D. says it’s the best pizza I’ve ever made.  All the components of your favorite sandwich are here including the mayonnaise.  By adding some oil to the mayo it makes a creamy sauce that is used to fully cover the dough and gives a richer taste to the pizza.   We both enjoyed this pizza so much that I know that I’ll be making this one again and again.   It’s a keeper!

BLT PIZZA WITH WHITE SAUCE

Yield:   1 10-inch pizza

Ingredients:

  • 1 pound ripe tomatoes, seeded and cut into 1/4-inch-thick slices
  • 1 teaspoon dried oregano
  • 1/2 teaspoon black pepper
  • 1/4 cup mayonnaise
  • 1 tablespoon extra-virgin olive oil
  • 1 tablespoon minced fresh chives, or green onions (tops only)
  • 2 garlic cloves, grated, or finely minced
  • 4 center-cut slices lean bacon
  • 1 pound fresh pizza dough
  • 1 tablespoon cornmeal
  • 2 ounces part-skim mozzarella cheese, shredded
  • cooking spray
  • 1 cup baby arugula
Roast tomatoes, cook bacon, prepare sauce.

Roast tomatoes, cook bacon, prepare sauce.

Directions:

1.  Preheat oven to 400*F.  Place a pizza stone in the oven to preheat.  (If you don’t have a pizza stone, use a round or flat baking sheet)

2.  Arrange tomato slices on a piece of parchment paper;  sprinkle with oregano and pepper. Place on a baking sheet or pizza stone, and bake for 20 minutes or until tomatoes are no longer wet.  Remove tomatoes and and allow to cool slightly while you make the sauce and prepare the dough.

3.  Combine mayonnaise, oil, chives, and garlic in a small bow.

4.  Cook bacon in a skillet over medium heat until crisp;  drain on paper towels.  Break into pieces.

5.  Increase oven temperature to 450*F.  Using floured hands, pat dough into a 10-inch circle.  Place on the baking sheet or pizza stone that has been sprinkled with corn meal.  Pierce dough with a fork; transfer to preheated oven.  Bake at 450*F for 5 minutes.

6.  Carefully remove from the oven.  Brush mayonnaise mixture over crust, leaving a small border;   top with tomatoes.

Cover crust with mayo mixture then top with tomato slices.

Cover crust with mayo mixture then top with tomato slices.

Sprinkle with bacon and cheese; coat crust edges with cooking spray.

Add bacon and cheese next.

Add bacon and cheese next.

IMG_7853

7.  Bake 10 minutes or until cheese melts and crust browns.  Before serving top with arugula.  Cut into 8 wedges.

A BLT on a pizza--the best of both.

A BLT on a pizza–the best of both worlds.


SOURCE:   Cooking Light