Orange Cardamom Madeleines

Orange Cardamom Madeleines

Orange Cardamom Madeleines

History is uncertain as to the exact origins of madeleines, but it is certain that these small, delicate cakes were first made in France.   Was it Louis XV’s father-in-law who introduced them to the court of Versailles way back in 1730?  Was it an accident discovered by a pastry chef and then kept secret for many years?  Who knows?  And really, do we care?  What matters is that these simple little cakes, these simply divine creations made of flour, butter, eggs and sugar are simply wonderful.

IMG_6567

Madeleines conform to the configuration of the pan they are baked in.  They are small, ridged, and elongated–somewhat like a shell shape.  A madeleine made in any other form is not a madeleine.

Traditionally these cakes are not particularly sweet, and therefore appeal more to grownups sipping their tea or coffee than to children who like their treats a little sweeter.  If you have a basic recipe for madeleines it can be adapted to include add-ins like finely chopped nuts or mini chocolate chips,  or other flavors like orange or lemon.  Dusting them with a coating of powdered sugar is all that’s needed before serving, but you can make them fancy schmancy by dipping one end in melted chocolate if you like, or drizzling them with a thin icing.   These look pretty elegant on a buffet table,  say for a bridal shower, for instance.

IMG_6569

Back some time ago I was rummaging through an “odd lots” store near me and came across a pair of madeleine pans that had a ridiculously low price tag on them.  Not one to pass up a good bargain, I bought them and then never used them.  Well, newsletters with recipes included come to my e-mail in-box every day it seems, and the latest one included a recipe for—-you guessed it—madeleines.   Ok, so that was the stimulus that brought about the response to break out the never- used-pans and make madeleines.   They came out so well that I had to share my baking efforts with you.

Making madeleines is easy, but you must allow at least 30 minutes for the dough to chill.  Otherwise, during baking, the batter will not rise into the traditional peak so necessary for a perfect madeleine.  Some of the newer madeleine pans are of the nonstick variety, which makes baking these treasures easier than ever.

IMG_6566

ORANGE CARDAMOM MADELEINES

Yield:   Makes 16  3-inch cakes

Ingredients:IMG_6558

  • 1/4 cup ( 1/2 stick) unsalted butter, plus more for the pans
  • 1 Tbsp. honey
  • 1 tsp. vanilla extract
  • 3/4 cup flour
  • 1 tsp. baking powder
  • 3/4 tsp. ground cardamom
  • 1/4 tsp. salt
  • 1/4 cup sugar
  • 2 large eggs
  • 3/4 cup confectioners’ sugar
  • 1 tsp. finely grated orange zest, plus 2 Tbsp. orange juice

1.   Melt butter in a microwave safe bowl.  ( I melted an extra 1 Tbsp. and used it to lightly brush the molds with a pastry brush.)  Stir in honey and vanilla.  Let cool for 10 minutes.

Silicone molds are easy to work with.  The cakes pop right out.

Silicone molds are easy to work with. The cakes pop right out.

2.   Whisk together the flour, baking powder, cardamom and salt in a medium bowl.

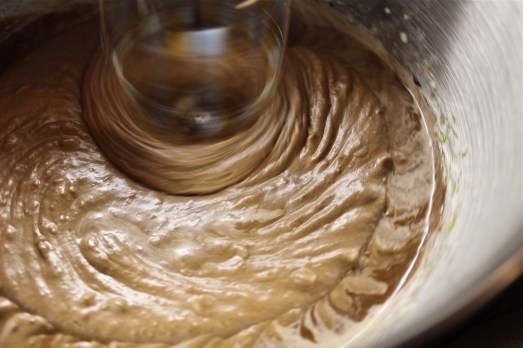
3.  In another small bowl, whisk together the eggs and sugar.  Gently add to flour mixture and stir until well combined.  Add butter mixture and fold to combine.   Cover with plastic wrap and refrigerate at least 30 minutes.

Batter will be thick.

Batter will be thick.

4.  Preheat oven to 325*F.  Brush molds with butter.  (note, I did this earlier when I melted the butter.)    Spoon batter into prepared pans, filling each mold half-way.  Tap on surface to eliminate air bubbles.

Partially filled molds.

Partially filled molds.

Bake until puffed and edges are golden,  7-8 minutes.

Puffed and golden when thoroughly baked.

Puffed and golden when thoroughly baked.

Let cool slightly, then unmold onto a cooling rack.

Unmold onto a cooling rack.

Unmold onto a cooling rack.

5.  Make orange glaze:   Stir together sugar, zest and orange juice in a small bowl till glaze is smooth, thick, and opaque.  Using a pastry brush, coat ridged side of each cake with the glaze..  Let set about 15 minutes.  Store in a single layer in an airtight container up to 3 days.

Only slightly sweet, they are lovely with a cup of tea.

Only slightly sweet, they are lovely with a cup of tea.

SOURCE:    Martha Stewart.com

Turtle Fudge Cake with Caramel Drizzle

Turtle Fudge Cake

Turtle Fudge Cake

Just hearing the word “fudge” brings tears of joy to most chocolate-lovers’ eyes.  After all, what other dessert conjures up images so rich and chocolaty?  It’s mind-boggling to consider how long fudge has been popular.  Did you know that fudge was adored back in the 19th century and is still popular today?

IMG_0191

According to John Mariani in the The Dictionary of American Food and Drink,  fudge as a candy first appeared as a written recipe in 1896.  Today fudge is more than just a candy–it’s used to enhance cakes, brownies, cookies, ice creams and frostings.

Most of us particularly love fudge cakes as they tend to be moister, richer and often more rewarding than regular chocolate cakes.  We celebrated family birthdays occurring in January and February just recently and I was the official cake-baker.  There were three “birthday girls” ranging in age from five years old, to mid-twenties, to her eighties.

The "birthday girls".

The “birthday girls”.

When asked what kind of cake they would like , all agreed on  chocolate cake, especially with white frosting.  So that sent me on a hunt for an outstanding chocolate cake that would meet all my requirements;  be moist and fudgy, and provide a large number of servings.  This one relies on a good quality cake mix as the basis with some additions that really raise it to a level that I call outstanding.

IMG_0183

One of the additions is caramel candies.  You will notice in the directions that half-way through the baking process, caramels are gently pressed into the top crust of the cake.  As the cake bakes they melt into a tunnel of caramel running through the center of the cake.  Since most little girls like lots of “do-dahs” on their cake, I used chocolate covered caramels in the cake, and then melted more of them with a little cream, to create an uncomplicated, delicious topping that’s drizzled over the top and down the sides of the cake.  To incorporate white frosting, I made a plain white frosting from butter, confectioner’s sugar and milk and kept it thin so it would run down the sides of the cake.  I applied that first and after it firmed up, I then drizzled the caramel topping over it.

Drizzle chocolate caramel over the top in a random pattern.

Drizzle chocolate caramel over the top in a random pattern.

TURTLE FUDGE CAKE WITH CARAMEL DRIZZLE

Yield:  12 – 14 servings

Ingredients:

For fudge cake:IMG_0166

  • 1  (18.25 oz.) box  Moist Deluxe Dark Chocolate Fudge Cake Mix (Duncan Hines or Betty Crocker)
  • 1 (3.9-oz.) box Jell-O Chocolate Fudge Instant Pudding and Pie Filling Mix
  • 1/2 cup vegetable oil
  • 4 large eggs
  • 1 cup sour cream
  • 1 cup pecans, coarsely chopped ( I needed to omit the nuts, because of allergies)
  • 25 caramels, such as Hershey’s Classic Caramels ( or chocolate covered caramels)
I used chocolate-covered caramels.

I used chocolate-covered caramels.

For Caramel Drizzle:

  • 15 caramels
  • 2 Tablespoons heavy cream

Directions:

1.  Preheat oven to 350*F.  Lightly spray a 12-cup tube or Bundt pan with nonstick cooking spray.

Put all the ingredients into one  bowl and mix up.

Put all the ingredients into one bowl and mix up.

2.  Place cake mix, pudding mix, oil, eggs and sour cream in bowl of electric mixer fitted with paddle attachment.  Mix on low speed until ingredients are just combined, about 1 1/2 minutes, stopping at least once to scrape down the sides of the bowl.  Remove bowl from mixer and fold in pecans with a spatula, mixing just until nuts are thoroughly distributed.  Batter will be thick.

Batter will be thick going into the pan,

Batter will be thick going into the pan,

3.  Scrape batter into prepared pan, smoothing and leveling top with a rubber spatula.  Bake for 25 minutes.  Remove cake from oven and place caramels on top of cake in a ring, pressing them down gently just into top crust of cake.

Place the caramels in a ring over the top of the partially baked cake.

Place the caramels in a ring over the top of the partially baked cake.

Do not push them entirely into cake.  Place cake back in the oven and bake for another 25 – 30 minutes (total of 50-55 minutes), or until a toothpick or cake tester inserted in center comes out clean.

This cake rises nice and high. Not all of the caramels sunk into the cake.

This cake rises nice and high. Not all of the caramels sunk into the cake.

4.  Cool cake in pan on wire rack for 10 minutes.  Turn cake out of pan onto wire rack and let cool completely.

5.  Make caramel drizzle:  In a small saucepan, over low heat, melt caramels and heavy cream together until completely smooth.  (You can melt them in the microwave also.) Place a sheet of waxed paper under wire rack holding cake and pour caramel over top of cake, allowing it to drizzle down sides and center.  Note:  I placed the cake on it’s serving plate, then slid strips of wax paper under the edges to catch any drips of frosting or caramel.  These can be easily pulled out before serving–much easier than trying to maneuver a frosted cake onto a cake dish!!

To make your cake look like mine:  After step 4,  mix up a small amount of frosting using about 1 cup confectioners’ sugar, 1 Tbsp. soft butter and enough cream (start with 1 Tbsp. and add as necessary) to make a spreading consistency.

Powdered sugar, butter and a little cream make the frosting.

Powdered sugar, butter and a little cream make the frosting.

Pour over the cake and allow it to drip down the sides and center.

Pour over the cake and let it run down the sides and middle.

Pour over the cake and let it run down the sides and center.

After it has hardened, proceed with step 5, making the caramel drizzle and dripping it over the white frosting so some of the white shows through.

Make the caramel a thin drizzling consistency.

Make the caramel a thin drizzling consistency.

Drizzle chocolate caramel over the top in a random pattern.

Drizzle chocolate caramel over the top in a random pattern.

Final decorations in place.  Let's party!!

Final decorations in place. Let’s party!!

This would be lovely for Valentine's Day also.

This would be lovely for Valentine’s Day also.

This cake more than lived up to its promise!  It was moist and fudgy, giving all the flavors of Turtle candies (minus the pecans).  Definitely a calorie splurge, but for a Birthday cake it was definitely worth it.  😀

SOURCE:  Major-ly adapted from Chocolatier Magazine

Chocolate Pudding Cake

Chocolate Pudding Cake

Chocolate Pudding Cake

When you are in the mood for a dessert that is gooey and chocolatey, but don’t want a whole lot left over ( to further tempt you), this recipe is the perfect answer.  It makes only four individual servings, so portion control is built right in.  This is cake that makes its own sauce.  The topping magically makes a fudge-y pudding on the bottom of the cake, and served with a scoop of  ice cream, whipped cream, or a toasted marshmallow, you just can’t go wrong!

Serve warm with ice cream.

Serve warm with ice cream.

Quick and easy to make, and deliciously fabulous to eat, these chocolate pudding-like cakes are a warm decadent finish to a winter menu.  This is comfort food at its best, an awesome dessert, whether served to family or guests, everyone will love it.

CHOCOLATE PUDDING CAKES

Yield:  4 servings

Ingredients:

Batter:IMG_6111

  • 1/2 cup all-purpose flour
  • 1/4 cup sugar
  • 1/4 cup baking cocoa
  • 1/4 cup almond flour ( or 1/4 cup almonds, finely chopped in a processor)
  • 1/4 tsp. salt
  • 1 tsp. baking powder
  • 1 tsp. vanilla extract
  • 3 Tbsp. butter, melted
  • 1 large egg
  • 1/2 cup milk

Topping:IMG_6132

  • 1/2 cup sugar
  • 2 Tbsp. baking cocoa
  • pinch salt
  • 1 cup hot milk or hot water

Directions:

1.  Preheat the oven to 350*F.   Grease 4 ( 8 – 10 0z,) oven-safe mugs or ramekins.

2.  For the cake:  Mix together the flour, sugar, cocoa, almond flour, salt, and baking powder.

Mix together dry ingredients.

Mix together dry ingredients.

In a separate bowl, whisk together the vanilla, melted butter, egg, and milk.  Add to dry ingredients, and mix until all is moistened without over mixing.  Divide this batter among the 4 mugs or ramekins, using about 1/3 cup batter in each.

3.  For the topping:  Whisk together the sugar, cocoa, and salt.  Divide this mixture among the mugs or ramekins, using two heaping tablespoons for each.

Divide batter into ramekins and sprinkle on topping.

Divide batter into ramekins and sprinkle on topping.

4.  Top each dish with a 1/4 cup of the hot milk or water.  Place all on a baking sheet.

Pour warm milk over top.

Pour hot milk over top.

5.  Bake the cakes for 18 to 22 minutes.  The cake should be puffy, with some liquid bubbling up around the edges.

Serve warm with ice cream or whipped cream if desired.

IMG_6130

Warm, gooey, fudge-y.  What's not to love?

Warm, gooey, fudge-y. What’s not to love?

SOURCE:   King Arthur Flour

There’s What in the Cake?

Bettcha can’t guess what’s in this cake!  A secret ingredient that provides that extra moisture.  Hint:  Theme Thursday?  Tomatoes?

A moist and flavorful apice cake.

A moist and flavorful spice cake.

Some of you may have guessed it by now, but maybe some of you have never heard of  this  recipe for Tomato Soup Cake that dates back quite a few years.  It was popular when my Mom and Dad were young, and my mother used to make it when I was growing up.  She got the recipe from my Dad’s mother.  She made it about once a year, since it was my favorite cake and I always wanted it for my birthday.  I loved it with walnuts and raisins in it and lots of cream cheese frosting.

The recipe got lost after a while, and when my children were young I wanted to make it for them, but couldn’t find the recipe.  I was thrilled to find it on a web site called Heritage Recipes.  We had a family birthday get-together last weekend, and I made this cake.  The flavor and spiciness are just as I remember.  It was like meeting an old friend again.    If you are somewhat put off by using tomato soup in a cake, I promise you will never know its there.  It just tastes like a wonderful spice cake.  You must try it.

Tomato Soup Spice Cake

Tomato Soup Spice Cake

After having written the above introduction to this recipe I found another version of it using a spice cake mix, tomato soup, eggs and water.  So that is the one I actually made since it was quick, but I am including both recipes here because I really want to save the original so it doesn’t get lost again.   You can take your pick about which one to make, the quick version was also very moist and intensely spice flavored.

TOMATO SOUP SPICE CAKE

Yield:

Ingredients:IMG_5199

  • 1/2 cup shortening
  • 1 cup sugar
  • 2 eggs
  • 1 ( 10.75 ounce ) can tomato soup, undiluted
  • 1 tsp. baking soda
  • 2 cups flour
  • 2 tsp. baking powder
  • 1 tsp. ground cinnamon
  • 1/2 tsp. cloves
  • 1 tsp. nutmeg
  • 1 cup raisins
  • 1 cup chopped walnuts (optional)

Directions:

1.  Preheat oven to 350*F.  Lightly grease and flour a 13 x 9-inch cake pan.

2.  Cream the shortening with the sugar using an electric mixer.  Add eggs, one at a time, beating well.  Stir baking soda into the tomato soup and add to shortening/sugar mixture.

3.  Whisk together dry ingredients and add to the creamed mixture.  Beat to blend well.

4.  Stir in raisins and nuts.

4.  Pour into prepared pan and bake at 350*F for 45-50 minutes, testing with a cake tester or toothpick for doneness.

5.  Let cool completely on a wire rack.  Frost with cream cheese frosting.

Quick Version:IMG_5181

  • 1 ( 18.25 oz.) box Spice Cake Mix
  • 1 ( 10.75 oz.) can condensed tomato soup
  • 1/2 cup water
  • 2 large eggs

Preheat oven to 350*F.  Lightly grease 2  8″  or 9″-round cake pans, or a 13 X 9″ cake pan.

Mix cake mix, soup, water and eggs as per package directions.

Mix all 4 ingredients together at medium speed.

Mix all 4 ingredients together at medium speed.

Pour into prepared pan(s), and—-

Bake  for 30 -35 minutes till it tests done with a toothpick.

IMG_5183

Cool completely on a wire rack before frosting with cream cheese frosting.

IMG_5194

IMG_5195

SOURCES:  Heritage Recipes,  and CampbellSoup.com

Chocolate Plum Cake

Chocolate Plum Cake

Chocolate Plum Cake

The last day of summer has come and gone and we are now officially into the fall season.  However stone fruits are still widely available at the farm stands in my area and in the supermarkets.  All these fruits reach their peak of ripeness in the summer sun, and they are delicious and appealing when you cook with them.   They lend themselves to every kind of preparation:  poaching, sautéing, roasting, grilling, and baking.  So you can work them into your early fall dessert recipes.IMG_5126

In this recipe for Chocolate Plum Cake you can interchange the fruits, and perhaps use nectarines instead of plums.  I decided to make it with plums because I have always enjoyed chocolate with wine; port wine or other dessert wine goes best with chocolate.  Since purple plums have a sweet, wine-like flavor they pair beautifully with chocolate in this moist, single-layer cake.  Another stone fruit that would work well here is the pluot–a cross between apricots and plums.  They are now sold in many supermarkets in the summer.

I loved making the batter for this cake.  There is only 1/4 cup flour (whole wheat) in it.  The rest of the dry ingredients consist of  ground almond flour, with baking powder and a little salt.   This makes the texture of the cake very fine and a little crumbly.  Almond is not noticeable in the taste, instead you’re bombarded with dense chocolate.  The recipe calls for chocolate that is at least 64% cocoa, but I had a bar that was 70% cocoa, so I used that.  With baking, the plums become tender and retain their juiciness.  Oh, boy, this is good!

Tender and moist cake, juicy plums.

Tender and moist cake, juicy plums.

CHOCOLATE PLUM CAKE

Yield:    8 servings

Ingredients:

  • 1 stick softened butter, divided  (7 Tablespoons plus 1 Tablespoon.)

    Beautiful black plums and chocolate. Yum-yum!!

    Beautiful black plums and chocolate. Yum-yum!!

  • 4 black or purple plums
  • 1 Tablespoon, plus 1/3 cup sugar
  • 1 cup almond meal**
  • 1/4 cup buckwheat or whole-wheat flour##
  • 1/2 teaspoon baking powder
  • 1/4 teaspoon kosher salt
  • 3 large eggs, at room temperature
  • 3.5 ounces dark chocolate ( around 64% cocoa content), melted
  • 1/4 cup heavy cream
  • Garnish:  confectioners’ sugar

**  Almond meal – also called almond flour–is sold in the health-food aisle of many supermarkets.  The brand I used is by Bob’s Red Mill.  You can substitute other nut meals, or make your own by pulsing blanched almonds in a food processor until finely ground but not yet nut butter.

##  Substitute a gluten-free baking mix for the flour and this can be a gluten-free dessert.

1.  Preheat the oven to 350*F.  Butter a 9 – inch round cake pan; then line the bottom with parchment paper and set aside.

2.  In a frying pan, melt 1 Tablespoon butter over medium heat.  Add the plums, cut side down, and sprinkle with 1 Tablespoon granulated sugar.  Cook 2 minutes and flip onto the other side.  Continue to cook 2 minutes more.  Remove pan from heat and set aside.

Sauté the plums in butter and sugar.

Sauté the plums in butter and sugar.

3.  In the bowl of your mixer beat the remaining 7 tablespoons butter and 1/3 cup sugar until pale in color.  Add eggs, one at a time, beating well after each.  Scrape the sides of the bowl as you go.  Stir in the melted chocolate and then the heavy cream.

Mix melted chocolate into the batter.

Mix melted chocolate and cream into the batter.

4.  Add the dry ingredients, and stir until the batter is smooth.

Almond flour as oart of the dry ingredients.

Almond flour as part of the dry ingredients.

Pour into the prepared pan and arrange the sautéed plums on top, cut side up.

Pour into a round baking pan.

Pour into a round baking pan.

Top with plums

Arrange plums on top.

Drizzle any pan juices over the plums.

5.   Bake until the blade of a sharp knife inserted into the middle comes out clean, 40 to 45 minutes.  Let the cake cool 5 minutes before removing it from the pan,   Dust with confectioners’ sugar.

IMG_5127

Each wedge gets a half plum.

Each wedge gets a half plum.

SOURCE:   slightly modified from Yankee Magazine

Spirit-Lifting Cherry Coffee Cake

 Cherry Cream Coffee Cake


Cherry Cream Cheese Coffee Cake

“Forget your troubles, come on, get happy,  you better chase all your cares away”

The words to that song come to mind when I think about this coffee cake.  It’s guaranteed to be a spirit-lifter for anyone who tastes it.  Just looking at it makes me happy.

This recipe was featured recently on the blog “Rantings of an Amateur Chef”.  The blog author has been using Greek yogurt in a variety of dishes as a substitute for higher fat and calorie laden foods such as sour cream and cream cheese.

That is a technique that I also use on many occasions, so when I saw this recipe for Cherry Cream Cheese Coffee Cake, I knew I had to make it, not so much because of the substitutions, but because it contains almond flavoring.  My all-time favorite flavor in the world!!   But since I, too, would be incorporating the substitutions, I purchased 0%-fat Greek yogurt in Black Cherry flavor as a match-up with the cherry pie filling that is part of the cake’s filling.

Looks luscious.

Looks luscious.

“Shout Alleluia,  come on, get happy,”

The aroma of this cake baking was so enticing I could hardly wait for it to cool sufficiently before sampling it. While still a very rich cake, the yogurt did its job in making a very creamy layer of filling below the cherry pie filling.  The over-all texture is mouth watering and tender with a little crunch provided by the sliced almonds.  And the combination of cherries and almond flavoring is a classic that I love.  This cake could be served as a dessert,  as a fancy coffee cake for a brunch, or just for breakfast.  I would not hesitate to make and take it as a gift for someone whose spirits need lifting.

IMG_5020

“The sun is shining, come on, get happy”.

CHERRY CREAM CHEESE COFFEE CAKE

YIELD:  8 – 10 servings

Ingredients:

For the Crust:

Crust ingredients.

Crust ingredients.

  • 2 1/4 cups all-purpose flour ( I substituted in 1 cup white whole wheat flour)
  • 3/4 cup sugar
  • 3/4 cup cold butter, cubed
  • 1/2 tsp. baking powder
  • 1/2 tsp. baking soda
  • 1/2 tsp. salt
  • 1 egg, lightly beaten
  • 3/4 cup sour cream ( or 0%fat Greek yogurt)
  • 1 tsp. almond extract

For the Filling:

  • 1 package ( 8-oz. ) cream cheese, softened ( I substituted 8-oz. Black Cherry flavor 0% fat Greek yogurt)

    Filling ingredients.

    Filling ingredients.

  • 1/4 cup sugar
  • 1 egg, lightly beaten
  • 1 can ( 21-oz.) cherry pie filling
  • 1/2 cup sliced almonds

Directions:

1.    Preheat oven to 350*F.  Pan needed:  9 – inch springform pan with removable bottom,  ungreased.

2.  In a large bowl, combine flour and sugar.  Cut in butter until crumbly.

Cutting in the butter.

Cutting in the butter.

Reserve 3/4 cup crumb mixture and set aside.

Reserve some crumbs for the topping.

Reserve some crumbs for the topping.

Add the baking powder, baking soda and salt to remaining crumb mixture.

3.  In a small bowl, whisk the egg, then add sour cream and almond extract.  Whisk to blend.  Stir into the crumb mixture to form a thick dough.

Mix together the egg, sour cream and almond extract

Mix together the egg, sour cream and almond extract

4.  Press onto the bottom and 1-inch up the sides of the springform pan.

Press crust into bottom of pan.

Press crust into bottom of pan.

5.  Make filling:  In a large bowl, beat cream cheese (yogurt), and sugar for 1 minute.  Add egg; beat just until combined.  Spread over crust.

Pour on cream filling.

Pour on cream filling.

Carefully spoon pie filling over the top.

Spoon on cherry filling.

Spoon on cherry filling.

Sprinkle with almonds, and the reserved crumbs.

Top with sliced almonds.

Top with sliced almonds.

Sprinkle on reserved crumbs.

Sprinkle on reserved crumbs.

6.  Bake at 350*F for 50 – 60 minutes or until center is set.  Cool on a wire rack.  Carefully run a knife around edge of pan to loosen;  remove sides of pan.  Store in the refrigerator.

Out of the oven.  Isn't that beautiful?

Out of the oven. Isn’t that beautiful?

Looks luscious.

Looks luscious.

Tastes as good as it looks.

Tastes as good as it looks.

SOURCE:  Taste of Home via Rantings of an Amateur Chef

Old-Fashioned Blueberry Coffee Cake

Old Fashioned Blueberry Coffeecake

Old Fashioned Blueberry Coffeecake

I love it when a recipe has the words “old-fashioned” in its title.  There is a certain comfort factor in those words.  I makes me think of when I was a child and my mother baked something warm and yummy.  I particularly loved her coffee cakes that had a crumbly topping with lots of cinnamon and nuts in it.  In my mother’s recipe box I have a recipe for sour cream coffee cake, and this recipe today is very similar to that one.  The major difference that I can see is that this one uses buttermilk in place of the sour cream.  But the soft crumb texture of the cake is just like what I remember.

IMG_4419

Fresh blueberries are now appearing in the market and I bought some, not really knowing what I would do with them, but then I found this recipe for the coffee cake, so that decided the question.   The day I baked it we had to have a piece while it was still warm.  Oh my!  It was everything you could imagine.  The cake has three textural layers;  the tender cake, heavily scented by cinnamon, the blueberries oozing their juices, and a crunchy, crumb topping.  You had better not skip dessert, if this cake is being served!  If blueberries are not available, use any of your favorite fresh or frozen berries.

All the layers can be seen in each piece.

All the layers can be seen in each piece.

OLD FASHIONED BLUEBERRY COFFEECAKE

Yield :    8 – 12 servings

Crumb Topping:

  • 1/2 cup all-purpose flour
  • 1/4 cup plus 2 Tbsp. packed dark brown sugar
  • 1/2 tsp. kosher salt
  • 1/4 cup nuts, chopped ( suggest walnuts or pecans)
  • 3 Tbsp. chilled unsalted butter, cut into small pieces

Cake:

  • non-stick pan spray
  • 1 1/2 cups all purpose flour
  • 1 Tbsp. cornmeal
  • 1/2 tsp. baking powder
  • 1/2 tsp. baking soda
  • 1/4 tsp. kosher salt
  • 3/4 cup plus 3 Tbsp. sugar, divided
  • 6 Tbsp. ( 3/4 stick ) unsalted butter, room temperature
  • 1/2 tsp. vanilla extract
  • 2 large eggs
  • 1 cup buttermilk
  • 1 Tbsp.  ground cinnamon
  • 2 cups fresh or frozen, thawed blueberries
  • 1 Tbsp. panko breadcrumbs

Prepare the crumb topping:  Whisk the flour, sugar, and salt in a medium bowl.  Add butter; using your fingertips, work butter into dry ingredients until large, moist crumbs begin to form.  Stir in chopped nuts.  Set topping aside.

 Prepare the cake:  Preheat oven to 350*F.  Coat an 8-inch square pan with nonstick spray.    Set aside.

1.  Whisk flour, cornmeal, baking powder, baking soda and salt in a medium bowl; set aside.

2.  With an electric mixer on medium speed, beat 3/4 cup sugar and butter in a medium bowl until light and fluffy, 3 – 4 minutes.  Beat in vanilla.  Add eggs one at a time, beating to blend between additions and occasionally scraping down sides of bowl, until mixture is pale and fluffy, 3 – 4 minutes longer.

3.  With mixer on low speed, add dry ingredients to bowl in 3 additions, alternating with buttermilk in 2 additions, beginning and ending with dry ingredients.  Pour half of batter into prepared pan and smooth top.  Whisk remaining 3 Tbsp. sugar and cinnamon in a small bowl, sprinkle evenly over batter in pan,

Half the batter covered by a layer of cinnamon sugar.

Half the batter covered by a layer of cinnamon sugar.

Spoon remaining batter over, smooth top.

Remaining batter goes on top.

Remaining batter goes on top.

4.  Toss blueberries with panko in a small bowl;  scatter evenly over batter.

Spread blueberries evenly on top.

Spread blueberries evenly on top.

Sprinkle crumb topping over blueberries.

Crumb topping makes the top layer.

Crumb topping makes the top layer.

5.  Bake cake  until top is golden brown and a tester inserted into the center comes out clean, 55 -65 minutes.  Let cool completely in pan.  Store air-tight at room temperature.

IMG_4416

SOURCE:   slightly adapted from Bon Appetit

Let’s Get Berried on the 4th!

Lemon buttermilk cake with strawberries, whipped cream and strawberry coulis.

Lemon buttermilk cake with strawberries, whipped cream and strawberry coulis.

Ahhhhh—-Strawberry Shortcake!  Nothing that I know of says summer so well as strawberry shortcake, a great favorite for the 4th of July.  And this recipe does the impossible–makes it even more delicious.   It starts with a warm, lemon flavored golden buttermilk cake that’s followed by sweet juicy fresh strawberries, and topped with whipped cream drizzled with strawberry coulis.   Like Whoa!

IMG_4460

This version is so beyond the shortcake I grew up with it’s almost in another world.  Back in the day when I was still living at home, strawberry shortcake consisted of sweetened, sliced berries spooned over biscuits that were a lot like the texture of scones.  They soaked up the juice and got all soft like, and the perfect bite included biscuit, berries and cream.  Yeah, that’s the shortcake I know.

But this,  this takes it all to a new level.   Here you taste and smell the essence of lemon in a finely textured cake, along with the goodness of fresh sweet berries, then the cream is further enhanced by the strawberry coulis, a puree of strawberries containing just a touch of balsamic vinegar.  Can I entice you to give this a try?  I don’t think you will be the least bit sorry.

IMG_4465

GOLDEN LEMON CAKE WITH STRAWBERRIES AND COULIS

Servings:   8

Ingredients:

  • 1 quart of fresh strawberries, hulled and sliced
  • 2 Tablespoons sugar

Combine sliced berries and sugar in a bowl.  Toss to coat.  Let stand at room temperature for at least 15 minutes before serving.

For the cake:IMG_4463

  • 1 cup cake flour
  • 1 tsp. baking powder
  • 1/2 tsp. baking soda
  • 1/4 tsp. salt
  • 1/3 cup sugar
  • 1/4 cup unsalted butter, softened
  • 1 egg
  • 2/3 cup low-fat buttermilk
  • 1/2  tsp. vanilla extract
  • 1/2  tsp lemon extract
  • 1 tsp. lemon zest
  • 1 tsp. powdered sugar

1.  Preheat oven to 350*F.  Spray an 8 – inch round cake pan with non-stick cooking spray.

2.  Lightly spoon flour into a dry measuring cup; level with a knife.  Combine flour, baking powder, baking soda, and salt, stirring with a whisk.

3.  Place 1/3 cup sugar and butter in a medium bowl;  beat with a mixer at medium speed until well blended.  Add egg, beat just until combined.  Add flour mixture alternately with buttermilk to the sugar mixture, beginning and ending with flour.  Beat well.  Stir in vanilla.

4.  Spoon batter into the prepared 8 – inch cake pan.  Bake at 350*F for 22 – 25 minutes, until a tooth pick inserted in center comes out clean.  Cool in pan on a wire rack for 10 minutes.  Remove from pan to cool completely on wire rack.  To serve, place on serving dish and  sift powdered sugar over top of cake.

Lemon Buttermilk Cake

Lemon Buttermilk Cake

For coulis:

  • 2 cups strawberries, hulled and sliced
  • 1 tsp. balsamic vinegar
  • 2 tsp. sugar

Place berries, vinegar and sugar in the blender and blend to smooth consistency.  If too thick add a little water or a touch more vinegar.

This strawberry sauce is great spooned over the cake only, or over ice cream.

Whipped Cream Topping:

  • 1 cup heavy cream
  • 1 Tbsp. confectioners’ sugar
  • 1/4 tsp vanilla extract

Place all the ingredients in a small beater bowl, and beat on high speed until the cream holds stiff peaks.

To assemble and serve:

Portion the cake into 8 wedges.  Place a wedge of cake on each serving plate.  Spoon strawberries with their juice over the cake.  Place a dollop of cream on top.  Drizzle a little of the coulis over the cream or on the plate around the cake.

IMG_4462

SOURCE:  Cake recipe adapted from Cooking Light,  the remainder is my own idea.

Cappuccino Bars

Cappuccino  Bars

Cappuccino Bars

If they look like cake and taste like cake, they must be cake, right?   Well, not necessarily!   The recipe calls them “bars”, so I will, too.  Although I must admit I expected them to be more chewy, like brownies.  Once I got past the unexpected texture of these cake/bars I really loved the flavor.  It was the promise of chocolate, coffee, and cinnamon all blended together that drew me to making them in the first place.

IMG_4174

The word cappuccino comes from the Italian “capuchin”, a monk who wore dark brown robes; since the color of coffee frothed with chocolate and cinnamon resembles the color of the monk’s robe, the drink became known as cappuccino.

Beside the flavor combination of this recipe, I liked the idea of using a cake mix as the basis for the recipe.  I see nothing wrong with using a good quality cake mix to get a jump start on a recipe if the end result is especially note-worthy.  I think this recipe meets that criteria.  I also liked baking them in a 13 x 9 ” pan,  –and I have one with a cover–so I could carry them easily to a picnic where everyone thought they were delicious.  Not exactly patriotic in color, I decorated the tops with “stars and stripes” sprinkles and a little flag to dress them up for the Memorial Day holiday.

CAPPUCCINO BARS

Yield:   about 28 bars,  more if you cut them smaller.IMG_4147

Ingredients:

  • 2 large eggs
  • 1/2 cup  (1 stick) butter, melted or vegetable oil
  • 1/2 cup each packed brown sugar and water
  • 1 Tablespoon each ground cinnamon and vanilla extract
  • 2 teaspoons instant coffee
  • 1/2 teaspoon ground nutmeg
  • 1 package (18.25 oz.) chocolate cake mix. ( I used Devil’s Food)

1.  Preheat oven to 350*F.  Grease and flour a 13 x 9 – inch baking pan.

2.  In a large mixing bowl combine all the ingredients except the cake mix.  Mis well to combine.  Stir in cake mix. and beat to incorporate well..  Batter will be thick.

3.  Spread into prepared pan and bake at 350* for 30 minutes or until a toothpick inserted in the center comes out clean.  Cool completely.

4.  Frost or decorate the top as desired.  A drizzle of melted white or dark chocolate is nice, or frost lightly with frosting of your choice.  My version is frosted with butter cream and decorated with sprinkles.

IMG_4169

These are not heavy, chewy bars, but instead are light and airy with a complex flavor that will have people asking, “what is that flavor?”

IMG_4176

SOURCE:   Baking at Home;  Bars, Cakes and Cookies

Blueberry Lemon Cornmeal Cakes with Lemon Sauce

Blueberry Lemon Corn Cakes with Lemon Sauce

Blueberry Lemon Corn Cakes with Lemon Sauce

This recipe makes the cutest little individual cakes, with a creamy lemon sauce poured over them.  More cake-like than muffin and not very sweet they are surprisingly sophisticated for your most elegant summer gatherings.  The addition of cornmeal to the batter provides some crunchiness and the zesty lemon flavor combines perfectly with the delicate flavor of blueberries.

Slightly crunchy from cornmeal, and studded with blueberries.

Slightly crunchy from cornmeal, and studded with blueberries.

This is the dessert I mentioned in yesterday’s post that completed the pork tenderloin meal, but I think these would also be great for an outdoor picnic too.  Most people seem to enjoy it when they are served their own perfect little cake, so bake these in small custard cups or ramekins that hold between 5 – 6 ounces.  To serve them, turn upside down on a serving plate or shallow dessert dish, and spoon some of the lemon sauce over the top.  I particularly enjoy them when they are still somewhat warm; or they could be briefly heated in the microwave before serving.

BLUEBERRY LEMON CORNMEAL CAKES

Yield:  makes 8 small cakes

Ingredients:

  • 1  1/4 cups all-purpose flour
  • 1/4 cup cornmeal
  • 1/2 cup sugar
  • 2 tsp. baking powder
  • 1/4 tsp. salt
  • 1/2 cup buttermilk or nonfat plain yogurt (not Greek)
  • 2 large eggs
  • 1/2 tsp. lemon extract
  • 1 Tbsp. lemon juice
  • 1 tsp. lemon zest
  • 1/2 cup vegetable oil
  • 1 cup blueberries, rinsed and dried

To Make the cakes:

1.  Preheat the oven to 350*F.  Lightly grease eight  5 to 6 -ounce ramekins or baking cups.

2.  Combine the dry ingredients in a large bowl.  Whisk together the remaining ingredients except the berries, then stir into the dry mixture until just combined.  Fold in the blueberries.  Divide the batter among the baking dishes/ramekins.

3.   Bake the cakes for 24 – 26 minutes, until the centers are firm to the touch.  Transfer to a rack to cool.

LEMON SAUCE

This recipe for lemon sauce can be made with either water or half milk.  The water version has a brighter lemon flavor; when made with milk it’s a little creamier.  That is how I made mine.

YIELD:  Makes  1 1/2 cups or about 10 servingsIMG_4122

Ingredients:

  • 1/2 cup sugar
  • 2 Tablespoons cornstarch
  • 1/8 tsp. salt
  • 1/4 tsp. nutmeg
  • 1/2 cup water
  • 1/2 cup milk 1 Tbsp. butter
  • 1 tsp. grated lemon zest
  • 1/4 cup fresh lemon juice

In a medium saucepan, stir together the sugar, cornstarch, salt and nutmeg.  Gradually stir in the water and milk, then bring to a simmer over low heat until the mixture thickens and becomes translucent.   Remove from the heat.  Stir in the butter, lemon zest and juice and serve.

IMG_4123

SOURCES:   For the cakes:   King Arthur Flour Baking Co.

For the sauce:  all recipes.com